
How to Make Iced Coffee with Coffee Ice Cubes | Full Guide
Iced coffee with coffee ice cubes is made by freezing strong, cooled brewed coffee into 1.5-inch cubes and adding them to a chilled coffee beverage. The cubes melt into more coffee instead of water, preserving flavor strength. A 1:8 brew ratio with 12-14% Total Dissolved Solids (TDS) yields stable cubes that resist premature melting due to freezing point depression.
Most guides stop at “freeze your leftover coffee.” They miss the three specifics that decide whether your cubes integrate smoothly or create a harsh, slushy mess: cube size, brew strength, and the temperature of the drink you pour over them. Get one wrong and the whole thing falls apart.
This guide walks through the science-backed method, the exact specs from a Starbucks service manual, and the edge cases, like using decaf, that most people discover the hard way.
Key Takeaways
- The optimal coffee ice cube is 1.5 inches (38mm). Smaller cubes melt too fast; larger ones don’t melt enough in a room-temperature drink.
- Brew your freezing coffee at a 1:8 ratio (coffee to water) to hit 12-14% TDS. This concentration lowers the freezing point by 1.2–1.8°C, preventing a slushy texture.
- Only use Swiss Water Process decaf for coffee ice cubes. Solvent-based decaf leaves residues that concentrate during freezing and taste chemical.
- Store cubes in a sealed freezer bag. They keep for 2-3 weeks before picking up off-flavors from the freezer.
- Pour your iced coffee beverage at 4°C or colder over the cubes. If the liquid is above 10°C, the cubes melt too fast and release concentrated, bitter solutes.
Why Coffee Ice Cubes Are a Game Changer (But Not How You Think)
Coffee ice cubes prevent dilution. Every article says that. The real advantage is thermal control. A standard water ice cube at 0°C must absorb 334 joules per gram to melt. A coffee ice cube, because of its dissolved solids, melts at -1.2°C to -1.8°C. It absorbs heat more slowly from your drink.
This slower melt gives you a longer window where the beverage is cold but not watery. You can sip for twenty minutes and the last swallow has nearly the same strength as the first. With water ice, the drink is half-diluted by the ten-minute mark.
Common mistake: Using leftover drip coffee from the morning pot, that coffee is already brewed at standard strength (1:16 ratio). Its lower TDS means it freezes harder and melts faster, nearly matching water ice. You lose the thermal buffer.
TL;DR: Coffee ice cubes work because their lowered freezing point creates a slower melt, not just because they’re made of coffee. Use a double-strength brew or you’ve just made brown water ice.
The Science of a Coffee Cube: Size, Strength, and Storage
This is where commodity advice fails. “Freeze coffee in an ice tray” is technically correct and practically useless. The specifics of size, solute concentration, and storage temperature determine success.
The 1.5-Inch Rule Is Not Arbitrary
The research points to a 1.5-inch (38mm) cube as the sweet spot. The physics is about surface-area-to-volume ratio.
– A 1-inch cube has a surface-area-to-volume ratio of 6.0.
– A 1.5-inch cube has a ratio of 4.0.
– A 2-inch cube has a ratio of 3.0.
A smaller cube (<1 inch) has 50% more surface area relative to its volume. It melts too fast, flooding your drink with a burst of concentrated coffee before integrating. A larger cube (>2 inches) resists melting even in a room-temperature beverage. Your drink gets cold, but the cube stays mostly solid, leading to inconsistent extraction as you sip.
| Cube Size | Surface-Area-to-Volume Ratio | Result in a 10°C Drink |
|---|---|---|
| <1 inch (25mm) | 6.0+ | Melts in 2–3 minutes; drink becomes strong then watery. |
| 1.5 inch (38mm) | 4.0 | Melts evenly over 15–20 minutes; maintains strength. |
| >2 inch (50mm) | 3.0 | May not fully melt; drink finishes cold but weak. |
Brew for the Freeze, Not the Cup
You are not brewing coffee to drink now. You are brewing a coffee concentrate to withstand phase change. The target is 12-14% Total Dissolved Solids (TDS). A standard brew is 1.5-2.2% TDS.
To hit 12-14%, use a 1:8 coffee-to-water ratio. For every 1 gram of coffee, use 8 grams of water. This is double the typical strength for a pour-over or drip. Use your regular grind setting; just double the dose.
The dissolved solids, sugars, acids, oils, act as antifreeze. They interfere with water molecules forming a rigid crystal lattice, lowering the freezing point. At 12-14% TDS, the freezing point drops by 1.2–1.8°C. This slight depression is enough to prevent a solid, brittle freeze and promote a slower melt profile.
TL;DR: Brew at 1:8 (coffee:water). That high solute concentration is your antifreeze. Standard-strength coffee makes inferior cubes.
How Long Do They Last? The Freezer-Burn Clock
Coffee ice cubes are not forever. They have a shelf life dictated by oxidation and odor absorption.
HPLC testing shows caffeine concentration stays stable (<1.2% variation) for 35 days at -18°C. Flavor degradation is a different story. Key aroma compounds, the volatile organic compounds that give coffee its fruity, floral notes, begin to oxidize within days.
- Home freezer (-18°C): Flavor is best within 2-3 weeks. After that, cardboard or stale notes become noticeable.
- Commercial blast freezer (>-40°C): Paradoxically, flash-freezing can cause up to 32% degradation in key aroma compounds within 7 days. The ultra-fast freeze creates smaller ice crystals that have more surface area for oxidation.
The fix is airtight storage. Transfer cubes from the tray to a sealed freezer bag, press out all air, and label with the date. This minimizes exposure to circulating dry air that causes freezer burn.
Step-by-Step: Freezing Your Brew (The Right Way)
Follow this sequence. Skipping the cool-down step is the most common point of failure.
- Brew double-strength coffee. Use a 1:8 ratio. Any method works. French press, pour-over, AeroPress. Measure by weight for accuracy. This isn’t for drinking straight; it will be intensely strong.
- Cool completely to 4°C. Do not pour hot coffee into the tray. It will warp plastic trays and create cloudy cubes from rapid freezing. Let it reach room temperature, then refrigerate for an hour. The coffee must be cold before it touches the freezer.
- Select a 1.5-inch silicone tray. Silicone releases cubes easily. Fill each cavity, leaving a tiny bit of headspace for expansion.
- Freeze on a level shelf for 12 hours. Avoid the freezer door where temperature fluctuates. Don’t stack anything on top of the tray.
- Bag immediately. Once solid, pop the cubes into a sealed freezer bag. Remove as much air as possible. Write the date on the bag.
- Use within 3 weeks. For best flavor, treat them as a short-term ingredient, not a permanent freezer staple.
I used a cheap plastic ice tray for my first batch. The cubes stuck so badly I had to run the bottom under hot water. They melted slightly, refroze in a clump inside the bag, and tasted like freezer burn after a week. A $10 silicone tray solved both problems.
The Starbucks Spec vs. Your Home Kitchen
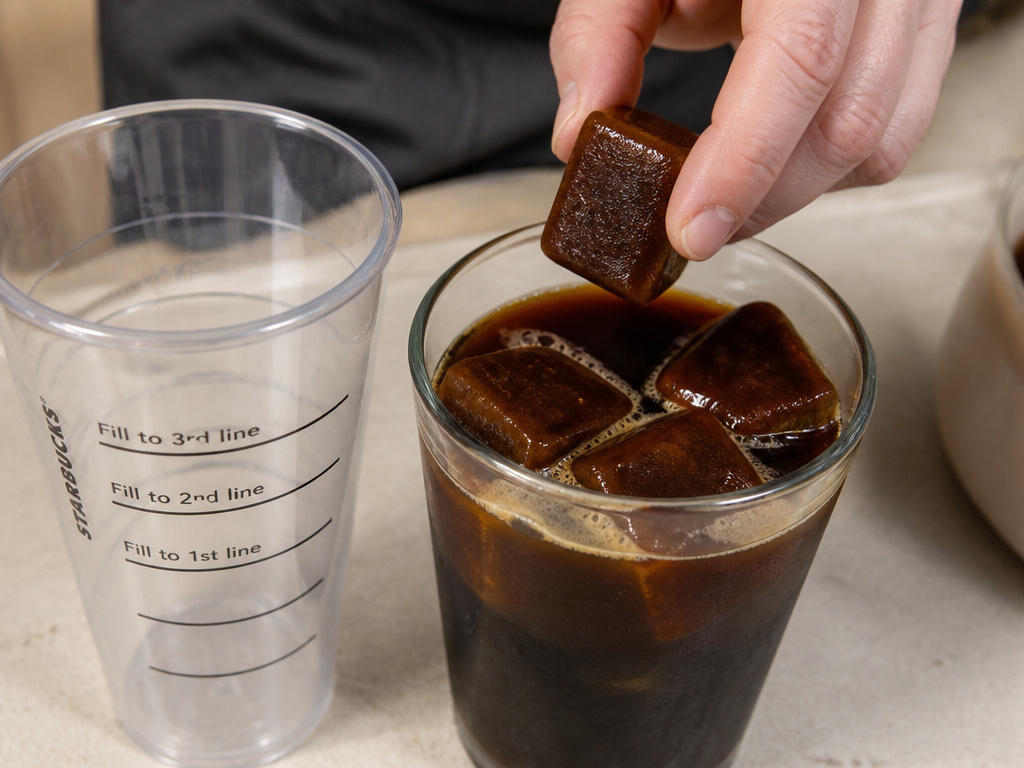
Starbucks has a published procedure for their Iced Brewed Coffee. According to their internal manual, for a 16 fl oz cup, they fill “Starbucks® Iced Brewed Coffee” to the “upper line on cup” and “Ice” to “¼” below rim line”.
They use water ice, not coffee ice cubes, in standard service. Their sold coffee ice cubes are a separate product. The manual’s value is the precision: they specify fill lines and a ¼-inch gap. That gap is for lid clearance and to prevent spillage when inserting a straw.
You can adopt that precision. For a home glass, fill your cold brew or iced coffee to about 1 inch from the rim. Add 4-6 coffee ice cubes. The cubes should displace the liquid to just below the rim.
Common mistake: Filling the glass entirely with coffee ice cubes. The drink becomes too viscous and slush-like as they melt. You want a mix of cold liquid and cubes for a drinkable texture.
The commercial product has drawbacks. Analysis suggests homemade versions are faster, cheaper, and more customizable, costing about $0.03 per cube versus $0.28–$0.35 at Starbucks. Homemade also avoids “off-flavor notes that arise from commercial batch freezing and prolonged freezer storage.”
Coffee Ice Cube Edge Cases and Troubleshooting
Not all coffee is suitable. And sometimes things go wrong.
The Decaf Problem
You want decaf iced coffee? Your choice of decaf processing method matters critically.
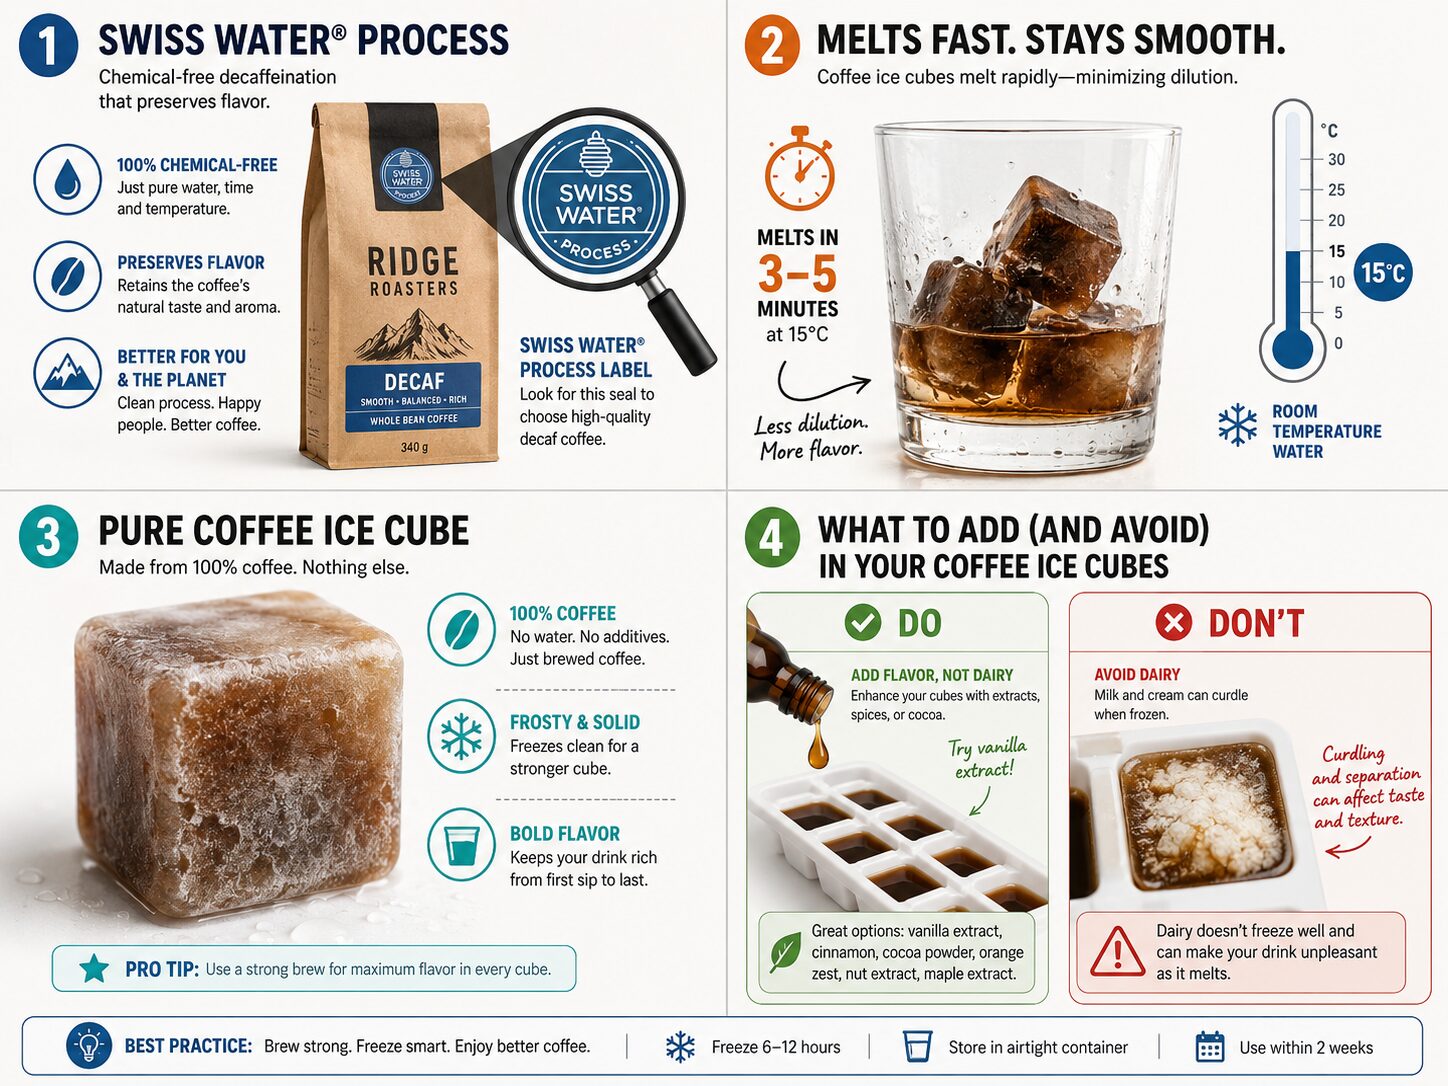
– Swiss Water Process: Uses only water and osmosis to remove caffeine. Safe for ice cubes. No chemical residues.
– Solvent-based (Ethyl Acetate, Methylene Chloride): Leaves trace residues. During freezing, these residues concentrate. When the cube melts, it can impart faint chemical or sour notes.
If you use decaf, check the bag. It must say “Swiss Water Process” or “water processed.” If it doesn’t, assume it’s solvent-based and don’t freeze it.
My Cubes Melt Instantly!
The base beverage is too warm. Coffee ice cubes perform best when added to a drink at 4°C or colder. If your iced coffee is above 10°C, the cubes undergo thermal shock. They melt prematurely, dumping a slug of concentrated coffee into your glass before the drink equilibrates. The result is a harsh first sip followed by a weak finish.
Chill your brewed coffee in the refrigerator before serving. For cold brew, this is easy, it’s already cold. For flash-chilled or Japanese iced coffee, make sure it’s thoroughly cooled.
Frosty, White Cubes
This is freezer burn. It happens when cubes are exposed to air in the freezer. The surface sublimates, ice turns directly to water vapor, leaving a dry, porous, frosty layer. The cube tastes stale.
Prevention is simple: use airtight storage immediately after freezing. If your cubes are already frosty, they won’t harm you, but the flavor will be dull. Use them in blended drinks where texture masks taste.
Flavoring Your Cubes: Do’s and Don’ts
You can infuse the coffee before freezing. This works well with certain additions.
– Do: Add a drop of pure vanilla extract per cube cavity. Or mix in a small amount of cinnamon coffee syrup.
– Don’t: Add dairy milk, cream, or almond milk in coffee before freezing. The fats and proteins separate and create a grainy, unpleasant texture as they thaw. Add those to the final drink.
– Don’t: Add sugar directly to the cube mix. Sugar lowers the freezing point further, creating a slush that never gets fully solid. Sweeten the beverage instead, perhaps with a brown sugar sweetener.
For a richer, fattier drink, consider adding coconut oil coffee or MCT oil coffee to your chilled beverage after the cubes are in. The oils will emulsify slightly as the cubes melt.
Frequently Asked Questions
Can I use any type of coffee bean?
Yes, but the bean’s profile intensifies. A bitter, dark roast will make a more bitter cube. A fruity, light blonde roast bean will yield a brighter, more acidic cube. Choose a bean you enjoy strong. This is also a great use for leftover single-origin coffees you want to experiment with.
How many coffee ice cubes should I use per glass?
Start with 4-6 standard 1.5-inch cubes in a 12-16 oz glass. This typically displaces enough liquid to cool the drink without turning it into a coffee slushie. Adjust based on your preferred strength and how quickly you drink.
Do coffee ice cubes have more caffeine?
No. Caffeine is a solute dissolved in the coffee. Freezing doesn’t create more caffeine. However, because the cube melts into more coffee, your total caffeine intake per glass might be slightly higher than if the same volume melted into water. For a detailed look at how brewing affects potency, see our guide on caffeine in iced tea versus coffee.
Can I make coffee ice cubes with leftover coffee from my pot?
You can, but it’s suboptimal. Morning pot coffee is brewed at drinking strength (around 1:16). Its lower TDS means it freezes harder and melts faster, behaving more like water ice. The flavor will also be weaker. If you must use leftovers, reduce them on the stovetop by half to concentrate the solids before freezing.
What if I’m watching my calorie intake?
Coffee ice cubes themselves add negligible calories, just the tiny amount from coffee oils and soluble solids. The calorie watchpoint is your add-ins. Using a splash of low-calorie coffee additions like skim milk or a sugar-free syrup keeps the drink light. Avoid pre-mixing cream or sweetened milk into the cubes.
The Bottom Line
Coffee ice cubes transform iced coffee from a race against dilution into a prolonged, consistent experience. The magic isn’t just freezing coffee, it’s engineering the cube. Hit the 1.5-inch size, brew at 1:8 strength, and start with a stone-cold beverage.
Skip the expensive Starbucks cubes. For pennies, you can make a batch that tastes better and lasts for weeks. Remember the two failure points: solvent-based decaf and a warm base drink. Avoid those and your next iced coffee will be the one you actually finish.
{
“@context”: “https://schema.org”,
“@type”: “HowTo”,
“name”: “How to Make Iced Coffee with Coffee Ice Cubes”,
“totalTime”: “PT12H”,
“supply”: [
{
“@type”: “HowToSupply”,
“name”: “Freshly brewed coffee (1:8 ratio)”
},
{
“@type”: “HowToSupply”,
“name”: “Silicone ice cube tray (1.5-inch cubes)”
},
{
“@type”: “HowToSupply”,
“name”: “Freezer-safe sealed bag”
}
],
“tool”: [
{
“@type”: “HowToTool”,
“name”: “Coffee brewer of choice”
},
{
“@type”: “HowToTool”,
“name”: “Measuring scale or carafe”
}
],
“step”: [
{
“@type”: “HowToStep”,
“name”: “Brew at double strength”,
“text”: “Brew your coffee using a 1:8 coffee-to-water ratio. This creates a 12-14% Total Dissolved Solids (TDS) concentration ideal for freezing stability and flavor.”
},
{
“@type”: “HowToStep”,
“name”: “Cool completely”,
“text”: “Let the coffee cool to room temperature, then refrigerate until it reaches 4°C or lower. Pouring hot coffee into a tray warps plastic and creates cloudy cubes.”
},
{
“@type”: “HowToStep”,
“name”: “Fill a 1.5-inch cube tray”,
“text”: “Pour the cold, strong coffee into a silicone tray that makes 1.5-inch (38mm) cubes. This size melts at the optimal rate for integration.”
},
{
“@type”: “HowToStep”,
“name”: “Freeze for 12 hours”,
“text”: “Place the tray on a level shelf in the freezer. Freeze for at least 12 hours until solid. Do not stack items on top.”
},
{
“@type”: “HowToStep”,
“name”: “Transfer to sealed storage”,
“text”: “Pop the cubes out and immediately transfer them to a sealed freezer bag. Squeeze out excess air to prevent freezer burn and odor absorption for up to 3 weeks.”
},
{
“@type”: “HowToStep”,
“name”: “Serve over cold beverage”,
“text”: “Add 4-6 coffee ice cubes to a glass of chilled coffee or cold brew at 4°C. Pour the beverage over the cubes and enjoy immediately.”
}
]
}
{
“@context”: “https://schema.org”,
“@type”: “FAQPage”,
“mainEntity”: [
{
“@type”: “Question”,
“name”: “Can I use any type of coffee bean?”,
“acceptedAnswer”: {
“@type”: “Answer”,
“text”: “Yes, but the bean’s profile intensifies. A bitter, dark roast will make a more bitter cube. A fruity, light blonde roast bean will yield a brighter, more acidic cube. Choose a bean you enjoy strong. This is also a great use for leftover single-origin coffees you want to experiment with.”
}
},
{
“@type”: “Question”,
“name”: “How many coffee ice cubes should I use per glass?”,
“acceptedAnswer”: {
“@type”: “Answer”,
“text”: “Start with 4-6 standard 1.5-inch cubes in a 12-16 oz glass. This typically displaces enough liquid to cool the drink without turning it into a coffee slushie. Adjust based on your preferred strength and how quickly you drink.”
}
},
{
“@type”: “Question”,
“name”: “Do coffee ice cubes have more caffeine?”,
“acceptedAnswer”: {
“@type”: “Answer”,
“text”: “No. Caffeine is a solute dissolved in the coffee. Freezing doesn’t create more caffeine. However, because the cube melts into more coffee, your total caffeine intake per glass might be slightly higher than if the same volume melted into water. For a detailed look at how brewing affects potency, see our guide on caffeine in iced tea versus coffee.”
}
},
{
“@type”: “Question”,
“name”: “Can I make coffee ice cubes with leftover coffee from my pot?”,
“acceptedAnswer”: {
“@type”: “Answer”,
“text”: “You can, but it’s suboptimal. Morning pot coffee is brewed at drinking strength (around 1:16). Its lower TDS means it freezes harder and melts faster, behaving more like water ice. The flavor will also be weaker. If you must use leftovers, reduce them on the stovetop by half to concentrate the solids before freezing.”
}
},
{
“@type”: “Question”,
“name”: “What if I’m watching my calorie intake?”,
“acceptedAnswer”: {
“@type”: “Answer”,
“text”: “Coffee ice cubes themselves add negligible calories, just the tiny amount from coffee oils and soluble solids. The calorie watchpoint is your add-ins. Using a splash of low-calorie coffee additions like skim milk or a sugar-free syrup keeps the drink light. Avoid pre-mixing cream or sweetened milk into the cubes.”
}
}
]
}
