
How to Make Frothy Coffee | The Right Milk, Wrong Foam Fix
To make frothy coffee, you need to introduce tiny air bubbles into a liquid, usually milk, and stabilize them with protein and fat. The method defines the texture: a steam wand creates silky microfoam for lattes, a French press or whisk makes thicker foam for cappuccinos, and whipping instant coffee with sugar creates the dense Dalgona foam topping.
Most people get the air part right but miss the stability. They blast steam into milk until it’s a hot bubble bath, or they whisk almond milk until it collapses into hot, thin liquid. That’s because froth isn’t just about adding air. It’s about trapping it with the right molecules at the right temperature.
This guide walks through the tools that work, the milk that won’t, and the step-by-step fixes for the foam that keeps failing on you.
Key Takeaways
- Whole dairy milk and specific “barista blend” plant milks froth best because their protein structures trap air. Skim milk makes large, unstable bubbles.
- A steam wand’s secret is the “stretch and roll” phase: introduce air for only 3-5 seconds, then sink the wand to heat and circulate the milk, creating microfoam.
- For plant-based milks like oat or almond, do not exceed 55°C (131°F). The proteins denature and the foam collapses much faster than with dairy.
- The popular Dalgona method (whipped instant coffee) requires equal parts instant coffee, sugar, and hot water by volume. Whisking by hand takes 3-5 minutes of vigorous work.
- If your automatic frother (like on a Breville Bambino Plus) makes foam too airy, switch to manual mode. Start with the wand tip just below the milk’s surface to control aeration.
The Two Big Reasons Your Froth Fails
You can have the best machine and follow every step. Your foam still goes flat or separates into hot milk and dry bubbles. The cause is almost always one of two things: wrong milk temperature or the wrong type of milk protein.
Steam milk above 70°C (158°F) and the proteins, casein and whey in dairy, unfold permanently. They can’t hold the air bubbles they just captured. The foam looks okay in the pitcher, but it starts to separate before you even finish pouring. You get a layer of hot milk under a dry, floating head of foam. For plant milks, this denaturation point is even lower, around 55°C.
The second reason is using milk with low protein or fat. Skim milk has protein but no fat. It froths up fast with huge, shiny bubbles that pop quickly. Heavy cream has fat but too much of it; it makes a thick, meringue-like foam that doesn’t pour. Whole milk or a 2% blend is the sweet spot. For a non-dairy option, you need a barista blend oat or soy milk. These are formulated with added stabilizers like gellan gum or pea protein to mimic dairy’s behavior.
Common mistake: Steaming plant-based milk to the same temperature as dairy, the proteins break down 15 degrees sooner, and the foam collapses into the drink before your first sip.
TL;DR: Keep dairy milk under 70°C and plant milk under 55°C. Use whole milk or a formulated barista blend for foam that lasts.
Your Tool Dictates Your Texture
Not all froth is the same. The tool you pick decides whether you get silky microfoam for latte art, dry foam for a cappuccino, or a sweet, spoonable topping. Your goal should match your gear.
| Tool | Best For | Texture Produced | Key Limitation |
|---|---|---|---|
| Steam Wand | Lattes, flat whites | Silky, liquid microfoam | Requires an espresso machine; skill-dependent |
| French Press | Cappuccinos, macchiatos | Thick, dry foam | Manual effort; harder to heat milk evenly |
| Electric Frother | Quick, consistent foam | Light, airy foam | Often lacks texture control; foam separates fast |
| Immersion Blender | Large batches, cold foam | Dense, whipped cream-like foam | Can over-whip into butter if unsupervised |
| Hand Whisk | Dalgona coffee, toppings | Stiff, meringue-like foam | 3–5 minutes of vigorous arm work required |
A steam wand on a machine like the Breville Bambino Plus is the gold standard for microfoam. It forces steam through a tiny hole, shearing air into microscopic bubbles while simultaneously heating the milk. An automatic machine like the Jura ENA 4 does this with a press of a button, but as some users note, the texture can be less refined than a manual wand.
For methods without a steam wand, a French press is shockingly effective. The fine mesh screen shears air into the milk as you pump the plunger. It makes a foam so dry it can stand in peaks, perfect for a traditional cappuccino where the foam sits on top of the espresso.
The steam wand is a heat and shear tool, not just an air pump. Position it slightly off-center in the pitcher to create a whirlpool that folds air into the milk evenly.
If you’re counting calories in milk, remember that the fat content you choose for frothing will directly impact your drink’s richness and calorie count. A lighter foam might be a trade-off you’re willing to make.
The Steam Wand Method: From Bubbly to Velvety
This is the professional path. It’s also where most home mistakes happen. You’ll need an espresso machine with a steam wand, a metal pitcher, and a thermometer (at least for your first twenty tries).
Before you start: The steam wand exits water vapor above 100°C. Keep your hands clear. Purge the wand for a second before and after use to clear any water or milk residue. A wet wand drips into your milk and ruins the texture.
- Start with a cold pitcher and cold milk. Fill your pitcher no more than halfway. Cold milk gives you more time to aerate before it gets too hot. The cold pitcher helps slow the heating.
- Submerge the wand tip, then raise it. Turn on the steam fully. Immediately lower the pitcher so the wand tip sits just below the milk’s surface. You should hear a gentle paper-tearing sound, this is the “stretch” phase where you’re adding air.
- Aerate for only 3–5 seconds. This is the critical window. Too little and the foam is thin; too much and you get large, dry bubbles. Keep the tip near the surface to maintain that tearing sound.
- Sink the wand and whirlpool. After aerating, tilt the pitcher and submerge the wand tip deeper. Position it so the steam jet pushes the milk in a circular vortex. This “roll” phase heats the milk evenly and shears the large bubbles into microfoam.
- Heat to temperature, then stop. For dairy, aim for 60–65°C (140–150°F). The pitcher should be hot to the touch but not unbearable. For plant milk, stop at 55°C (131°F). Immediately turn off the steam, remove the pitcher, and wipe the wand.
- Tap and swirl. Tap the pitcher firmly on the counter to pop any big surface bubbles. Swirl the milk in the pitcher until it looks glossy and like wet paint. Pour within 30 seconds.
Skipping the whirlpool phase leaves the air bubbles large and separate. Your foam will sit on top of the milk like a bubble bath instead of integrating into a creamy, pourable liquid.
TL;DR: Stretch (aerate) for 3-5 seconds, then sink the wand to create a whirlpool until the milk reaches temperature. Tap and swirl before pouring.
No Machine? Use a French Press or Whisk

You don’t need a $500 espresso machine. A $20 French press makes excellent foam, especially for drier cappuccino-style drinks. An immersion blender or even a simple whisk works for cold foam or the viral Dalgona coffee.
French Press Foam (for hot drinks):
- Heat your milk to the target temperature (60°C for dairy, 55°C for plant) in a microwave or saucepan.
- Pour the warm milk into a clean French press. Fill it no more than one-third full to allow room for expansion.
- Pump the plunger up and down vigorously for 30–45 seconds. The mesh screen will force air into the milk.
- The foam will triple in volume and become very dry. Spoon it directly onto your coffee.
Immersion Blender Cold Foam:
- Use cold milk, dairy or barista blend plant milk.
- Pour a small amount (about 1/4 cup) into a tall, narrow container.
- Submerge the head of the immersion blender and blend on high for 15-20 seconds. Move it up and down to incorporate air.
- The foam will be light, creamy, and perfect for topping iced coffee or cold brew.
Whisking by hand, whether for a small amount of warm milk or for Dalgona, is a workout. The key is a tight, rapid motion to incorporate as much air as quickly as possible. For a flavor twist, a dash of cinnamon coffee benefits can be whisked right into the foam for a spiced topping.
The 5-Minute Dalgona Method

This isn’t coffee with frothed milk. It’s coffee as the froth. The Dalgona method went viral for a reason: it’s simple, dramatic, and delivers a powerful, sweet coffee kick. The formula is strict.
You’ll need equal parts (by volume, not weight) of instant coffee granules, granulated sugar, and hot water. Two tablespoons of each is a standard single serving.
- Combine the instant coffee, sugar, and hot water in a wide, shallow bowl. The hot water is non-negotiable, it dissolves the granules and sugar to create a stable syrup.
- Whisk vigorously. You can use a hand whisk, a milk frother, or an electric hand mixer. A hand whisk takes 3-5 minutes of constant, fast whipping.
- Watch for the color change. It will go from a dark liquid to a thick, pale brown foam. It’s ready when you can lift the whisk and the foam holds a soft peak, or you can make a line through it that doesn’t fill in immediately.
- Spoon the foam over a glass of cold or warm milk. Do not stir it in immediately, the contrast is the point.
The sugar isn’t just for sweetness. It’s a structural ingredient that helps stabilize the foam. Using a brown sugar sweetener will add caramel notes but may slightly alter the foam’s stiffness due to its moisture content.
Common mistake: Using brewed coffee or espresso instead of instant coffee, the liquid lacks the concentrated soluble solids needed to form a stable foam, and it will never whip up.
Navigating Plant-Based Milks and Cold Brew
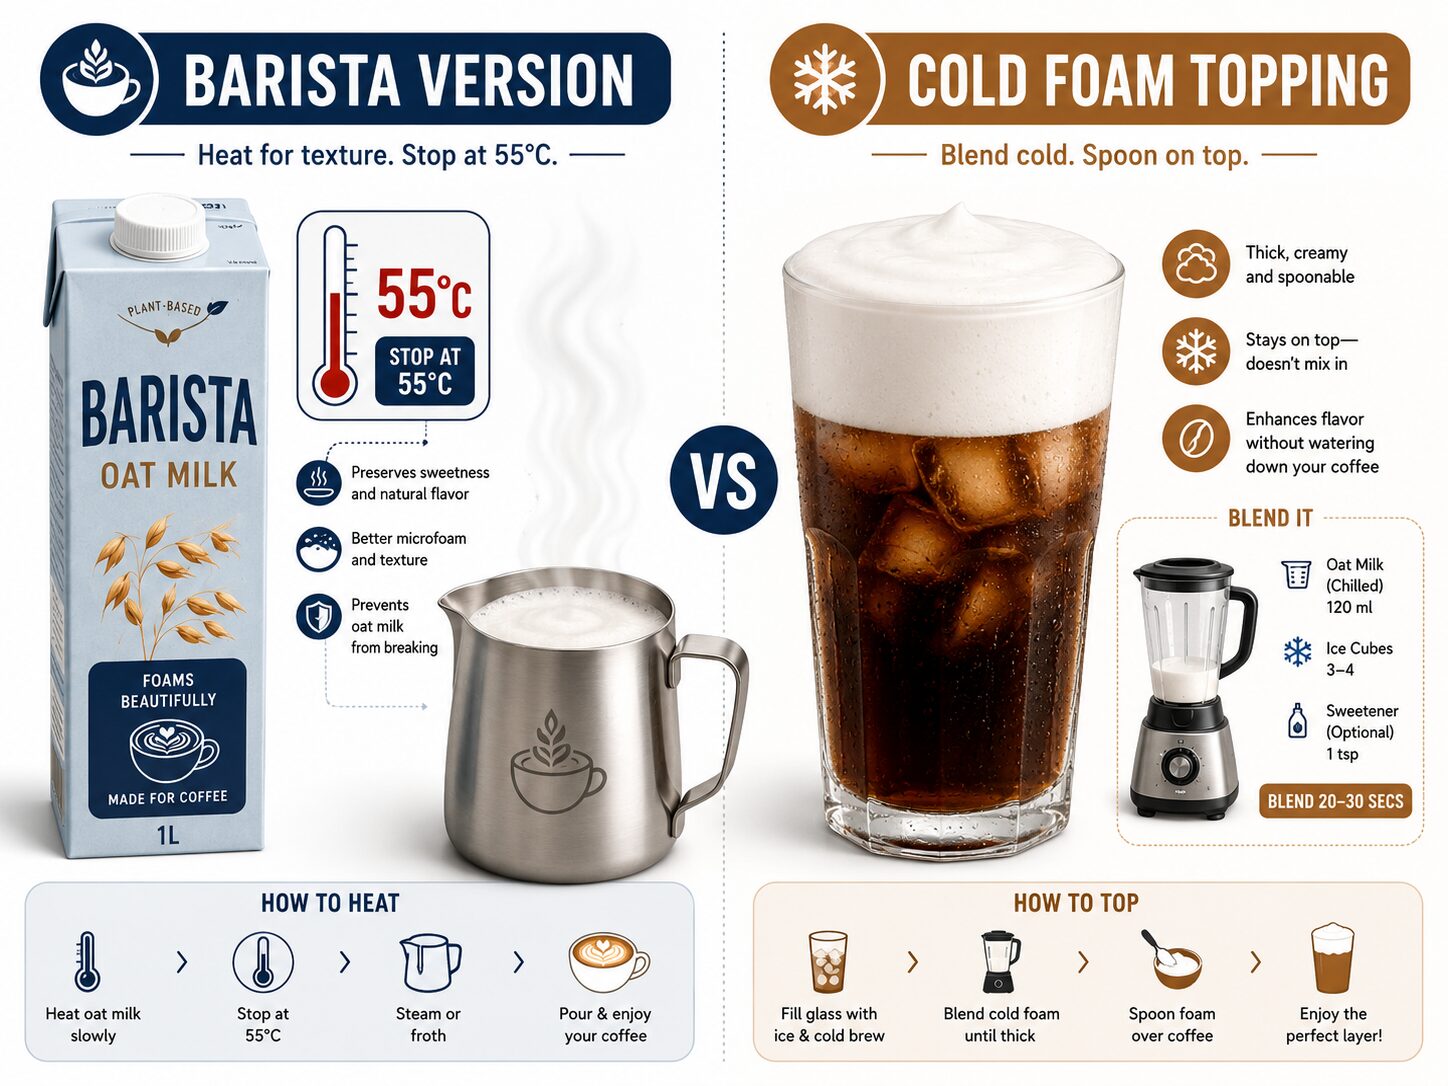
These are the edge cases that break standard rules. Plant-based milks froth differently, and cold brew coffee resists frothing altogether.
Plant-Based Milk Rules:
- Buy the “Barista” version. Oatly Barista, Califa Farms Barista Blend, and Alpro Professional Soya are formulated for this. They have added oils, proteins, or stabilizers.
- Steam gently and stop early. Never take a plant milk above 55°C (131°F). The proteins are more fragile. You’ll often get a good initial froth that then visibly deflates as you pour.
- Shake the carton first. The additives can separate. For the best guide on one popular type, see our deep dive on frothing almond milk.
Cold Brew Frothing Workaround:
You cannot froth pure cold brew. To get a frothy iced coffee, you have two paths:
1. Make a cold foam topping. Froth cold milk or a creamer using a French press or immersion blender, then float it on top of your cold brew.
2. Blend it. Combine cold brew, milk, and ice in a blender. The blending action creates a frothy, slushy texture. For a richer, keto-friendly version, this is where adding a spoonful of MCT oil coffee can integrate smoothly.
If you find your coffee base is too bitter for these sweet, frothy preparations, a tiny pinch of salt trick in the cup before adding foam can balance the flavors perfectly.
Fixing Your Froth: A Diagnostic Table
Your foam didn’t work. Use this chart to find the likely cause and the specific fix.
| Symptom | Likely Cause | Immediate Fix |
|---|---|---|
| Large, shiny bubbles that pop | Skim milk, or over-aeration | Switch to whole milk. Aerate for 3 secs max. |
| Foam separates from milk | Milk steamed too hot | Use a thermometer. Stop at 65°C for dairy, 55°C for plant. |
| Thin, no foam | Plant milk not barista blend, cold milk | Use a formulated barista blend. Start with ice-cold milk. |
| Dalgona foam is runny | Incorrect 1:1:1 ratio, water not hot enough | Measure equal volumes. Use near-boiling water. |
| Froth tastes scalded | Wand tip was too high, burning surface milk | Keep wand tip submerged after initial aeration. |
The fix is almost always about temperature control or ingredient choice. If you’re using an automatic machine and the texture is consistently off, remember that many, like the Breville Bambino Plus, allow you to override the automatic cycle for manual control. That manual control is essential for mastering texture.
Frequently Asked Questions
Can you make frothy coffee without a machine?
Absolutely. A French press is the best alternative for hot, dry foam. For cold foam or whipped coffee (Dalgona), a simple whisk, hand mixer, or immersion blender works perfectly.
What is the best milk for frothing?
Whole dairy milk is the most forgiving and produces the silkiest microfoam. For a non-dairy option, a “barista blend” oat milk is the current champion for its balanced protein, fat, and added stabilizers.
Why does my milk foam collapse?
The milk was too hot, destroying the proteins that hold the bubbles. For dairy, the threshold is around 70°C (158°F). For plant milks, it’s closer to 55°C (131°F). Using milk with insufficient protein (like some almond milks) will also cause collapse.
What’s the difference between froth and microfoam?
Froth is a general term for bubbly milk. Microfoam is a specific, velvety texture where the air bubbles are so tiny they’re invisible, making the milk smooth and shiny. Microfoam is necessary for latte art and integrates into the drink.
Can you froth cold brew coffee?
You cannot froth pure cold brew. To make a frothy cold brew drink, either blend it with milk and ice or prepare a separate cold milk foam to float on top.
How does the caffeine in a frothy drink compare?
The caffeine comes from the coffee, not the foam. A cappuccino caffeine content is typically the same as a straight espresso shot, as it’s just espresso + foam. The foam itself adds no caffeine.
Before You Go
Frothy coffee succeeds or fails on three pillars: the right milk, the right temperature, and the right tool for your desired texture. Whole milk or a barista blend plant milk is your foundation. Keep a thermometer handy until the 65°C and 55°C limits are instinct.
If you have a steam wand, master the short 3-second aeration window. If you’re using a French press or whisk, embrace the manual effort, it’s what gives you control. And for that show-stopping Dalgona foam, stick religiously to the equal-parts-instant-coffee-sugar-water formula.
The foam on your coffee should be a texture you enjoy, not a frustrating science experiment. Start with cold milk, stop before it’s too hot, and pour it fast.
{
“@context”: “https://schema.org”,
“@type”: “HowTo”,
“name”: “How to Make Frothy Coffee”,
“totalTime”: “PT10M”,
“tool”: [
{
“@type”: “HowToTool”,
“name”: “Steam wand espresso machine”
},
{
“@type”: “HowToTool”,
“name”: “French press or immersion blender”
},
{
“@type”: “HowToTool”,
“name”: “Whisk or hand mixer”
},
{
“@type”: “HowToTool”,
“name”: “Chilled metal pitcher”
}
],
“step”: [
{
“@type”: “HowToStep”,
“name”: “Choose the right milk”,
“text”: “Start with cold, fresh whole dairy milk or a ‘barista blend’ plant milk. The protein and fat content dictate foam stability.”
},
{
“@type”: “HowToStep”,
“name”: “Steam to the right temperature”,
“text”: “For a steam wand, submerge the tip, open the valve, and introduce air for 3-5 seconds before sinking the wand to heat the milk to 60-65°C (140-150°F).”
},
{
“@type”: “HowToStep”,
“name”: “Create texture, not just bubbles”,
“text”: “Swirl the pitcher during and after steaming to pop large bubbles and create a uniform, velvety microfoam.”
},
{
“@type”: “HowToStep”,
“name”: “Pour immediately”,
“text”: “Tap the pitcher on the counter, swirl again, and pour your frothed milk into your coffee within 30 seconds before the foam separates.”
}
]
}
{
“@context”: “https://schema.org”,
“@type”: “FAQPage”,
“mainEntity”: [
{
“@type”: “Question”,
“name”: “Can you make frothy coffee without a machine?”,
“acceptedAnswer”: {
“@type”: “Answer”,
“text”: “Absolutely. A French press is the best alternative for hot, dry foam. For cold foam or whipped coffee (Dalgona), a simple whisk, hand mixer, or immersion blender works perfectly.”
}
},
{
“@type”: “Question”,
“name”: “What is the best milk for frothing?”,
“acceptedAnswer”: {
“@type”: “Answer”,
“text”: “Whole dairy milk is the most forgiving and produces the silkiest microfoam. For a non-dairy option, a “barista blend” oat milk is the current champion for its balanced protein, fat, and added stabilizers.”
}
},
{
“@type”: “Question”,
“name”: “Why does my milk foam collapse?”,
“acceptedAnswer”: {
“@type”: “Answer”,
“text”: “The milk was too hot, destroying the proteins that hold the bubbles. For dairy, the threshold is around 70°C (158°F). For plant milks, it’s closer to 55°C (131°F). Using milk with insufficient protein (like some almond milks) will also cause collapse.”
}
},
{
“@type”: “Question”,
“name”: “What’s the difference between froth and microfoam?”,
“acceptedAnswer”: {
“@type”: “Answer”,
“text”: “Froth is a general term for bubbly milk. Microfoam is a specific, velvety texture where the air bubbles are so tiny they’re invisible, making the milk smooth and shiny. Microfoam is necessary for latte art and integrates into the drink.”
}
},
{
“@type”: “Question”,
“name”: “Can you froth cold brew coffee?”,
“acceptedAnswer”: {
“@type”: “Answer”,
“text”: “You cannot froth pure cold brew. To make a frothy cold brew drink, either blend it with milk and ice or prepare a separate cold milk foam to float on top.”
}
},
{
“@type”: “Question”,
“name”: “How does the caffeine in a frothy drink compare?”,
“acceptedAnswer”: {
“@type”: “Answer”,
“text”: “The caffeine comes from the coffee, not the foam. A cappuccino caffeine content is typically the same as a straight espresso shot, as it’s just espresso + foam. The foam itself adds no caffeine.”
}
}
]
}
