
Learn How to Make a Coffee Milkshake With the Perfect Texture
To make a coffee milkshake with the perfect texture, use chilled coffee, a 1:4 coffee-to-milk ratio, and fill the rest with ice. Blend on low first to crush the ice, then pulse and finish high. The Starbucks build for a Grande uses this method, blending for 15-20 seconds to avoid a watery drink.
To make a coffee milkshake, you need a specific liquid-to-ice ratio, chilled coffee, and a blending sequence that first crushes ice on low speed before pulsing and finishing high. The Starbucks internal build for a Grande Frappuccino uses 1 ounce of coffee base, 4 ounces of milk, and fills the rest with ice, blended for 15-20 seconds on setting “1”. Most home recipes use too much milk or skip the pre-chill, which melts the ice and leaves you with a weak, watery drink.
That watery result is the universal mistake. People dump hot coffee over ice cream, add a cup of milk, and hit blend. The hot coffee starts melting everything before the blades even spin. You get a lukewarm, separated mess that tastes like sweetened milk with a coffee afterthought.
This guide walks through the barista build ratio, why your ice quality matters, and the one blender setting you’ve probably never used that makes all the difference.
Key Takeaways
- The Starbucks Frappuccino build ratio is 1 part coffee base to 4 parts milk, with the rest ice. For a 16oz drink, that’s 1oz coffee, 4oz milk, and about 12oz of ice.
- Always use chilled coffee or espresso. Hot coffee melts the ice too fast, creating a thin, diluted milkshake instead of a thick, frothy one.
- Start blending on the lowest setting for 10 seconds to crush the ice before ramping up. Skipping this low-speed crush leaves chunks and overworks the motor.
- For a stable texture that doesn’t separate in the glass within five minutes, add a tiny pinch (1/16 tsp) of xanthan gum with the dry ingredients.
- Common mistake: Using wet, freezer-burned ice, it incorporates too much water and makes the shake slushy instead of creamy.
The Core Ratio That Changed Everything
Most recipes tell you to eyeball it. That’s why most homemade coffee milkshakes fail. The leaked 2009-2010 Starbucks Barista Manual gives the exact build for a Grande Frappuccino: 2 pumps of coffee base (about 1 fl oz), milk to the first line on the cup (about 4 fl oz), and ice to the top line. Everything else is flavor syrup and blending time.
The standard Grande Frappuccino build uses 2 pumps (approx. 1 fl oz) of coffee base, milk to the lower line (approx. 4 fl oz), and ice to the upper line (approx. 12 fl oz), blended on setting “1” for 15–20 seconds. This ratio balances coffee flavor against melting ice and dairy dilution.
That 1:4 coffee-to-milk ratio is non-negotiable if you want the coffee to punch through the cream and ice. More milk and you get a weak, milky slush. Less milk and the ice won’t blend smooth, it seizes the blades and burns out cheaper blender motors. Your home version isn’t pumping syrup from a bottle, so your “coffee base” is either cold brew concentrate or chilled espresso.
TL;DR: Use 1 ounce of strong cold coffee or espresso to 4 ounces of milk for a 16oz drink. Fill the rest with ice.
Why Your Ice Quality Decides the Texture
Ice isn’t just frozen water. Old, freezer-burned ice has sublimated, it’s drier, harder, and colder. Fresh ice straight from the tray is wetter on the surface. The wet ice incorporates water instantly, thinning your shake before the fat from the ice cream can emulsify. You get a slush.
Dry, cold ice needs a bit more liquid to blend, but it holds structure longer. If your shake is coming out watery, check your ice. Empty the ice bin, run the freezer through a defrost cycle, and make a fresh batch. Don’t use the half-melted cubes at the bottom of the bin.
| Ice Type | Best For | Risk If Used |
|---|---|---|
| Fresh, wet tray ice | Quick blending, if used immediately | Thin, watery texture if blended >20 sec |
| Dry, freezer-burned ice | Stable, thick shakes that hold foam | Requires 5-10 sec longer blend, can stall weak motors |
| Commercial pellet ice | Perfect consistency every time | Home blenders often lack the torque to crush it fully |
Espresso vs. Cold Brew: The Flavor Trade-Off
You have two paths for the coffee base: a shot of espresso or cold brew concentrate. Espresso gives you that sharp, aromatic kick but must be chilled first. Cold brew is mellow and already cold, but lacks the bright top notes.
I pulled a shot directly into the blender once. The heat melted the ice cream on contact before the blades even turned. The result was a lukewarm, greasy film on top of a thin milkshake. Now I pull the shot into a metal glass and stick it in the freezer for 8-10 minutes. It chills fast and doesn’t water down.
Cold brew concentrate is easier. Use a 1:4 concentrate (the kind you dilute with water or milk). If your concentrate is ready-to-drink strength, it’s too weak, the ice will drown it. You need the intensity.
TL;DR: Espresso needs a 10-minute freezer chill. Cold brew needs to be a strong concentrate, not ready-to-drink strength.
The Blender Matters More Than You Think
A weak blender spins the ice around the jar. A powerful one shears it. The difference is in the texture, gritty versus smooth. I’ve burned out two cheap blenders trying to crush ice and frozen ice cream together on high. The motor whines, the blades bounce, and you’re left with a half-blended, half-melted puddle.
The sequence is everything. Start on the lowest setting for a full 10 seconds. Let the blades grab and crush the ice. Then pulse 3-4 times on medium. Finish on high for 15-20 seconds until the sound changes from a crushing roar to a smooth whirl. That sound shift is your cue. Stop immediately. Over-blending incorporates too much air and the shake collapses in the glass within minutes.
I won’t use a blender under 1000 watts for milkshakes anymore. The first time my Ninja Professional stalled on a batch with dry ice, I smelled burning plastic. A Vitamix or Blendtec doesn’t even notice the load.
If you’re working with a burr grinder benefits for your coffee beans, you already understand consistency. The same principle applies to ice. Inconsistent chunk size leads to an uneven blend. A high-powered motor ensures every piece is sheared to the same fine grain.
The Step-By-Step Build (And the Step Everybody Skips)
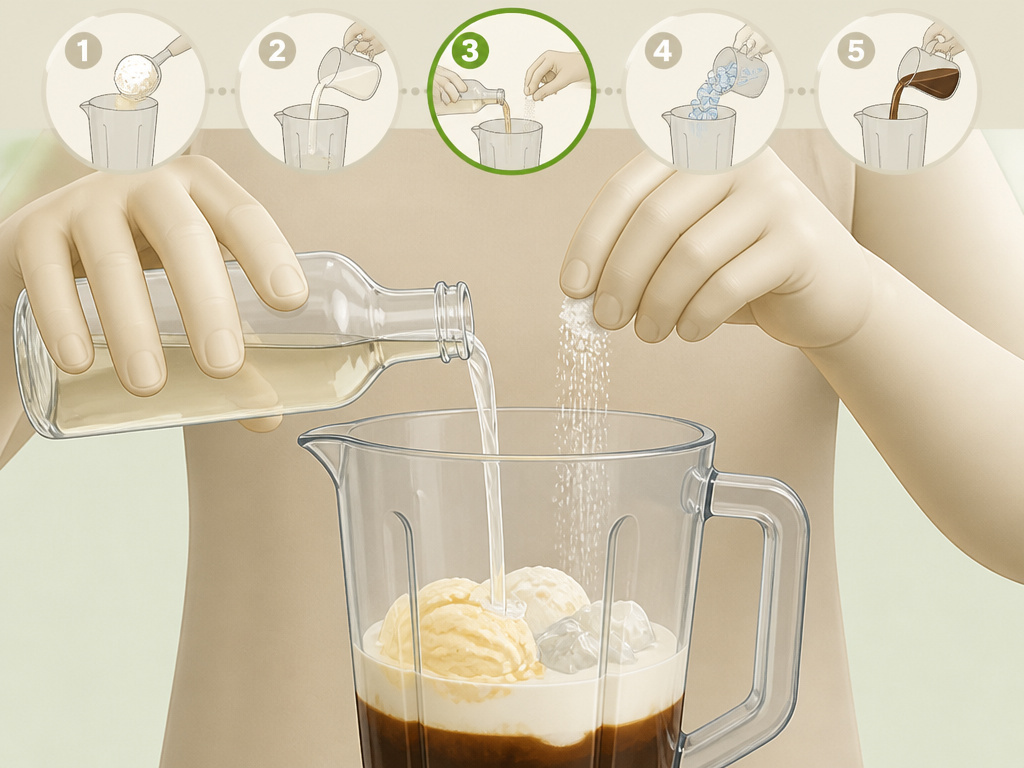
This isn’t a dump-and-blend process. Layering the ingredients in the jar decides whether you get a smooth emulsion or a lumpy mess.
- Chill your coffee base. Pour 1 oz of cold brew concentrate or chilled espresso into the blender jar.
- Add the milk. Measure 4 oz of whole milk or your preferred dairy alternative. The fat in whole milk creates a richer, more stable foam. If you’re using a dairy-free milk alternative like almond milk, know it will blend faster and produce a slightly thinner result.
- Add the sweetener and stabilizer. This is the skipped step. Add your sweetener, 2 tbsp of simple syrup, a pump of flavored syrup, or a spoonful of brown sugar sweetener. Then add a tiny pinch (about 1/16 tsp) of xanthan gum. This hydrocolloid is what keeps a milkshake from separating in the glass. It’s the difference between a drink that lasts and one that becomes liquid on top in five minutes.
- Add the ice cream and ice. Drop in two large scoops (about 1.5 cups) of vanilla ice cream. Then add 1.5 cups of ice cubes. Do not pack the ice down.
- Blend with the lid vent open. This is crucial. The trapped air needs to escape or pressure builds and the mixture seizes. Start on the lowest setting for 10 seconds. Pulse 3-4 times on medium. Finish on high for 15-20 seconds until smooth.
- Taste and adjust immediately. Pour a little into your glass. Too thin? Blend in another half-scoop of ice cream. Too thick? Add a splash of milk and pulse twice.
- Serve straight away. Pour into a chilled glass. Top with whipped cream if you like. Drink within 10 minutes, the texture degrades as the air escapes.
Skipping the xanthan gum seems minor. Your shake will look perfect for two minutes. Then you’ll see a clear liquid pool forming at the bottom of the glass. By minute five, it’s a layered puddle.
Advanced Twists and Stability Hacks

Once you have the basic build down, you can start playing with flavors and textures. A pinch of salt in the blend cuts the sweetness and enhances the coffee flavor without making it taste salty. It’s a barista trick that works just as well in a frozen drink.
For a thicker, more dessert-like shake, swap one scoop of ice cream for frozen banana slices. The banana adds body and a subtle sweetness that pairs well with coffee. For a keto or high-energy version, add a teaspoon of MCT oil benefits or coconut oil coffee to the blender. It makes the shake incredibly rich and helps sustain energy.
If you’re watching the calorie content of milk, using a lower-fat milk or almond milk is fine, but you’ll need to reduce the ice slightly, try 1.25 cups instead of 1.5. Less fat means less emulsification power, so the xanthan gum becomes even more important.
Common mistake: Substituting ice with frozen coffee cubes to boost flavor, they melt slower and create an uneven, gritty texture unless you blend for an extra 30 seconds, which overheats the motor.
A study in the Journal of Food Science article on coffee-supplemented milk beverages found that stability over time is heavily influenced by the ratio of solids to liquids and the presence of stabilizers like gums. The home-kitchen version of that finding is your xanthan gum pinch.
Choosing Your Coffee for Maximum Flavor

The coffee you choose sets the entire profile. A dark roast will taste bitter and ashy when frozen and sweetened. A medium or blonde roast coffee has brighter, fruitier notes that cut through the dairy.
If you’re using espresso, consider the espresso caffeine content. A single shot gives you a noticeable kick without overwhelming the other flavors. A double shot can make the shake taste aggressively bitter unless you balance it with extra sweetness.
For cold brew, make it strong. A 1:4 concentrate (1 part coffee grounds to 4 parts water, steeped 18 hours) is the baseline. If your concentrate tastes potent and almost syrupy at room temperature, it’s right. Ready-to-drink bottled cold brew is usually too diluted and will get lost.
| Coffee Base | Best For | Prep Required | Flavor Outcome |
|---|---|---|---|
| Chilled Espresso | Bold, aromatic kick | Pull shot, chill 10 mins | Sharp coffee flavor, needs balancing sweetener |
| Cold Brew Concentrate | Smooth, mellow, easy | Steep overnight, strain | Chocolatey, less acidic, blends seamlessly |
| Instant Coffee Paste | Quick, no-equipment option | Mix instant granules with hot water into a paste | Flat, one-dimensional flavor with slight bitterness |
Adding a dash of cinnamon in coffee or a drop of vanilla extract to the blender can round out the flavor without needing more sugar.
Frequently Asked Questions
Can I make a coffee milkshake without a blender?
No. A shaker bottle or stirring will not crush ice and ice cream into a smooth emulsion. The closest you can get is stirring cold brew into a very soft, almost-melted milkshake from a shop, but the texture will be wrong.
Why did my milkshake turn out watery?
You used hot coffee, too much milk, or wet, partially melted ice. Hot coffee melts the ice cream instantly. The standard ratio is 1 part coffee to 4 parts milk by volume for a 16oz drink. Check your ice, freezer-burned, dry ice works better.
Can I use a dairy-free milk?
Yes, but the texture will be thinner. Almond, oat, or soy milk lack the fat content of whole dairy milk. Compensate by using 1/4 cup less ice and consider adding a quarter of a ripe avocado or that tiny pinch of xanthan gum for creaminess.
How do I make it less sweet?
Reduce or omit the added sweetener (syrup, sugar). Rely on the natural sweetness of the vanilla ice cream. You can also use a less-sweet ice cream brand or swap in plain Greek yogurt for one of the ice cream scoops.
How long will a coffee milkshake keep in the freezer?
Don’t freeze it. The emulsification breaks, and it becomes an icy block. Make it and drink it within 10-15 minutes. If you must store it, freeze in an ice cube tray and re-blend later, but expect a significant loss in texture.
Can I make this with decaf coffee?
Absolutely. Use decaf espresso or decaf cold brew concentrate. The process and ratios are identical. You’ll get all the coffee flavor without the caffeine kick.
Before You Go
The perfect coffee milkshake isn’t about complicated recipes. It’s about three things: the 1:4 coffee-to-milk ratio, using bone-dry ice, and starting your blend on the lowest setting. Get those right and you’ll beat any coffee shop version. Skip the xanthan gum if you must, but expect to drink it fast before it separates. Your blender matters more than your coffee choice, a weak motor guarantees a gritty disappointment. Now you know what to listen for: the shift from a crushing roar to a smooth, quiet whirl. That’s your cue to stop.
