
How to Make Coffee Art | The Pour Angle That Decides It
To make coffee art, the pour angle that decides it is 20–30 degrees from horizontal. This low angle, combined with a pitcher spout nearly touching the crema, lets you push and stack foam into crisp patterns. The exact angle is determined by your cup’s width and the pattern’s complexity, with shallower cups requiring a steeper approach.
To make coffee art, you need three things aligned: a shot of espresso with thick, stable crema; milk steamed to a glossy, paint-like microfoam between 135°F and 140°F; and a pour that starts high to sink the milk, then drops low to lay the white foam on top in a pattern. The difference between a blurry blob and a defined tulip is about five degrees of milk temperature and two inches of pitcher height.
Most tutorials start with the pour. That’s backwards. Your pour is the last variable in a chain that begins twenty minutes earlier with your bean grinder. If the crema is thin or the milk is scalded, no wrist technique in the world will save the pattern. It will diffuse into a beige cloud before you set the pitcher down.
This guide walks through that chain. We’ll cover the non-negotiable setup for the espresso, the exact sounds and temperatures for steaming milk, and the hand motions for three foundational patterns. You’ll also learn how to diagnose why your last attempt failed, was it the milk, the shot, or your pour angle?
Key Takeaways
- Steam milk to 140°F, not the standard 160°F for drinking. The extra heat breaks the protein structure holding microfoam together, causing art to blur within seconds.
- Your espresso must have a viscous, honey-like crema. If your shot runs longer than 32 seconds or you use older beans, the crema weakens and won’t support the milk canvas.
- Start your pour 4–5 inches above the cup in a thin stream to sink the white milk. Only drop the pitcher spout to the surface when you’re ready to draw.
- Whole milk is the most forgiving medium for learning. The fat content stabilizes foam. Low-fat or most dairy-free milk alternatives require a much faster, more aggressive aeration technique.
- Swirl the steamed milk in the pitcher immediately before pouring. Let it sit for ten seconds and the foam separates, guaranteeing a clumpy, inconsistent pattern.
The Espresso Foundation: It’s Not Just Coffee
You cannot paint on water. Latte art needs a dense, stable canvas, and that canvas is crema, the reddish-brown foam that sits on top of a well-pulled shot. Weak crema means sinking art.
A proper art-ready shot follows a specific ratio: 18 grams of ground coffee in, 36 grams of liquid espresso out, in 25 to 30 seconds. This isn’t arbitrary. The timing ensures enough dissolved solids and carbon dioxide are present to create a thick, persistent crema. Use a scale.
A 28-second extraction at a 1:2 brew ratio produces an espresso with approximately 9-10% total dissolved solids. This viscosity is the minimum threshold for supporting defined milk patterns without immediate diffusion.
Beans matter intensely. Use espresso roasted within the last 3 weeks. Older beans lose the CO2 needed for crema. A blonde roast or a light roast will often produce a thinner, faster-dissipating crema compared to a medium or dark roast. For consistency as you learn, a reliable coffee bean blend is often easier than a finicky single-origin.
Grind consistency is non-negotiable. A blade grinder creates powder and boulders, leading to channeling and weak, pale crema. A burr grinder consistency is the single most impactful upgrade for achieving art-quality espresso. The uniform particles extract evenly, building a stable foam layer.
TL;DR: Dose 18g, aim for 36g out in 28 seconds, with beans less than a month old. Thin, fast-dissipating crema cannot hold a pattern.
Steam the Milk to 140°F, Not 160°F
Milk texture decides everything. The goal is microfoam: tiny, uniform bubbles suspended in liquid milk, giving it a glossy, wet-paint look. Scalded milk, anything over 150°F, breaks down the proteins that hold those bubbles, turning your microfoam into a dry, floating foam cap.
The ideal temperature for latte art is 135–140°F. At this range, the milk is hot enough to be fluid but the proteins are intact. You judge this by touch: the pitcher should be almost too hot to hold comfortably for more than a second against the bottom of your palm.
| Milk Temperature | Texture Result | Pattern Outcome |
|---|---|---|
| 125–135°F | Too thin, under-aerated | Art blurs immediately, white milk sinks. |
| 135–140°F | Glossy, paint-like microfoam | Crisp, defined patterns that hold. |
| 145–150°F | Beginning to separate, slightly bubbly | Patterns form but edges blur quickly. |
| 155°F+ | Dry, stiff foam floating on hot milk | Clumps, won’t pour, creates blobs. |
The process has two distinct phases: aeration and integration.
1. Aeration: Start with the steam wand tip just submerged. Lower the pitcher slightly until you hear a steady, paper-tearing hiss. This is air being sucked into the milk. Do this for 2–3 seconds only. More hiss means thicker foam.
2. Integration: Submerge the wand tip fully to stop the hiss. Position it to create a vortex, spinning the milk in a whirlpool. Hold this until the pitcher reaches temperature. The vortex folds the foam you just created into the liquid milk, creating microfoam.
Common mistake: Letting the milk hit 160°F because a recipe said “steam until hot”, the proteins denature, the foam separates, and your tulip will look like a cloud within 20 seconds of pouring.
Whole milk is standard for a reason. Its fat content helps stabilize the foam. If you’re monitoring your calorie content of milk, 2% can work but is less forgiving. Non-dairy milks like oat or almond require a different approach, often more aeration, faster, as they lack the same protein structure.
TL;DR: Listen for a 2-3 second hiss to aerate, then create a vortex to integrate. Stop when the pitcher is almost too hot to touch. This gives you microfoam, not dry foam.
The Mechanics of the Pour
You have your canvas and your paint. Now for the brushstroke. The pour has two heights: high and low. Each serves a different, non-negotiable purpose.
Phase 1: The High Pour (Mixing)
Start with the pitcher spout 4 to 5 inches above the espresso cup. Pour in a steady, thin stream, aiming for the center of the crema. This height gives the milk enough momentum to plunge beneath the surface, mixing with the espresso and creating the drink’s base color. The white foam is held back in the pitcher. Pour until the cup is roughly half full.
Phase 2: The Low Pour (Drawing)
Now, drop the pitcher. Bring the spout as close to the surface of the coffee as possible, about half an inch away. This is where you lay the foam on top of the crema to create the white pattern. The closer the spout, the more control you have. At this point, the milk flow should be slightly faster and more confident.
The transition between these two phases is the critical moment. Hesitate, and the foam will start to pour out prematurely, creating a white streak. Shift the cup, don’t the pitcher, to keep your drawing hand stable.
A 12oz Rattleware pitcher with a sharp spout is the standard tool for this. Its shape gives precise control over flow. A rounded spout or a larger pitcher makes fine patterns like tulips much harder.
The Basic Pour: Heart, Tulip, Rosetta
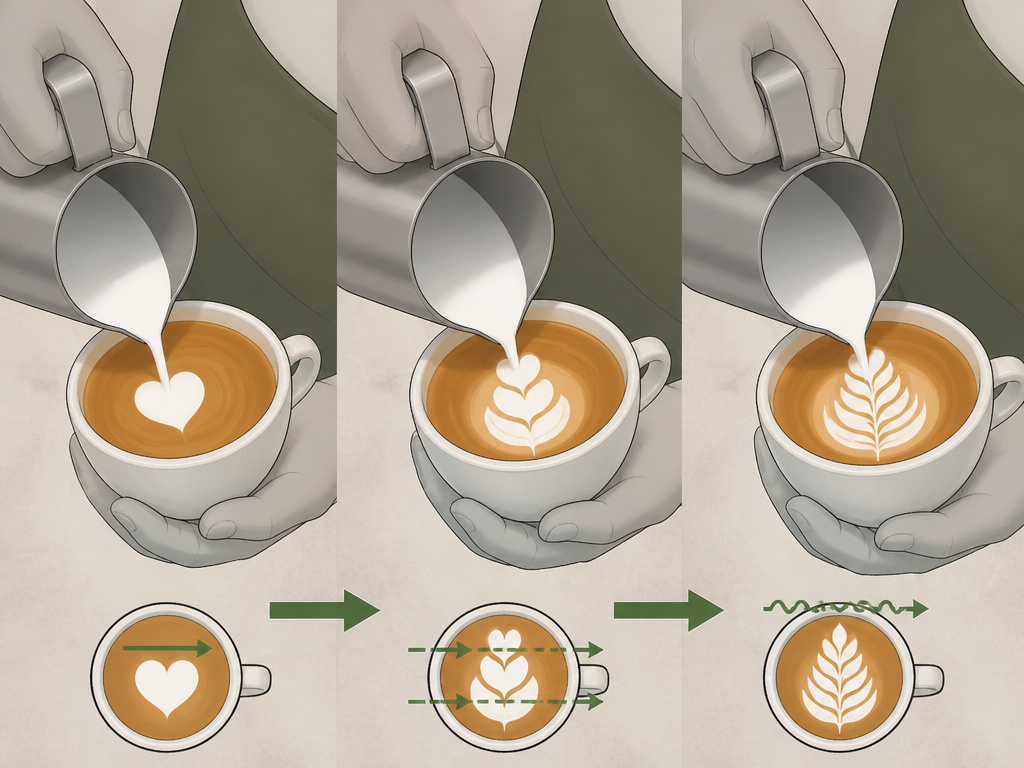
These three patterns form the alphabet of coffee art. Master the heart first, it’s the fundamental motion.
How to Pour a Heart
- Complete your high pour to fill the cup halfway.
- Drop the pitcher spout to the surface in the center of the cup.
- Pour with a steady, accelerating flow, keeping the pitcher still. A round white circle will form.
- Just as the circle is nearly the size you want, stop pouring abruptly.
- Without lifting the pitcher, push the flow of milk forward through the center of the circle, then pull the stream back and up through the center line to create the point of the heart.
The heart fails if you wiggle the pitcher. It’s a push-pull, not a wiggle. The common failure is a round blob with a faint line, that means you stopped the pour but didn’t commit to the forward push and pull-through.
How to Pour a Tulip
The tulip is a stacked heart. It teaches you to control the flow to “stack” layers.
1. After the high pour, drop the spout low to the surface.
2. Pour a small, thick dot of foam in the center, then stop the flow completely by tilting the pitcher back slightly.
3. Move the pitcher forward a centimeter, then pour another dot directly in front of the first, allowing it to push the first dot upward and backward.
4. Repeat for a third or fourth dot, each one pushing the previous stack.
5. Finish by pulling a thin stream of milk through the entire stack from base to top to form the stem.
The key is stopping the flow between each dot. If milk continues to flow, you get a single elongated shape, not a stack.
How to Pour a Rosetta
The rosetta is the heart in motion. It’s a continuous pour with a side-to-side wiggle.
1. After the high pour, drop the spout to the surface at the far side of the cup (closest to you).
2. Begin a medium-paced pour while wiggling the pitcher from side to side. The wiggle comes from the wrist, not the arm.
3. Slowly move the pitcher backward (away from you) as you wiggle, creating a leaf-like pattern that flows toward the cup’s far side.
4. As you reach the far side of the cup, stop wiggling, pause for a split second, then pull the stream straight back through the center of the pattern to form the stem.
I spent two weeks producing rosettas that looked like ferns after a hurricane. The fix was the pull-through. Without that final, decisive pull straight back, the leaves just splay out into a messy bush. Now I focus on finishing the stem, and the leaves align themselves.
TL;DR: Heart: push and pull. Tulip: stop and stack. Rosetta: wiggle and pull. Each pattern builds on a controlled, stopped flow.
Troubleshooting: Why Your Art Fails

Diagnosis is faster than practice. Check this table first.
| Problem | Likely Cause | The Fix |
|---|---|---|
| White pattern sinks/disappears | Espresso crema is too weak or thin. | Fresher beans, finer grind, ensure 28-second shot time. Check your espresso grind quality. |
| Pattern is blobby, not defined | Milk foam is too thick/dry or too thin. | For thick foam: aerate for less time (1-2 sec hiss). For thin foam: aerate for more time (3-4 sec hiss). |
| Only the last bit makes white | Pouring too low from the start. | Start your initial pour from 5 inches up to sink the milk. Only go low to draw. |
| Large white bubbles in pattern | Milk not integrated after steaming. | Swirl the pitcher aggressively for 10 seconds and tap it hard on the counter before pouring. |
| Pattern is off-center | Cup is tilted or pitcher is moving. | Keep the cup level on a flat surface. Move the cup, not your pouring arm, to shift the canvas. |
If your milk consistently feels thin, consider your milk choice. The fat and protein in whole milk create a luxurious texture. Exploring light milk alternatives is fine for dietary needs, but know it raises the difficulty. Similarly, if your espresso tastes harsh, a pinch of salt trick can balance the bitterness for drinking, but it won’t fix the crema. That’s a bean and grind issue.
Frequently Asked Questions
Do I need a professional espresso machine to make coffee art?
No, but you need a machine with a powerful steam wand. Many entry-level machines with a “panarello” wand (a plastic sleeve with a hole) only create dry, frothy foam. You need a machine with a bare, single-hole steam wand tip that lets you control aeration. The Breville Barista Express is a common home model capable of good microfoam.
Can I make latte art with cold brew or regular coffee?
True latte art requires espresso. The high pressure of an espresso machine creates the crema that supports the milk. Pour-over or brewed coffee strength lacks this dense foam layer, so the milk will just mix in. You can make “cream art” on the surface of a black coffee, but it will not have defined, crisp lines.
Why does my milk sometimes scream or screech when steaming?
That high-pitched noise means the steam wand tip is too close to the surface of the milk without fully drawing in air. It’s vibrating against the surface tension. Lower the pitcher a tiny bit more to get a clean, paper-tearing hiss, or submerge it slightly deeper to enter the integration phase.
How long does it take to get good at latte art?
Expect a month of daily practice to pour consistent hearts. The tulip and rosetta take longer. The biggest hurdle is developing the muscle memory for the pitcher height and flow rate. Film your pours with your phone. Watching the replay shows errors your brain misses in the moment.
Can I reuse milk if I over-froth it?
No. Once milk is steamed, its protein structure is altered. Re-steaming it will create large, useless bubbles. Pour it out, clean your pitcher, and start over with fresh, cold milk. It’s a waste, but it’s the only way to learn the correct texture.
Before You Go
Coffee art is a satisfying proof of skill. It tells you your espresso is balanced, your milk technique is sound, and your hand is steady. Remember the chain: start with fresh beans and a consistent espresso grind, steam your milk to 140°F with a vortex, and pour with two distinct heights.
Your first fifty attempts will be abstract. The fifty-first will have a recognizable shape. The difference is usually one small tweak, a half-second less aeration, a degree of temperature, a centimeter of pitcher height. Isolate the variable, change it, and pour again. The evidence is in the cup.
{
“@context”: “https://schema.org”,
“@type”: “HowTo”,
“name”: “How to Make Coffee Art at Home”,
“totalTime”: “PT15M”,
“tool”: [
{
“@type”: “HowToTool”,
“name”: “Espresso machine with steam wand”
},
{
“@type”: “HowToTool”,
“name”: “Milk pitcher (12oz Rattleware recommended)”
},
{
“@type”: “HowToTool”,
“name”: “Fresh whole milk”
},
{
“@type”: “HowToTool”,
“name”: “Espresso cup or latte mug”
}
],
“supply”: [
{
“@type”: “HowToSupply”,
“name”: “18g dose of freshly ground coffee”
},
{
“@type”: “HowToSupply”,
“name”: “4-6oz of cold whole milk”
}
],
“step”: [
{
“@type”: “HowToStep”,
“name”: “Pull a balanced espresso shot”,
“text”: “Dose 18g of coffee, grind fine enough for a 36g yield in 28 seconds. The shot needs a rich, viscous crema to support the milk.”
},
{
“@type”: “HowToStep”,
“name”: “Steam milk to 140°F with microfoam”,
“text”: “Submerge the steam wand, then lower the pitcher to hear a paper-tearing hiss for 2-3 seconds. Submerge fully to heat and spin until the pitcher is almost too hot to touch.”
},
{
“@type”: “HowToStep”,
“name”: “Swirl and tap the pitcher”,
“text”: “Swirl the steamed milk vigorously in the pitcher to integrate foam, then tap it firmly on the counter to pop large bubbles.”
},
{
“@type”: “HowToStep”,
“name”: “Start your pour high and slow”,
“text”: “Hold the pitcher 4-5 inches above the espresso. Pour in a thin, steady stream to sink the white milk beneath the crema.”
},
{
“@type”: “HowToStep”,
“name”: “Drop the pitcher and pour the pattern”,
“text”: “Bring the pitcher spout almost to the coffee’s surface. Wiggle your wrist side-to-side for a rosetta, or push forward for a heart. Finish with a swift pull-through.”
}
]
}
{
“@context”: “https://schema.org”,
“@type”: “FAQPage”,
“mainEntity”: [
{
“@type”: “Question”,
“name”: “Do I need a professional espresso machine to make coffee art?”,
“acceptedAnswer”: {
“@type”: “Answer”,
“text”: “No, but you need a machine with a powerful steam wand. Many entry-level machines with a \”panarello\” wand (a plastic sleeve with a hole) only create dry, frothy foam. You need a machine with a bare, single-hole steam wand tip that lets you control aeration. The Breville Barista Express is a common home model capable of good microfoam.”
}
},
{
“@type”: “Question”,
“name”: “Can I make latte art with cold brew or regular coffee?”,
“acceptedAnswer”: {
“@type”: “Answer”,
“text”: “True latte art requires espresso. The high pressure of an espresso machine creates the crema that supports the milk. Pour-over or brewed coffee strength lacks this dense foam layer, so the milk will just mix in. You can make \”cream art\” on the surface of a black coffee, but it will not have defined, crisp lines.”
}
},
{
“@type”: “Question”,
“name”: “Why does my milk sometimes scream or screech when steaming?”,
“acceptedAnswer”: {
“@type”: “Answer”,
“text”: “That high-pitched noise means the steam wand tip is too close to the surface of the milk without fully drawing in air. It’s vibrating against the surface tension. Lower the pitcher a tiny bit more to get a clean, paper-tearing hiss, or submerge it slightly deeper to enter the integration phase.”
}
},
{
“@type”: “Question”,
“name”: “How long does it take to get good at latte art?”,
“acceptedAnswer”: {
“@type”: “Answer”,
“text”: “Expect a month of daily practice to pour consistent hearts. The tulip and rosetta take longer. The biggest hurdle is developing the muscle memory for the pitcher height and flow rate. Film your pours with your phone. Watching the replay shows errors your brain misses in the moment.”
}
},
{
“@type”: “Question”,
“name”: “Can I reuse milk if I over-froth it?”,
“acceptedAnswer”: {
“@type”: “Answer”,
“text”: “No. Once milk is steamed, its protein structure is altered. Re-steaming it will create large, useless bubbles. Pour it out, clean your pitcher, and start over with fresh, cold milk. It’s a waste, but it’s the only way to learn the correct texture.”
}
}
]
}
