
Stop Milk Curdling in Your Cold Brew Coffee Latte with Our Fix
A cold brew coffee latte combines cold brew concentrate, water, and milk in a 1:1:2 ratio over ice. The key to preventing curdling is using a properly diluted concentrate with a pH above 5 and avoiding ultra-pasteurized (UHT) milk, which has destabilized proteins.
Most guides promise a smooth, creamy drink but skip the chemistry that turns your latte into a lumpy mess. They tell you cold brew is less acidic, so it should never curdle milk. That’s only half true.
This guide walks through the exact ratios, the science of why curdling happens, and a foolproof Japanese method that guarantees a silky texture every time.
Key Takeaways
- Cold brew’s pH (4.85–5.13) is still acidic enough to curdle certain milks, especially ultra-pasteurized (UHT) varieties.
- The standard 1:1:2 ratio (concentrate:water:milk) is a starting point; adjust the concentrate strength to match your milk’s sensitivity.
- For a guaranteed smooth latte, try the Japanese “milk cold brew” method, steeping grounds directly in cold milk for 24 hours.
- Light roast beans produce a more acidic cold brew concentrate, increasing curdling risk with dairy.
- Always add milk to diluted cold brew, not concentrate, and pour it slowly over the back of a spoon to buffer the mix.
Why Cold Brew Lattes Curdle (and How to Stop It)
The marketing line is that cold brew is “smooth” and “low acid.” That’s relative. A 2021 review in Foods journal notes cold brew’s pH ranges from 4.85 to 5.13. Hot coffee sits between 4.5 and 4.9. So yes, cold brew is less acidic, but it’s still an acid.
Technical Snapshot: Cold brew coffee extraction occurs at ambient or refrigerated temperatures over 12–24 hours. This slow process solubilizes fewer acidic compounds (like chlorogenic acids) and bitter-tasting quinic acid compared to hot brewing, resulting in a pH typically 0.1–0.3 units higher than hot coffee. The specific pH of your final concentrate depends on bean roast, grind size, and steeping time.
Milk proteins, primarily casein, are stable in a neutral environment. When you introduce an acid, even a mild one, the proteins begin to denature, unfold, and clump together. You see this as tiny curds floating in your drink. The curdling point depends on the milk’s processing.
Ultra-High Temperature (UHT) pasteurized milk, the stuff in shelf-stable cartons, has its proteins pre-denatured by the intense heat. This makes them hypersensitive to any further acid attack. Conventional pasteurized milk holds up better.
TL;DR: Your cold brew is still acidic. UHT milk is fragile. Combine them carelessly and you get a science experiment, not a latte.
The UHT Milk Problem
You grab a carton of milk from the pantry. It doesn’t need refrigeration, so it must be fine, right? That’s the first mistake.
UHT processing heats milk to at least 135°C for a few seconds. This extends shelf life but alters the protein structure. The casein micelles become less stable. When you pour this milk into your cold brew, even at a pH of 5.0, the proteins immediately look for an excuse to clump.
I learned this the hard way testing a popular barista-brand oat milk. It curdled on contact with my favorite light-roast cold brew. The oat milk was UHT processed. Switching to a refrigerated, conventionally processed whole milk solved it. The drink stayed silky.
Common mistake: Using shelf-stable UHT milk in cold brew lattes, the proteins curdle almost instantly upon hitting the acidic coffee, creating a grainy texture you can’t fix.
For plant-based milks, the rule is the same. Look for “barista edition” blends, which are often formulated with stabilizers like dipotassium phosphate to resist acidity. Even then, always test a small amount before committing to your whole glass.
Choosing Your Beans and Brew Method
Your choice of coffee bean blends directly influences the final acidity of your concentrate. This is where the flavor profile for your latte is built.
| Bean Roast Level | Cold Brew Flavor Profile | Curdling Risk with Dairy | Best For |
|---|---|---|---|
| Light Roast | Bright, fruity, tea-like | Higher (more acidic) | Milk cold brew method |
| Medium Roast | Balanced, chocolate, nutty | Medium | Standard diluted lattes |
| Dark Roast | Bold, smoky, low acidity | Lower | Strong, creamy lattes |
Dark roasts are the safest bet. The longer roasting process breaks down more chlorogenic acids. A cold brew made from a blonde roast beans can be deliciously bright, but its higher acidity makes it a risky partner for milk unless you use the milk-steeping method outlined later.
Your grind must be coarse. A fine grind will over-extract, pulling out more bitter and acidic compounds even with cold water. It also creates a sludge that’s impossible to filter cleanly, leaving sediment that can accelerate spoilage.
For equipment, you have two reliable paths:
1. The Immersion System: Like the Toddy Cold Brew System. It’s a bucket with a filter plug. Dump in grounds and water, steep, then pull the plug to drain. It makes a large batch of clean concentrate.
2. The Japanese Pour-Over: Like the Hario Mizudashi. A carafe with a fine mesh filter basket. You add grounds to the basket, fill with water, and steep. It’s for single-serving batches and is incredibly easy to clean.
The NIH cold brew extraction study confirms that grind size and steeping time are the biggest levers for flavor and acidity in the final cup. Their physicochemical analysis shows a coarse grind with a 24-hour steep maximizes sweetness and minimizes harsh acids.
The Standard Cold Brew Latte: Step-by-Step
This is the classic method: make a concentrate, dilute it, and add milk. Precision here prevents failures.
Before you start: Use cold, filtered water. Tap water minerals can create off-flavors during the long steep. Ensure all equipment is clean; any old coffee oils will turn rancid.
- Grind 80-100g of coffee. Use a coarse setting, the grounds should look like rough breadcrumbs or sea salt. Weigh it. Volume measurements are inconsistent.
- Combine with 1 liter of water. In your brewer, add the grounds first. Slowly pour the water over them, ensuring all grounds are fully saturated. Give it a gentle stir with a long spoon.
- Steep for 12-24 hours. Cover and leave it on the counter or in the fridge. Countertop steeping is slightly faster and may extract more flavor. Fridge steeping is cleaner and more stable. Do not disturb it.
- Strain the concentrate. Use your brewer’s built-in filter or strain through a fine-mesh sieve lined with a cheesecloth or a paper filter. This removes all silt. Store the concentrate in a sealed glass jar in the fridge. It keeps for about two weeks.
- Build your latte. Fill a glass with ice. Pour in 120ml (4 oz) of cold brew concentrate. Add 120ml of cold water. Now, slowly pour in 240ml of your chosen milk. For a richer drink, adjust to a 1:1:1 ratio.
The slow milk pour is critical. Dumping it in creates a sudden pH shock. Pouring it over the back of a spoon so it floats on top, then stirring gently, gives the proteins time to acclimate.
The Japanese Milk Cold Brew Method
When the standard method feels like a gamble, this is your cheat code. Popular in Japanese and Korean cafes, it involves steeping coffee grounds directly in cold milk.
The logic is elegant. Milk extracts coffee’s soluble solids differently than water. It pulls fewer bitter, acidic compounds and more of the inherent sugars and fats, resulting in a drink that’s naturally sweeter, creamier, and virtually immune to curdling, because the proteins are already in the solution.
Here’s how it works:
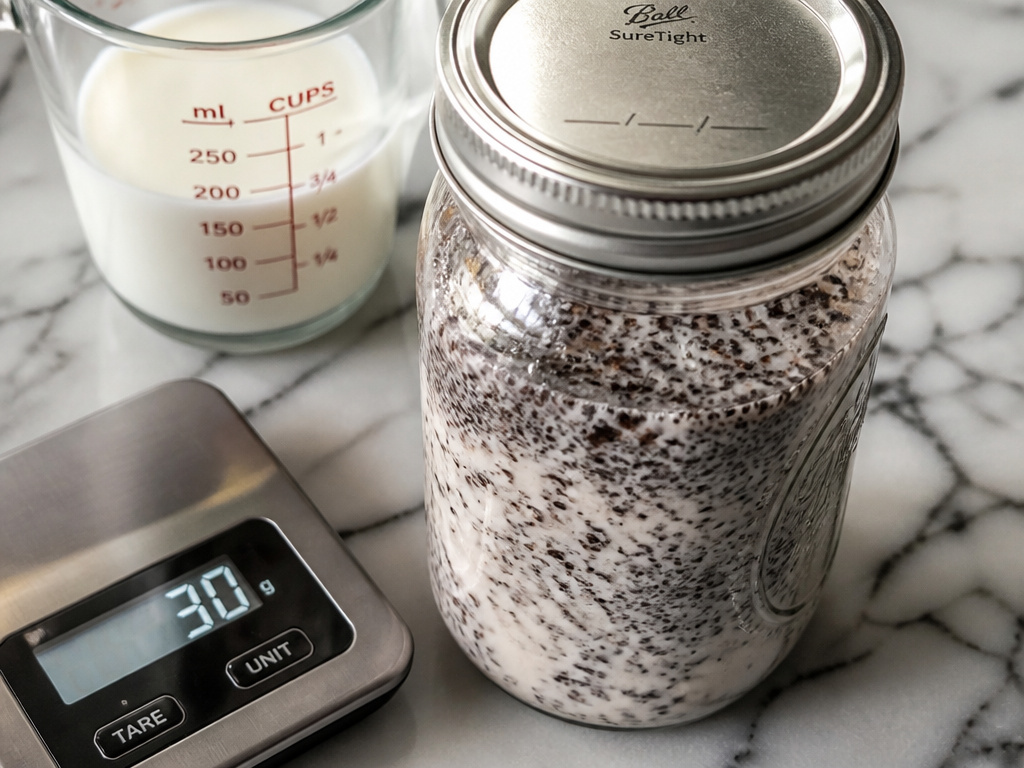
– Use a 1:8 ratio of coffee to milk. For one serving, that’s 30g of coarsely ground coffee to 240ml of milk.
– Combine them in a sealed container like a Hario Mizudashi or a mason jar.
– Steep in the refrigerator for 24 hours.
– Strain through a fine filter. The result is a ready-to-drink latte concentrate.
You can drink it straight over ice or gently heat it for a hot latte. The caffeine content is notably high because the milk doesn’t inhibit extraction as much as you’d think. It’s a potent drink.
I prefer whole milk for this method. The fat content carries flavor beautifully. The first time I tried it, the smoothness was a revelation, no salt in coffee trick needed to cut bitterness, because there wasn’t any.
| Aspect | Standard Cold Brew Latte | Japanese Milk Cold Brew |
|---|---|---|
| Base Liquid | Water | Milk |
| Steeping Time | 12-24 hours | 24 hours |
| Final Texture | Can separate or curdle | Inherently smooth, integrated |
| Flavor Profile | Clear coffee flavor + milk | Rounded, caramel-like, sweeter |
| Best Use | Iced lattes, adjustable strength | Ready-to-drink latte, hot or iced |
TL;DR: Steep coffee in milk, not water. It bypasses the acidity problem entirely and makes a uniquely smooth, sweet latte base.
Customizing Your Drink: Milk and Sweeteners

Your milk choice defines the drink’s body and flavor. Each has a different protein and fat structure, reacting uniquely to cold brew’s acidity.
Whole dairy milk is the gold standard for richness and microfoam. For a lighter option, 2% milk works but may taste slightly watery. Avoid skim milk; it lacks the fat to carry flavor and curdles more easily.
The world of plant-based coffee creamer is vast. Oat milk is the current champion for its creamy texture and neutral taste. Almond milk is lighter and can separate. Soy milk can curdle if it’s not a barista blend. Cashew milk is rich but less common.
Always consider the calories in milk if that’s a factor for you. Switching from whole milk to almond milk can cut the calorie count of your latte by more than half.
Sweeteners are personal. Simple syrup integrates best into cold drinks. For deeper flavor, sweetening coffee with brown sugar adds a molasses-like caramel note that pairs perfectly with dark roast cold brew. A pinch of vanilla extract or a dash of cinnamon shaken with the concentrate before adding milk can elevate the entire experience.
Frequently Asked Questions
Is a cold brew latte stronger than a regular latte?
In terms of caffeine, often yes. A cold brew latte uses a coffee concentrate, while a regular latte uses espresso. A 2oz shot of espresso has about 80mg of caffeine. The same volume of cold brew concentrate can have 100mg or more, depending on the brew ratio. So your cold brew latte might pack more punch. For a detailed look, see our comparison of espresso caffeine levels.
Why did my cold brew latte curdle after a few minutes?
This is usually a two-part failure. First, you likely used an ultra-pasteurized (UHT) milk, which is unstable. Second, your cold brew concentrate was probably too strong and acidic, perhaps from a light roast bean. The acid slowly attacks the already-weakened proteins, causing delayed curdling. Dilute your concentrate more next time and switch to a refrigerated, conventionally pasteurized milk.
Can I make a hot cold brew latte?
Absolutely. The “cold brew” refers to the brewing method, not the serving temperature. Gently heat your diluted cold brew concentrate in a saucepan or microwave until warm, do not boil it, as that can create off-flavors. Steam or froth your milk separately, then combine. The result is a remarkably smooth hot latte with low acidity.
What’s the difference between an iced coffee and a cold brew latte?
Iced coffee is hot-brewed coffee (often double-strength) that’s cooled and poured over ice. It has the acidity and flavor profile of hot coffee. A cold brew latte is made from cold-brewed concentrate, which is less acidic and smoother, specifically combined with a significant portion of milk. They are different drinks entirely. For more on hot-brewed methods, read about the drip coffee method.
The Bottom Line
A perfect cold brew latte balances strength, creaminess, and acidity. Start with a coarse grind of a medium or dark roast bean. Steep it for a full day. Dilute the strong concentrate before your milk ever touches it.
If curdling haunts you, abandon the traditional way. Try the Japanese milk cold brew method. Steeping grounds directly in cold milk for 24 hours guarantees a seamless, sweet, and creamy result every single time.
Remember that your milk choice is half the recipe. Skip the shelf-stable carton. Your reward is a glass of something smooth, refreshing, and utterly dependable.