
Master Coffee with Oat Milk: Tips for a Smooth, Creamy Cup
To make coffee with oat milk without curdling, use a barista-edition product containing pH stabilizers like dipotassium phosphate, shake the carton thoroughly, slightly warm the milk before adding it to very hot coffee, and pour it in a slow, steady stream. The proteins in oat milk curdle at their isoelectric point, around pH 4.5-5.0, which overlaps with the acidity of many coffees.
Most people grab the first oat milk they see, pour it straight from the fridge into a scalding cup of coffee, and watch it separate into grainy clumps. They blame the milk or the coffee. The real problem is a mismatch of temperature, acidity, and formulation.
This guide walks through the chemistry of oat milk curdling, compares the leading barista-formulated products, and gives you two reliable methods: one for store-bought and one for homemade. You will learn why a specific stabilizer matters more than brand marketing, and how a fifteen-second warming step changes everything.
Key Takeaways
- Oat milk proteins curdle at their isoelectric point, between pH 4.5 and 5.0, which is squarely within the acidic range of most coffees.
- Barista-edition oat milks contain specific buffering agents, dipotassium phosphate in Oatly, tricalcium phosphate in Minor Figures, that raise the milk’s pH stability to resist this reaction.
- Adding cold oat milk directly to very hot coffee creates a thermal shock that can trigger curdling even with stabilized milks; warming the milk for 20 seconds prevents this.
- Homemade oat milk will almost always curdle in hot coffee due to its lack of stabilizers and higher free starch content, but an enzymatic pretreatment can reduce this significantly.
- The sweetness and texture of oat milk degrade rapidly above 150–155°F; for the best flavor, stop steaming or heating around 145°F.
Why Does Oat Milk Curdle in Coffee?
Coffee is acidic. Light roasts can have a pH as low as 4.5, while darker roasts might sit around 5.5. Oat milk contains proteins that are stable within a certain pH range. When the pH of their environment drops to their isoelectric point, the specific pH where protein molecules have no net electrical charge, they clump together. For oat protein, that point is between pH 4.5 and 5.0.
The aggregation behavior of oat milk proteins under varying pH conditions shows a sharp decrease in stability below pH 5.0, with the isoelectric point (where curdling is most likely) occurring around pH 4.5-5.0.
That scientific finding explains why your oat milk sometimes curdles and sometimes doesn’t. A bright, citrusy light-roast Ethiopian coffee at pH 4.7 is a curdling trigger. A chocolatey dark roast at pH 5.3 might be safe. You are essentially pouring the milk into a mild acid bath. The second factor is heat. Proteins denature, unfold and tangle, when heated quickly. Adding fridge-cold oat milk to 200°F coffee is a double assault: a rapid pH drop and a thermal shock.
Common mistake: Using a “regular” or homemade oat milk in very acidic coffee, the proteins will hit their isoelectric point and form visible clumps within 10 seconds of stirring.
TL;DR: Oat milk curdles because coffee’s acidity (pH 4.5–5.5) matches the oat protein’s clumping point. Heat speeds up the reaction.
Barista Blends vs. The Grocery Shelf
Not all oat milks are built for coffee. The carton in the cereal aisle and the one labeled “Barista Edition” are different products. The barista version is engineered as a tool. It has a higher fat content for creaminess and, critically, it includes pH buffering agents.
| Product | Key Stabilizer | Best For | Risk in Acidic Coffee |
|---|---|---|---|
| Oatly Barista Edition | Dipotassium Phosphate | Espresso-based drinks, high-acidity coffees | Low; buffered to resist pH drop |
| Minor Figures Barista Oat | Tricalcium Phosphate | Filter coffee, medium-roast drinks | Moderate; good buffer, but can be overwhelmed |
| Generic / Homemade Oat Milk | None | Cereal, smoothies, cold drinks | Very High; will curdle almost immediately |
Dipotassium phosphate (K₂HPO₄) in Oatly is a salt that acts as a buffer. It resists changes in pH by absorbing excess hydrogen ions from the acidic coffee. This keeps the milk’s local pH above the protein’s clumping point long enough for you to drink it. Tricalcium phosphate does a similar job. Without these compounds, the proteins are defenseless.
This is why switching to a barista blend is the single most effective fix. It’s a chemical solution to a chemical problem. When you’re evaluating other dairy alternatives, the same rule applies: look for the “barista” label and check the ingredients for stabilizers.
TL;DR: Barista editions contain buffering salts (dipotassium phosphate, tricalcium phosphate) that protect oat proteins from coffee’s acid. Generic oat milk has no such defense.
The Barista’s Step-by-Step Method
This is the professional sequence for a guaranteed smooth cup, whether you’re steaming milk for a latte or just pouring it into black coffee.
- Shake the carton like you mean it. Fats and stabilizers separate. A vigorous 15-second shake rehomogenizes them. Skip this, and the first pour will be watery and the last pour will be thick, both more prone to breaking.
- Warm your portioned milk. Pour the oat milk you need into a small jug or cup. Microwave it for 15-20 seconds, or set the jug in a pan of warm water for a minute. You want it lukewarm, not hot. This minimizes the temperature differential with your coffee. Adding cold milk to hot coffee is asking for thermal shock curdling.
- Brew your coffee into the cup first. This gives you a stable, hot liquid base. If you pour milk first and then add coffee, the mixing is less controlled and more likely to create pockets of extreme acidity.
- Pour slowly and steadily. Tilt your cup slightly. Pour the warmed oat milk in a thin, consistent stream into the center of the coffee. A fast dump creates uneven mixing. A slow pour allows gradual, gentle incorporation.
- Stir once, immediately. After pouring, give the drink one gentle stir from the bottom up with a spoon. This ensures full integration before the proteins have time to think about clumping.
If you’re steaming for a latte, the principles tighten. Start with cold, shaken milk in your pitcher. Submerge the steam wand tip fully, then lower the pitcher just enough to introduce air in very short, sharp spurts, less than a second each. You’ll hear a crisp tearing sound. Do this for 3-4 seconds total. Then sink the wand tip to create a whirlpool and heat the milk. Stop at 145°F. Go hotter, and the proteins and sugars break down. The milk tastes less sweet and the texture turns thin. By 155°F, it’s often ruined.
TL;DR: Shake, warm, pour slow, stir once. When steaming, introduce air in micro-bursts and stop heating at 145°F.
Can You Make Stable Oat Milk at Home?
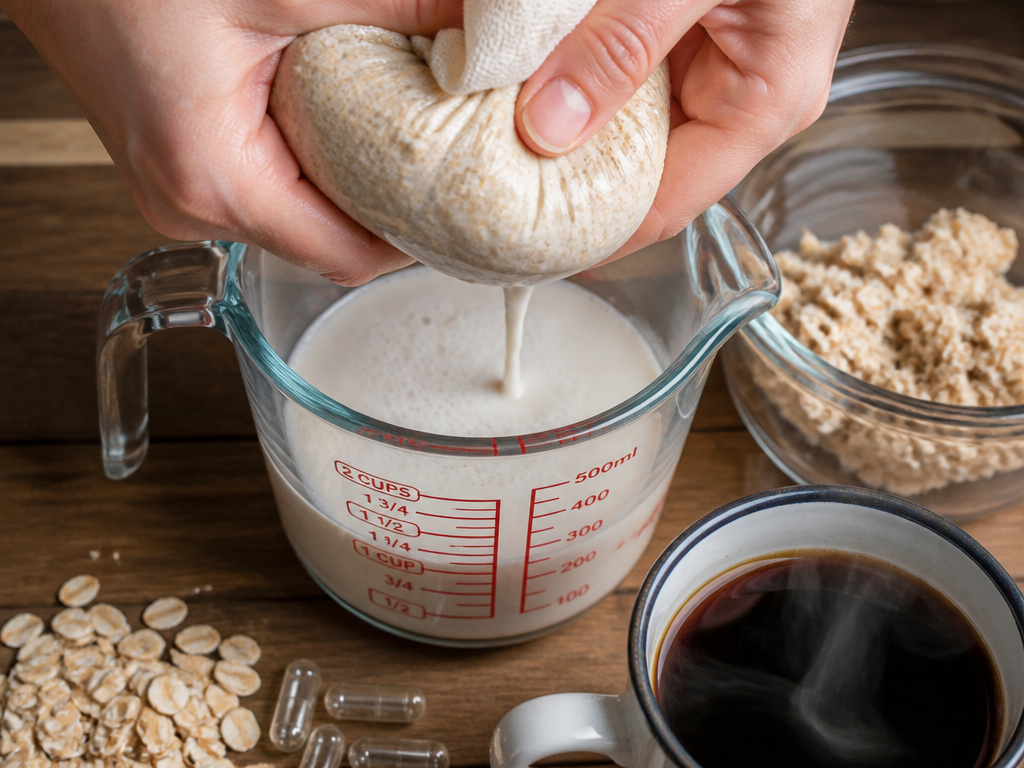
Yes, but with caveats. Homemade oat milk is simple: blend one cup rolled oats with four cups ice-cold water for 20–30 seconds, then strain through a nut milk bag. It’s cost-effective and clean-label. It also lacks stabilizers and has more free starch, making it a prime candidate for curdling in hot coffee.
The sliminess and instability come from starch. When you blend oats, you release soluble starch (amylose) into the water. Heat and acid cause this starch to gelatinize and thicken, creating a slimy texture and encouraging clumping. A 2023 PMC nutritional analysis of oat milk confirmed that processing methods dramatically alter these functional properties.
I tried the digestive enzyme trick from a popular YouTube tutorial. I soaked one cup of oats in water with two opened capsules of a broad-spectrum enzyme supplement for 15 minutes, then rinsed them. The resulting milk was noticeably less slimy when strained. It still wasn’t as stable as Oatly in my morning espresso, but it didn’t form the usual instant cottage-cheese clumps. It’s a clever hack that leverages amylase enzymes to pre-digest starches.
For homemade oat milk you plan to use in coffee, follow this adjusted recipe:
- Use ice-cold water. Heat during blending increases starch dissolution.
- Blend for only 20–30 seconds. Longer blending creates more friction heat and releases more starch.
- Do not squeeze the nut milk bag hard. Gentle pressure yields milk; hard squeezing forces out starchy pulp.
- Consider the enzyme soak. It’s not a perfect barista substitute, but it moves the needle.
| Factor | Standard Homemade | Enzyme-Treated Homemade | Store-Bought Barista |
|---|---|---|---|
| Starch Content | High | Moderate | Low (enzymatically treated during production) |
| Stabilizers | None | None | Dipotassium Phosphate, etc. |
| Coffee Stability | Poor | Fair | Excellent |
| Best Use | Cold Brew, Smoothies, Baking | Iced Coffee, Cold Brew | Any Hot Coffee Drink |
TL;DR: Homemade oat milk is inherently unstable for hot coffee due to starch and lack of stabilizers. An enzyme pretreatment can reduce sliminess and improve its odds.
Troubleshooting a Curdled Cup

Your drink separated. Don’t pour it out yet. Diagnose the cause first, because the fix changes.
If the curdling happened immediately upon stirring: The issue is likely pH. Your coffee is too acidic for the oat milk’s buffering capacity. This is common with light roast, fruity coffees or with generic oat milk.
* Fix for next time: Switch to a barista-edition oat milk with a strong buffer (look for dipotassium phosphate). Alternatively, try a darker roast coffee with a naturally higher pH. You can also try a tiny pinch of baking soda in your coffee grounds before brewing, it’s alkaline and will raise the brew’s pH slightly, but it will also mute bright flavors.
If the curdling happened after a minute or as the drink cooled: The issue is likely thermal. The milk was too cold, the coffee was too hot, and the protein network set as it cooled.
* Fix for next time: Warm your oat milk first. Even 20 seconds in the microwave brings it closer to the coffee’s temperature and prevents shock. Also, consider the bitter flavor reduction trick of a tiny salt grain in your cup; it won’t stop curdling, but it can improve the taste if minor separation occurs.
If the oat milk is near its expiration date or wasn’t shaken: Stabilizers degrade and ingredients separate over time. The buffering power fades.
* Fix: Always shake the carton vigorously. Mark the opening date and use within 7-10 days. Store it consistently in the fridge, don’t leave it on the counter.
A quick salvage for a already-curdled cup? Blitz it with an immersion blender or in a regular blender for five seconds. It will re-emulsify the proteins and fats, giving you a smooth, if slightly frothy, drink. The texture won’t be perfect, but it’s drinkable.
TL;DR: Instant curdling = acidic coffee. Slow curdling = temperature shock. Always shake your carton and use fresh milk.
Nutritional and Flavor Considerations
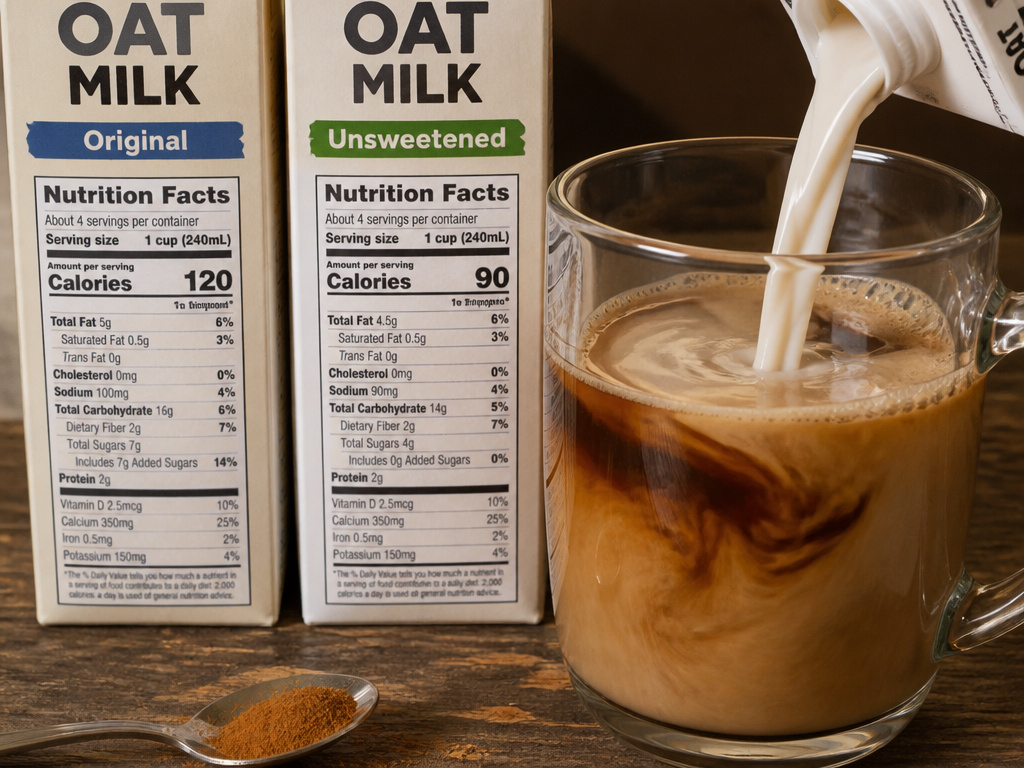
Oat milk brings a distinct nutritional and taste profile to your coffee. Understanding this helps you manage expectations and make informed choices, especially when comparing milk calories or other nutritional aspects.
Oat milk is naturally higher in carbohydrates and sugars (from broken-down oat starches) than almond or cow’s milk. This gives it a inherent sweetness that complements coffee, reducing the need for added brown sugar sweetener. It’s also a good source of soluble fiber, particularly beta-glucans, which are linked to heart health. Most commercial oat milks are fortified with vitamins and minerals like calcium, vitamin D, and B12 to match dairy milk’s profile.
The flavor is grain-forward and creamy. It can mask delicate coffee notes more than almond milk. For a very nuanced, light-roast single-origin coffee, oat milk might overpower it. For a balanced medium roast or a darker espresso, it’s a harmonious pairing. Its texture when steamed is generally richer and more velvety than other alternative milk options, which is why it became a barista favorite.
Common mistake: Assuming all oat milks have the same sugar content. “Original” versions often have added sugar, while “Unsweetened” and “Barista” versions typically do not. Check the label, the difference can be 5+ grams per serving.
If you’re exploring functional coffee additives, oat milk pairs well with MCT oil benefits for a sustained energy boost, or a sprinkle of cinnamon health benefits for added flavor and antioxidants.
TL;DR: Oat milk adds natural sweetness and a creamy body from carbs and fats. It can overshadow subtle coffees but is perfect for espresso drinks and medium roasts.
Frequently Asked Questions
Why does my barista edition oat milk still sometimes curdle?
Even the best buffers have limits. An extremely acidic coffee (pH below 4.5), a massive temperature difference between boiling coffee and fridge-cold milk, or an old carton whose stabilizers have degraded can overwhelm the system. Always shake, warm slightly, and use fresh milk.
Is curdled oat milk safe to drink?
Yes. Curdling is a physical reaction, not necessarily spoilage. The proteins have clumped, but it’s not harmful. However, if the milk was already spoiled (sour smell, off taste), curdling is a side effect of that and you should not drink it.
Can I use oat milk in cold brew?
Absolutely. Cold brew is your homemade oat milk’s best friend. Cold brew coffee has a much higher pH (often 6.0+), so it doesn’t trigger the acidic curdling reaction. The cold temperature also prevents thermal shock. It’s the safest, most forgiving way to use any oat milk.
Does the roast of coffee affect curdling?
Yes, significantly. Light roasts are more acidic (lower pH) and are more likely to cause curdling. Dark roasts are less acidic (higher pH) and are generally safer. If you’re having persistent issues, try switching to a medium or dark roast blend.
How does oat milk’s environmental impact compare to dairy?
Oat milk has a significantly lower carbon footprint and water usage than dairy milk. It’s generally considered one of the more sustainable plant-based milk options, though production impacts vary by brand and sourcing.
The Bottom Line
A smooth cup of coffee with oat milk isn’t luck. It’s chemistry met with technique. Start with the right ingredient: a barista-formulated oat milk containing dipotassium phosphate or tricalcium phosphate. Treat it right, shake it hard and take the twenty seconds to warm it up. Pour with purpose, not haste.
Remember that coffee’s own acidic beverage comparisons matter; a low-acid dark roast is a more forgiving partner than a bright light roast. For the purist wanting homemade, accept its limits for cold applications or try the enzyme soak for a better, though not perfect, result.
The goal is a creamy, satisfying drink that highlights your coffee, not a science experiment in your mug. With these steps, you get that consistency. Every time.
