
How to Brew Ground Coffee Correctly | A Step-By-Step Guide
Brewing ground coffee requires controlling four things: the coffee-to-water ratio (a 1:16 to 1:18 ratio is standard), water temperature (195–205°F or 90–96°C), grind size (medium-fine for drip), and total contact time (2–4 minutes). A digital scale and a gooseneck kettle make these controls repeatable.
Most people get this wrong because they guess. They scoop coffee by volume instead of weight, boil water and let it sit, and pour fast. The result is a cup that’s either sour and weak or bitter and harsh, and they blame the beans.
This guide walks through the four variables you control, matches them to your brewer, and gives you a step-by-step pour-over method that works every single time.
Key Takeaways
- Use a scale. A tablespoon of dark roast weighs less than a tablespoon of light roast. Volume-based measuring is the single biggest source of inconsistency.
- Water temperature is non-negotiable. Brewing with boiling water (212°F) extracts bitter compounds first. The ISO 9093:2019 standard for sensory analysis specifies 92–96°C (197–205°F).
- Grind size dictates brew time. Fine grinds over-extract in a slow drip machine; coarse grinds under-extract in a fast pour-over. Match the grind to your brewer’s flow rate.
- Pre-wet paper filters. An un-rinsed filter adds a distinct cardboard or paper taste to the first third of the carafe. The water should be hot, not just warm.
- Store opened ground coffee in the freezer, not the pantry. A 2018 Food Chemistry study found freezing at -18°C preserved aroma compounds significantly better than room temperature over 30 days.
The 4 Variables You Control
Your coffee brewer is just a delivery system. The quality of the cup is decided before the water ever touches the grounds.
For laboratory sensory analysis of coffee, ISO 9093:2019 specifies a brewing temperature of 92 °C to 96 °C (197 °F to 205 °F) and a preparation method designed to eliminate variables. Home brewing is the same science with messier tools.
Coffee-to-Water Ratio
This is the most important number you will write down. The standard range is 1:15 to 1:18, meaning 1 gram of coffee to 15–18 grams of water. For a single mug (about 300ml or 10 ounces), that’s 18–20 grams of coffee.
Scooping by volume fails because bean density varies. A tablespoon of a dense, light-roasted Ethiopian coffee weighs nearly 30% more than a tablespoon of a dark, oily French roast. Your morning cup swings from weak to brutal across a bag.
A $20 digital kitchen scale fixes this forever.
Water Temperature
Boiling water (212°F/100°C) is too hot. It scorches the grounds, extracting harsh, bitter compounds before the sweeter, more complex sugars have a chance to dissolve. The sweet spot is 195–205°F (90–96°C).
Your kettle’s “boil” setting is a lie. A standard electric kettle shuts off at 212°F, but by the time you pick it up and pour, the water in the spout has already dropped 5–10 degrees. A temperature-controlled gooseneck kettle holds the setting. If you don’t have one, let a boiled kettle sit for 30 seconds before pouring.
Grind Size
Grind size is the throttle for extraction time. Fine grinds have more surface area, extracting faster. Coarse grinds extract slower.
| Brew Method | Ideal Grind Size | What Happens If It’s Wrong |
|---|---|---|
| French Press | Coarse (sea salt) | Fine grit slips through the mesh, making the cup silty and over-extracted within 4 minutes. |
| Drip Machine | Medium (sand) | Too coarse and the water runs through too fast, producing a weak, sour cup in under 2 minutes. |
| Pour-Over (V60) | Medium-Fine (table salt) | Too fine clogs the filter, extending brew time past 4:30 and turning the coffee bitter. |
| Espresso | Fine (powdered sugar) | Too coarse and the shot runs blonde and sour in under 20 seconds; the machine chokes on fine. |
Brew Time
This is the outcome of the other three variables. Once water, grounds, and grind size meet, the clock starts. Total contact time, from first pour to last drip, should land between 2 and 4 minutes for most drip and pour-over methods.
Common mistake: Pouring all the water at once in a drip machine, the grounds in the middle stay dry while the edges flood, causing uneven extraction and a cup that’s simultaneously bitter and weak.
TL;DR: Weigh your coffee, heat your water to 205°F, match your grind to your brewer, and time the pour. All four are non-negotiable.
Why Your Drip Machine Lies to You
The manual for your Bonavita Connoisseur or Technivorm Moccamaster claims it heats water to 198–205°F. It probably does, at the heating element. But the water then travels through plastic tubes and a showerhead, losing heat before it hits the grounds.
I measured the slurry temperature in a Bonavita BV1901TS with a probe thermometer. The water at the showerhead was 205°F. The coffee grounds in the basket registered 192°F. That 13-degree drop matters.
If your machine is more than two years old, mineral scale on the heating element acts as an insulator. The boiler cycles longer to reach temperature, overheating the water in the process. You’ll taste burnt notes even with perfect beans.
Pre-heat everything. Run a cycle with just water through the machine to warm the carafe and basket. That buys back a few degrees.
Which Brew Method Should You Use?
The method is a tool. Pick the one that matches your tolerance for involvement and your flavor preference.
Automatic Drip Machine
Best for hands-off mornings. Consistency is its enemy and its strength. The Bonavita Connoisseur 8-Cup manual recommends 55 grams of coffee per liter of water and a 5–6 minute brew cycle. Follow that ratio, but always use a medium grind, not pre-ground “drip” coffee, which is often too coarse for modern, fast-showerhead machines.
Pour-Over (Hario V60, Kalita Wave)
Best for control and clarity. You control the pour speed, water temperature, and pattern. This method highlights acidity and floral notes. It’s also where most beginners fail by pouring too fast. The total brew time should be 2:30 to 3:30 minutes.
Immersion (French Press, Clever Dripper)
Best for body and sweetness. The grounds steep fully saturated, which extracts more oils and less acidity. The Clever Dripper hybrid, immersion then filtered drip, is what James Hoffman demonstrated in his viral method: steep 3–4 minutes, then drain. It’s forgiving.
AeroPress
Best for single servings and experimentation. It uses pressure and immersion for a concentrated, clean cup. Grind size and steep time are wildly adjustable.
| Method | Best For | Biggest Pitfall |
|---|---|---|
| Automatic Drip | Hands-off consistency | Stale pre-ground coffee and hard water scaling the heating element. |
| Pour-Over | Highlighting acidity | Pouring too fast, which causes channeling and uneven extraction. |
| French Press | Full body and richness | Over-steeping beyond 4 minutes, which makes the cup taste muddy and over-extracted. |
| AeroPress | Experimentation & strength | Using the fine espresso grind that comes with it, which makes the plunger too hard. |
The brewed coffee vs Americano debate often starts here, with immersion methods producing a heavier body similar to an Americano’s base, while pour-over aims for clarity.
TL;DR: Use a drip machine for convenience, pour-over for clarity, immersion for body, and AeroPress for experimentation. Your choice dictates your grind size.
Step-by-Step: The Foolproof Pour-Over
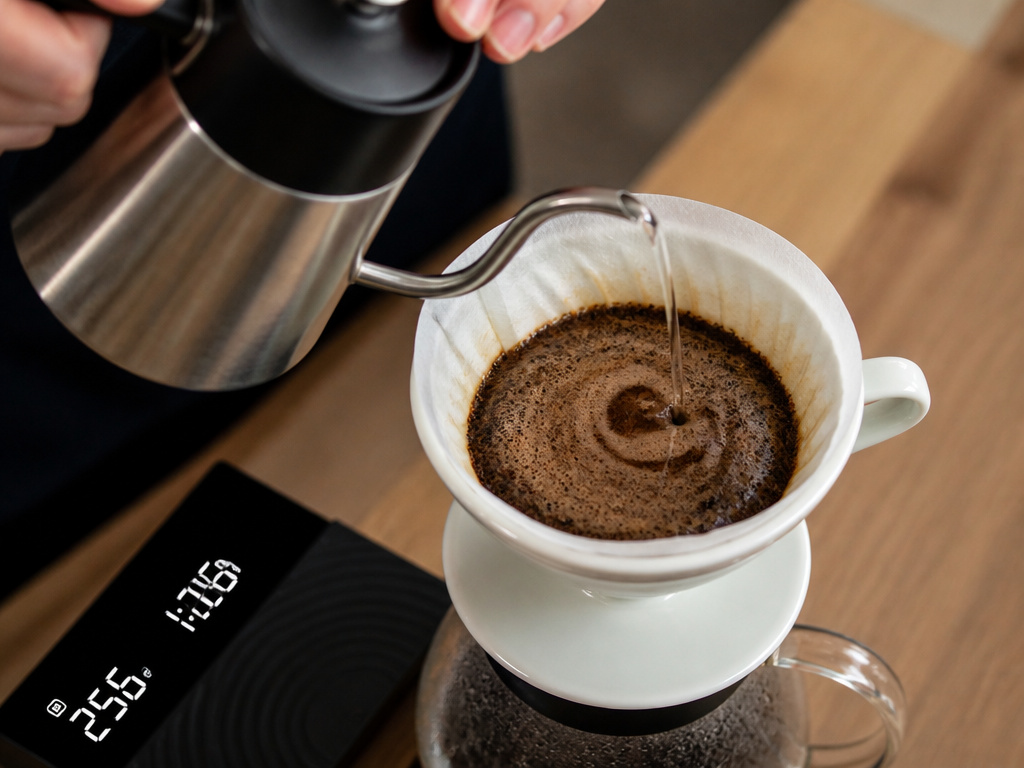
This is the method I use when testing new beans. It removes the machine’s variables and puts the outcome directly in your hands.
What You’ll Need
- 18g medium-fine ground coffee (or whole beans and a grinder)
- 300g filtered water
- Gooseneck kettle (temperature-controlled preferred)
- Pour-over dripper (Hario V60 size 02 or Kalita Wave 185)
- Paper filter (size matched to your dripper)
- Digital scale with timer
- Mug or carafe
Step 1: Grind and Measure
Weigh 18 grams of whole beans. Grind them to a consistency like table salt, not powder, not pebbles. If you’re using pre-ground, weigh 18 grams directly. Pouring blindly from a bag almost always doses 14–15 grams, which makes the cup taste hollow.
Skip this step, and everything that follows is guesswork.
Step 2: Heat and Rinse
Heat your 300g of water to 205°F (96°C). Place the paper filter in your dripper and rinse it thoroughly with hot water. This serves two purposes: it eliminates the paper taste, and it preheates the brewer and carafe so your brewing water doesn’t lose heat on contact.
Dump the rinse water. The choice between bleached vs unbleached coffee filters matters here, unbleached filters have a stronger paper taste that requires a more thorough rinse.
Step 3: Bloom
Add your grounds to the damp filter. Start your timer. Pour just enough hot water (about 50g) to saturate all the grounds evenly. You’ll see the coffee bed puff up and bubble as carbon dioxide escapes.
Let it sit for 30 seconds. This “bloom” allows gases to escape so water can contact the coffee surface evenly later. Rushing the bloom leads to channeling, where water finds a path of least resistance and the extraction becomes lopsided.
Step 4: The Main Pour
After 30 seconds, begin pouring the remaining 250g of water. Use a slow, steady spiral, starting from the center and moving outward, then back in. Keep the water level consistent, never letting the bed dry out, never flooding above the top of the grounds.
Your goal is to finish pouring by the 1:30 mark, and have all water drip through by 2:30 to 3:30. If it drips faster, your grind is too coarse. If it takes longer than 4 minutes, your grind is too fine or you’ve poured too slowly and clogged the filter.
Step 5: Serve Immediately
Remove the dripper and give the carafe a gentle swirl to integrate the coffee. Pour into your mug. Coffee begins losing volatile aromatics as soon as it hits air, so drink it within 20 minutes for the full experience.
I once tried to keep a carafe warm on a hot plate for an hour. It tasted like wet cardboard and aspirin by the end. The thermal carafe is a lie, it keeps coffee hot by cooking it.
TL;DR: Weigh 18g coffee, heat 300g water to 205°F, rinse the filter, bloom for 30 seconds, pour in a slow spiral to finish by 1:30, and aim for a total brew time of 2:30–3:30.
How to Adjust Your Brew for Taste
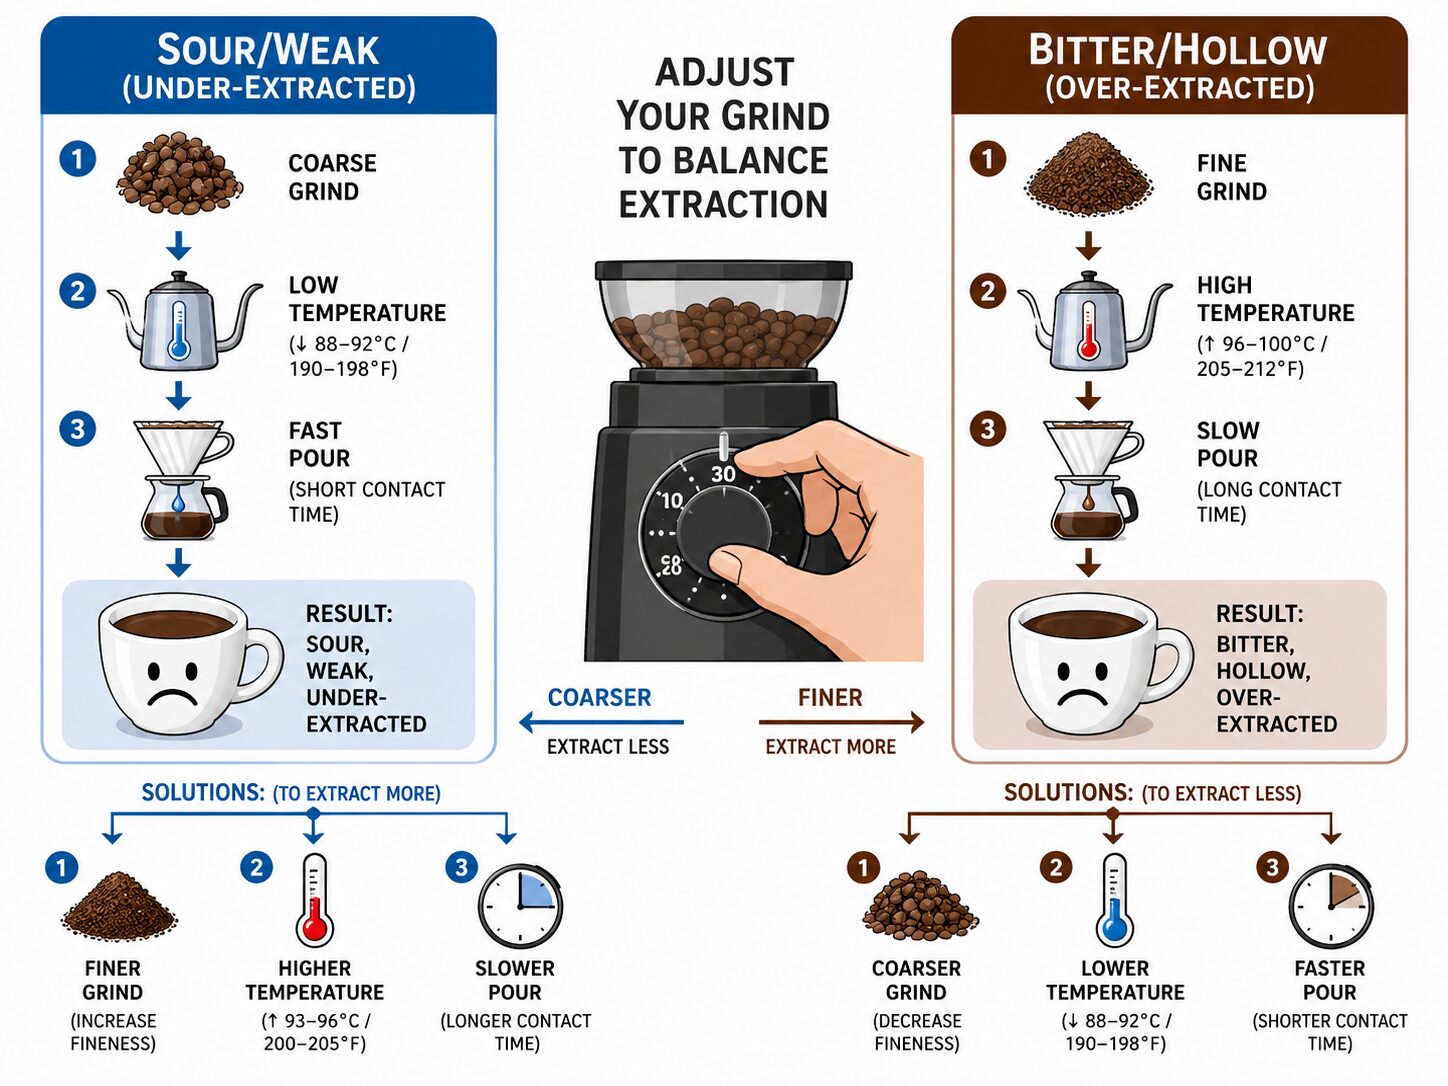
Your first cup is a baseline. The next one is where you fix it.
The Coffee Tastes Sour or Weak
This is under-extraction. The water hasn’t pulled enough sugars and solids from the grounds.
– Grind finer. This increases surface area and slows the water flow.
– Increase water temperature. Go up to 205°F if you were below 200°F.
– Extend brew time. Pour more slowly or increase the total water volume slightly.
The Coffee Tastes Bitter or Hollow
This is over-extraction. The water has pulled out too many bitter compounds.
– Grind coarser. This reduces surface area and speeds up flow.
– Decrease water temperature. Try 195°F.
– Shorten brew time. Pour faster or use slightly less water.
– Check your water. Hard water extracts differently. If you haven’t changed anything and the coffee turns bitter, your Breville coffee machine filter might be saturated with scale, or your municipal water chemistry might have shifted.
Bitterness can also come from the beans themselves. A dark roast developed for espresso will often taste ashy in a drip machine. Switching to a blonde roast coffee can reset your baseline with brighter, more acidic flavors that are harder to over-extract.
Storing Ground Coffee: What Actually Works
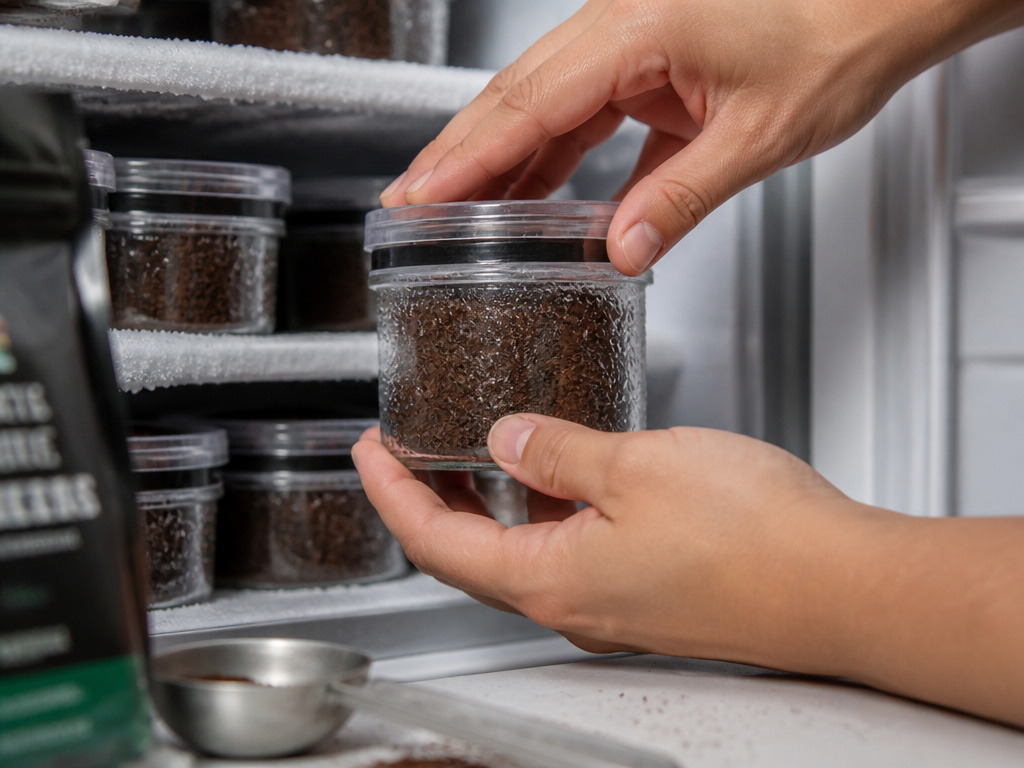
An opened bag of ground coffee goes stale in about a week on the counter. The enemy is oxygen, light, and heat.
The pantry is the worst place. A 2018 study in Food Chemistry tracked aroma loss in ground coffee stored at room temperature, 4°C (fridge), and -18°C (freezer). After 30 days, the frozen sample retained significantly more volatile compounds than the other two.
Freeze it. Portion your ground coffee into small, airtight jars or bags, press out the air, and freeze. When you brew, take out a portion and let it come to room temperature before opening. Condensation on frozen grounds makes them clump and ruins the coffee grind sizes you dialed in.
Never refrigerate ground coffee. The fridge is a humid environment, and moisture is the other great enemy. A paper by J. M. R. da Silva et al. in the Journal of Food Engineering showed that moisture content changes particle size distribution during grinding, wet grounds produce more fines. Those fines over-extract and turn bitter.
Common mistake: Storing ground coffee in its original bag with a rolled-down top, oxygen floods in every time you open it, and the coffee tastes flat after 4 days.
Frequently Asked Questions
Can I use pre-ground coffee?
Yes, but you lose control over grind size, which is one of your four key variables. Pre-ground coffee is typically ground for generic drip machines. If you’re using a pour-over or French Press, the grind will be wrong. If you must use pre-ground, shorten or extend the brew time to compensate, finer grinds need less time, coarser grinds need more.
Is filtered water necessary?
For taste, yes. Tap water contains chlorine and minerals that can add off-flavors or interfere with extraction. For machine longevity, absolutely. Scale buildup from hard water will wreck the heating element in your Bonavita or Technivorm within two years. A simple carbon filter pitcher changes everything.
Why does my coffee taste bitter even when I follow the ratio?
Check your water temperature first. If it’s above 205°F, you’re extracting bitter compounds. Second, check your grind, if it’s too fine for your method, it will over-extract. Third, your beans might be too dark a roast for your brewer. Finally, try adding salt to coffee, a tiny pinch in the grounds can counteract perceived bitterness by blocking certain bitter receptors on the tongue.
How fine should I grind for a French Press?
Coarse, like sea salt. If your grinder produces a lot of fine powder (fines), they will slip through the mesh and make the cup silty. Let the French Press brew for 4 minutes, then press slowly. Don’t leave it steeping on the table, over-extraction happens fast after pressing.
What’s the difference between a burr and blade grinder?
blade grinder chops beans randomly, producing a mix of powder and boulders. This leads to uneven extraction, some grounds over-extract (bitter), some under-extract (sour). A burr coffee grinder vs blade grinder comparison shows burrs crush beans between two surfaces for a consistent particle size. Consistency is the foundation of every other variable.
Can I sweeten my coffee without sugar?
Yes, but the method matters. Adding sweetener after brewing is straightforward. If you want to incorporate it into the process, try adding brown sugar in coffee grounds before brewing, the molasses in brown sugar caramelizes slightly with hot water, adding a deeper, richer sweetness than white sugar. Start with a quarter teaspoon per cup.
Before You Go
Brewing ground coffee isn’t about buying the most expensive gear. It’s about controlling the four variables you already own: ratio, temperature, grind size, and time. Weigh your coffee. Heat your water to 205°F, not boiling. Match your grind to your brewer. Time your pour.
Your drip machine has a manual, read it. The Bonavita Connoisseur expects 55 grams per liter. Your Bunn coffee maker filters are designed for a specific flow rate; using a generic basket filter changes that.
Store ground coffee in the freezer, in airtight portions. And if you’re debating brew methods, remember the Americano vs drip coffee divide: one is espresso diluted, the other is infusion. Your choice changes the grind, the ratio, and the cup in your hand.
Start with the pour-over method above. It takes five minutes and gives you a benchmark. Everything else, the machine, the French Press, the AeroPress, is a variation on those four numbers.
{
“@context”: “https://schema.org”,
“@type”: “HowTo”,
“name”: “How to Brew Ground Coffee”,
“totalTime”: “PT10M”,
“tool”: [
{
“@type”: “HowToTool”,
“name”: “Digital kitchen scale”
},
{
“@type”: “HowToTool”,
“name”: “Gooseneck kettle with temperature control”
},
{
“@type”: “HowToTool”,
“name”: “Pour-over dripper (e.g., Hario V60 or Clever Dripper)”
},
{
“@type”: “HowToTool”,
“name”: “Paper filter”
},
{
“@type”: “HowToTool”,
“name”: “Coffee mug or carafe”
}
],
“step”: [
{
“@type”: “HowToStep”,
“name”: “Weigh and grind”,
“text”: “Measure 18 grams of whole bean coffee and grind it to a medium-fine consistency, similar to table salt. If using pre-ground coffee, weigh 18 grams directly.”
},
{
“@type”: “HowToStep”,
“name”: “Heat water and pre-wet filter”,
“text”: “Heat 300 grams of filtered water to 205°F (96°C). Place a paper filter in your dripper and rinse it thoroughly with hot water to eliminate paper taste and preheat the vessel.”
},
{
“@type”: “HowToStep”,
“name”: “Bloom the grounds”,
“text”: “Add the coffee grounds to the filter. Pour just enough hot water (about 50 grams) to saturate all the grounds evenly. Let it sit for 30 seconds until bubbling stops.”
},
{
“@type”: “HowToStep”,
“name”: “Pour and brew”,
“text”: “Pour the remaining 250 grams of water in a slow, steady spiral, keeping all grounds submerged. The total brew time from the first pour should finish between 2:30 and 3:30 minutes.”
}
]
}
{
“@context”: “https://schema.org”,
“@type”: “FAQPage”,
“mainEntity”: [
{
“@type”: “Question”,
“name”: “Can I use pre-ground coffee?”,
“acceptedAnswer”: {
“@type”: “Answer”,
“text”: “Yes, but you lose control over grind size, which is one of your four key variables. Pre-ground coffee is typically ground for generic drip machines. If you’re using a pour-over or French Press, the grind will be wrong. If you must use pre-ground, shorten or extend the brew time to compensate, finer grinds need less time, coarser grinds need more.”
}
},
{
“@type”: “Question”,
“name”: “Is filtered water necessary?”,
“acceptedAnswer”: {
“@type”: “Answer”,
“text”: “For taste, yes. Tap water contains chlorine and minerals that can add off-flavors or interfere with extraction. For machine longevity, absolutely. Scale buildup from hard water will wreck the heating element in your Bonavita or Technivorm within two years. A simple carbon filter pitcher changes everything.”
}
},
{
“@type”: “Question”,
“name”: “Why does my coffee taste bitter even when I follow the ratio?”,
“acceptedAnswer”: {
“@type”: “Answer”,
“text”: “Check your water temperature first. If it’s above 205°F, you’re extracting bitter compounds. Second, check your grind, if it’s too fine for your method, it will over-extract. Third, your beans might be too dark a roast for your brewer. Finally, try adding salt to coffee, a tiny pinch in the grounds can counteract perceived bitterness by blocking certain bitter receptors on the tongue.”
}
},
{
“@type”: “Question”,
“name”: “How fine should I grind for a French Press?”,
“acceptedAnswer”: {
“@type”: “Answer”,
“text”: “Coarse, like sea salt. If your grinder produces a lot of fine powder (fines), they will slip through the mesh and make the cup silty. Let the French Press brew for 4 minutes, then press slowly. Don’t leave it steeping on the table, over-extraction happens fast after pressing.”
}
},
{
“@type”: “Question”,
“name”: “What’s the difference between a burr and blade grinder?”,
“acceptedAnswer”: {
“@type”: “Answer”,
“text”: “blade grinder chops beans randomly, producing a mix of powder and boulders. This leads to uneven extraction, some grounds over-extract (bitter), some under-extract (sour). A burr coffee grinder vs blade grinder comparison shows burrs crush beans between two surfaces for a consistent particle size. Consistency is the foundation of every other variable.”
}
},
{
“@type”: “Question”,
“name”: “Can I sweeten my coffee without sugar?”,
“acceptedAnswer”: {
“@type”: “Answer”,
“text”: “Yes, but the method matters. Adding sweetener after brewing is straightforward. If you want to incorporate it into the process, try adding brown sugar in coffee grounds before brewing, the molasses in brown sugar caramelizes slightly with hot water, adding a deeper, richer sweetness than white sugar. Start with a quarter teaspoon per cup.”
}
}
]
}
