
Pour Over Coffee to Water Ratio: The Key to a Perfect Cup
The perfect pour over coffee to water ratio starts at 60 grams of coffee per liter of water (or 18g for a 300ml cup). This 1:16.7 starting point, derived from the Specialty Coffee Association’s Golden Cup Standard, targets a total dissolved solids (TDS) range of 1.2% to 1.45% for balanced flavor clarity.
Most people get this wrong because they treat ratio as a dial for strength. It isn’t. You change the grind size and pour technique to fix a sour or bitter taste first. The ratio is the final tweak for personal preference, after extraction is already dialed in.
This guide breaks down why 60g/L works, how water retention changes your math, and how to adjust for your specific beans and brewer. You’ll learn when to change the ratio and when to leave it alone.
Key Takeaways
- Use 60 grams of coffee per liter of water as your universal starting point. It translates to 18g for a 300ml cup and targets the SCA’s flavor clarity range.
- Grind size fixes taste, ratio fixes strength. If your coffee is sour (under-extracted) or bitter (over-extracted), adjust your grind fineness and pour structure before touching the coffee-to-water ratio.
- Account for water retention. Spent grounds hold back about 2 grams of water for every gram of coffee. Your 300ml brew actually starts with 336ml of water if you use 18g of coffee.
- Light roasts often need more water (1:17), dark roasts less (1:15). Dense light roast beans extract slower, so a slightly higher water volume helps. Porous dark roasts extract faster and can taste better with a tighter ratio.
- Brewer design changes the ideal ratio. A thick-filtered Chemex performs well at 1:16. A slow-flow Melitta cone might need 1:15. Know your tool.
The 60 Grams Per Liter Starting Point
Forget 1:16. The math is backwards for morning brewing. You know how much coffee you want to drink, not how much coffee you have. Working in grams per liter flips the script.
The Specialty Coffee Association’s Golden Cup Standard recommends 55 grams of coffee per liter of water, falling within an optimal extraction zone. A 60g/L ratio (1:16.7) is a practical, slightly stronger starting point that targets a total dissolved solids (TDS) range of 1.2% to 1.45%.
The number 60 is easy. Want a 500ml brew? That’s half a liter, so you need 30g of coffee. A full liter for sharing? That’s 60g. No division by 16 required. This system also exposes the flaw of volumetric scoops. A “scoop” of dark roast might be 7g; a scoop of a dense light roast could be over 8g. That’s a 15% difference in dose before you even pour water. Your scale is non-negotiable.
TL;DR: Start with 60g of coffee per liter of water. It’s easier math than a 1:16 ratio and aligns with professional brewing standards.
Why Your Brew is Weaker Than the Math Says
You pour 300 grams of water over 18 grams of coffee. The math says you should have 300 grams of brewed coffee. You won’t. You’ll have about 250 grams.
Coffee grounds are sponges. They retain roughly 2 grams of water for every gram of coffee. Your 18g dose soaks up 36g of water that never makes it to your carafe. This is why understanding water-to-coffee methods matters for yield. If you want 300g of drinkable coffee in your cup, you need to start with 336g of water in your kettle. Ignore this, and every recipe will taste slightly stronger than intended because the effective ratio is tighter.
This retention is also the core difference between infusion and percolation methods. In a French press, all the water interacts with all the grounds, so no water is “lost.” To match the strength of a pour-over, you need a higher coffee dose for a French press. It’s a fundamental principle when comparing brewing technique.
| Brewing Method | Water Path | Strength Adjustment | Why It Matters |
|---|---|---|---|
| Pour-Over (Percolation) | Water flows through grounds, some is retained. | Use standard 60g/L ratio. | Retained water never brews, creating a de facto stronger cup. |
| French Press (Infusion) | All water steeps with all grounds. | Increase dose to ~67g/L (1:15). | All water contributes to dilution, so more coffee is needed for equal strength. |
| AeroPress (Hybrid) | Combination of immersion and pressure. | Start at 65g/L (1:15.4). | Short brew time and pressure require a tighter ratio for body. |
TL;DR: For a 300ml cup, start with 336ml of water to account for the 36ml your 18g of grounds will absorb. This gets you the actual ratio you calculated.
Adjusting Your Ratio for Roast and Brewer
The 60g/L rule is a starting line, not a finish line. Your beans and your brewer pull it in different directions.
Roast level is the biggest variable. Light roast beans are dense. Water has a harder time penetrating them, so extraction is slower. A slightly higher water volume helps. Try a 1:17 ratio (about 58g/L). Dark roast beans are more porous and brittle. They release their solubles quickly, and too much water can lead to a hollow, ashy taste. A 1:15 ratio (67g/L) often gives better body and sweetness. This is crucial knowledge when selecting beans for pour-over.
Your dripper dictates flow. The thick filters on a Chemex absorb more oils and slow extraction. A standard 1:16 ratio (62.5g/L) works well here. A Melitta cone with its small drip holes has a naturally slower flow, which can over-extract if the ratio is too high. A 1:15 ratio is a safer bet. The coffee grind consistency from your grinder is your primary tool for managing this flow rate.
Common mistake: Using the same ratio for a light roast in a Chemex and a dark roast in a Melitta, the light roast will taste sour and the dark roast will taste bitter. Match the ratio to the combination.
Here is a quick reference for matching your setup:
| Your Setup | Suggested Ratio | Grams per Liter | Reason |
|---|---|---|---|
| Light Roast + Hario V60 | 1:17 | ~58g | Higher water volume aids extraction of dense beans. |
| Dark Roast + Kalita Wave | 1:15 | ~67g | Tighter ratio prevents over-extraction of porous beans. |
| Medium Roast + Chemex | 1:16 | 62.5g | Compensates for thick filter’s oil absorption. |
| Single-Origin Ethiopian + Any Brewer | Start at 1:16.5 | ~60g | Highlight clarity; adjust grind first for floral notes. |
TL;DR: Light roasts often need more water (1:17), dark roasts less (1:15). Your brewer’s flow rate (Chemex vs. Melitta) also pushes the ideal ratio up or down.
When to Change the Ratio vs. When to Change the Grind
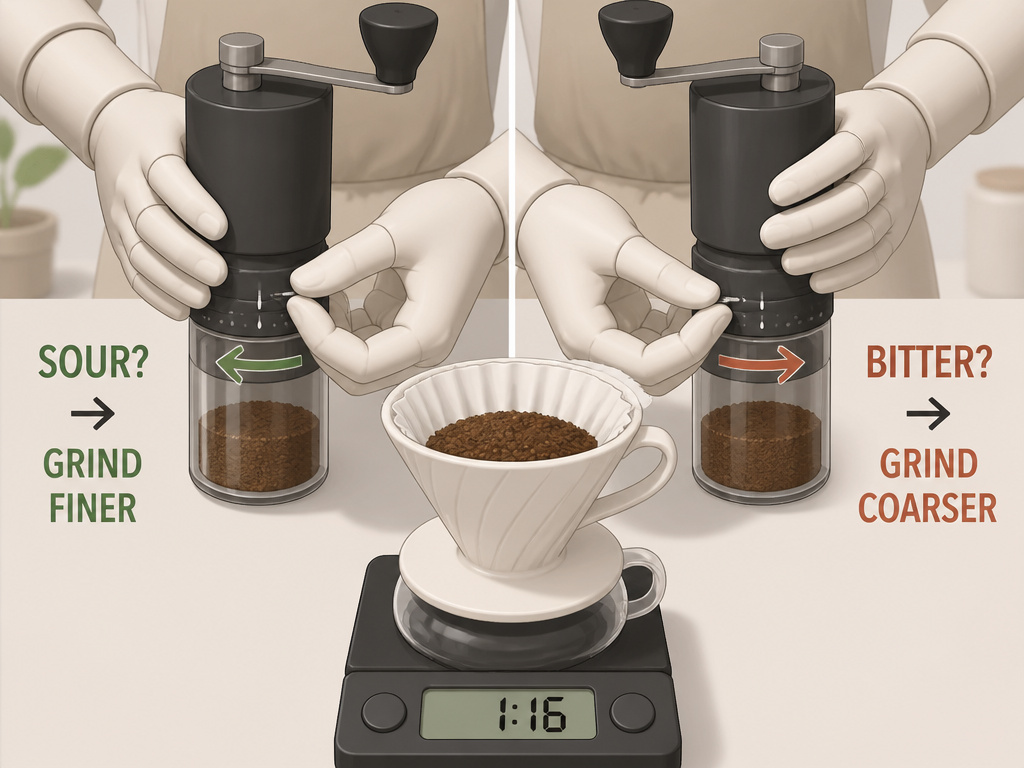
This is the most important section in this guide. Changing your ratio to fix a bad taste is usually wrong.
Your coffee tastes sour, sharp, or weak. Your instinct is to add more coffee (tighten the ratio) to make it stronger. Don’t. The problem is almost certainly under-extraction. You haven’t pulled enough flavor out of the beans. The fix is to grind finer. This increases the surface area, slows the brew time, and allows more flavor to dissolve.
Conversely, if your coffee tastes bitter, harsh, or dry, it’s over-extracted. You’ve pulled out too many compounds, including the undesirable ones. The fix is to grind coarser. This speeds up the flow and shortens the contact time.
I spent two months making sour, expensive cups of a beautiful Kenyan single-origin. I kept upping the dose from 18g to 22g, making it stronger but still sour. The fix was grinding three clicks finer on my Baratza Encore. The sourness vanished, revealing the blackberry and molasses notes. The dose went back to 18g.
Only change the ratio when you’ve achieved a balanced, pleasant extraction but wish the coffee was simply stronger or milder in your mouth. The difference is subtle but critical. Strength is about the concentration of dissolved flavors. Extraction is about which flavors, good or bad, have been dissolved. Mastering this separates a good cup from a great one and is the heart of coffee flavor profiles.
TL;DR: Sour or bitter taste? Change your grind size. Only after the flavor is balanced should you add or subtract coffee to make the cup stronger or milder.
The Advanced Move: By-Pass Brewing
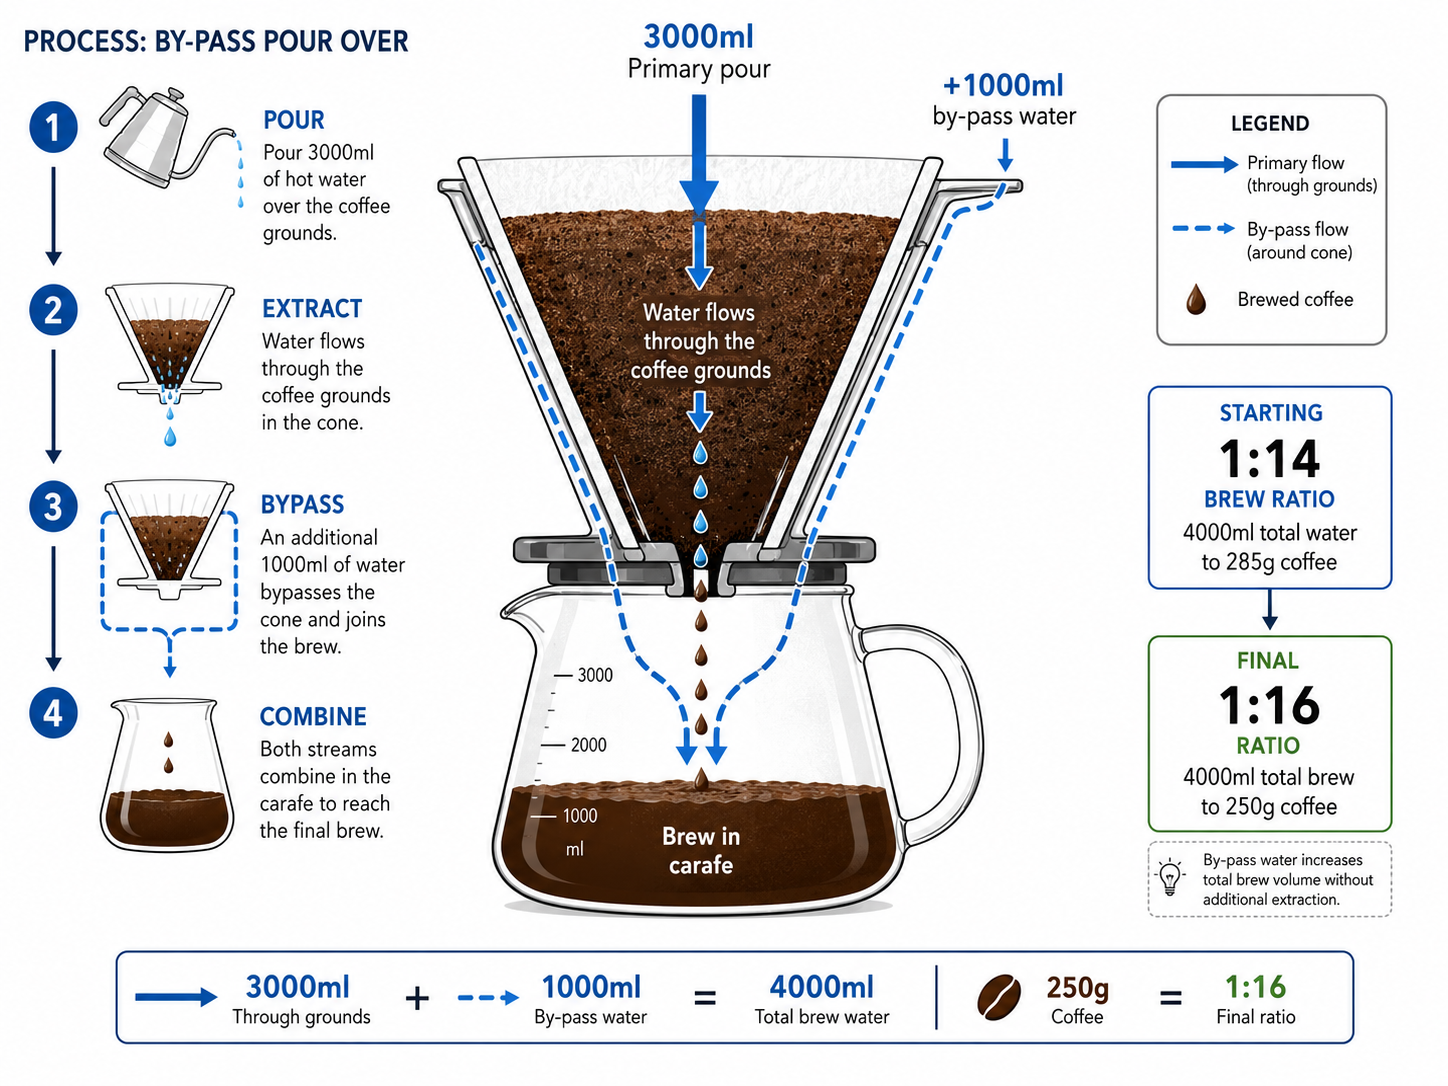
What if your ideal grind and pour still yields a cup that’s a touch too strong or extracts astringent notes at the end? This is where by-pass brewing, an official SCA method, comes in.
By-pass brewing deliberately routes a portion of your total water volume around the coffee grounds. You might brew with a 1:14 ratio, then add hot water to the carafe afterward to dilute it to a 1:16 strength. Why? It prevents over-extraction of the later, more bitter compounds. The SCA guide notes it can adjust brew time to grind size and gain “brew filter margin.”
For example, a 4000ml brew batch with 25% by-pass means only 3000ml passes through the coffee. This can reduce water-cycle time from 4 minutes to 3, preventing those final bitter notes from leaching out. It’s a technique for large batches or extremely light roasts that risk uneven extraction. For home brewing, it’s a useful trick if you find your coffee always gets a bitter tail-end, even with a coarser grind.
TL;DR: By-pass brewing adds clean hot water after brewing to dilute strength without risking over-extraction. It’s a pro technique for fixing bitterness in large batches.
The Non-Negotiable Tools
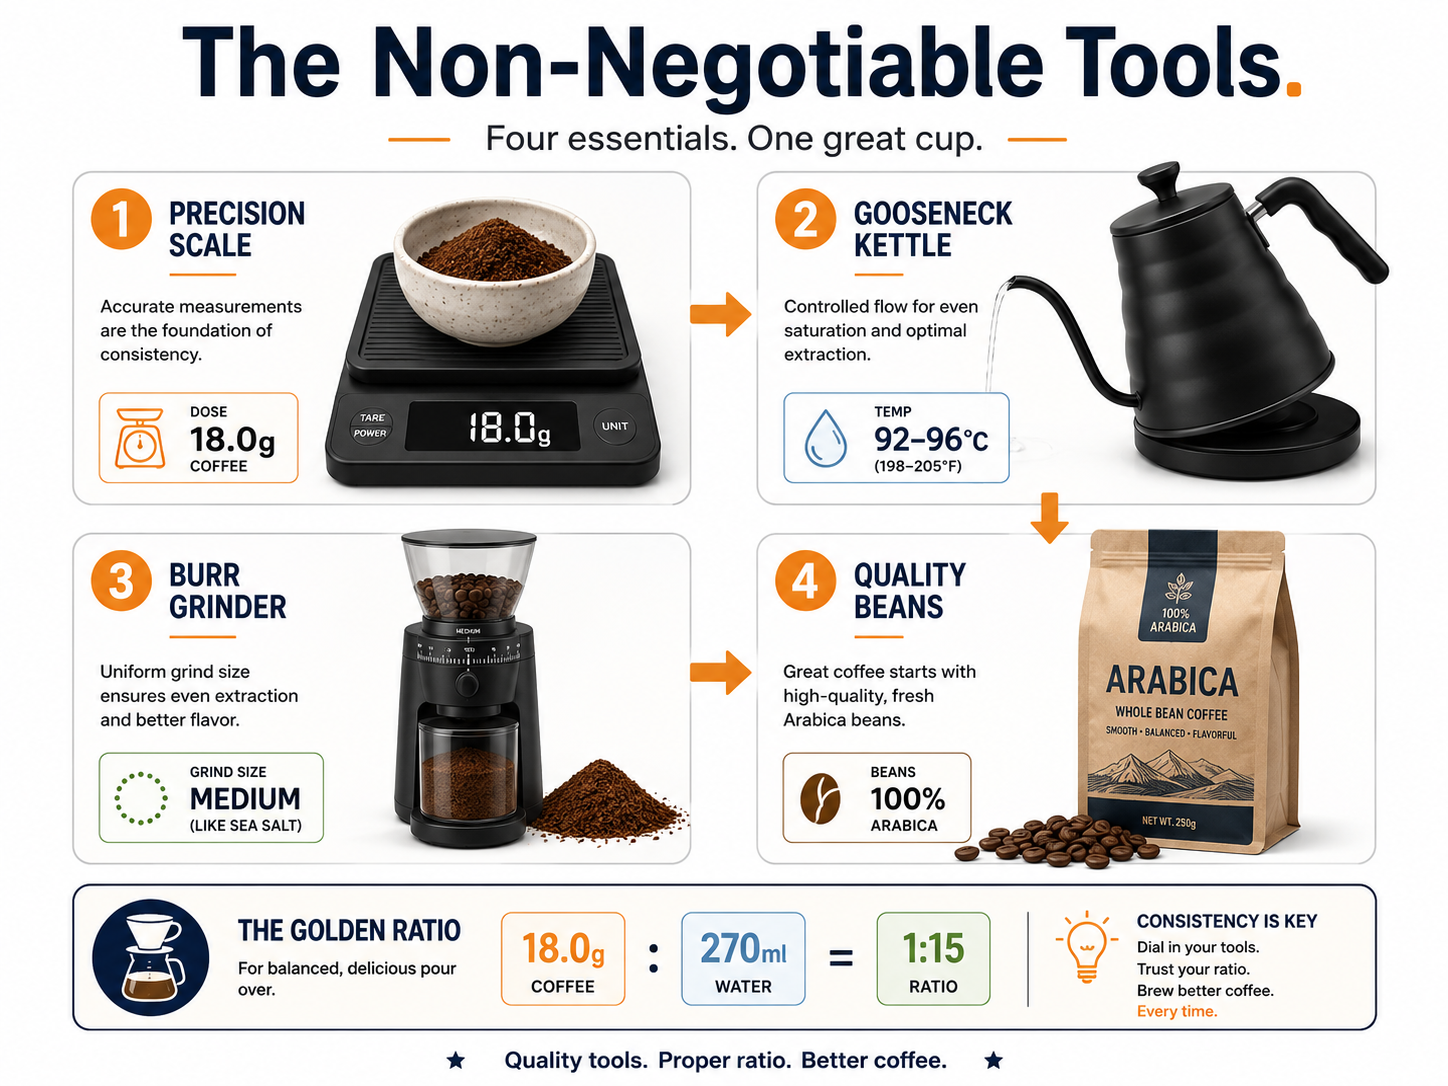
You can’t hit a ratio without the right gear. These aren’t suggestions.
- A 0.1g Precision Scale: This is the foundation. Any scale without 0.1g resolution is guessing. Place your entire dripper and carafe on it, tare to zero, and add your coffee. Tare again, then pour your water. This accounts for the filter’s weight and the paper filter selection you use.
- A Gooseneck Kettle: Control is everything. The thin spout lets you pour slowly and evenly, which is far more important than water temperature once you’re above 90°C. A uneven pour creates channels and uneven extraction, ruining any ratio.
- A Burr Grinder: Blade grinders create a mix of dust and boulders. The dust over-extracts (bitter), the boulders under-extract (sour). A consistent medium-fine grind from a burr grinder is the single biggest upgrade you can make. The debate of burr grinder vs blade grinder ends here for pour-over.
- Fresh, Good Coffee: No ratio will save stale or poorly roasted beans. Start with quality. Understanding Arabica bean characteristics helps you pick beans suited to the method.
Skip any one of these, and you’re optimizing in the dark. The best grinders for pour-over don’t need to be expensive, but they must be consistent.
Frequently Asked Questions
What is the best pour over coffee to water ratio for beginners?
Start with 60 grams of coffee per liter of water. For a standard mug, that’s 18g of coffee to 300g of water. Use a scale, grind medium-fine, and focus on a steady pour. Adjust grind size for taste before you ever change this ratio.
Is a 1:15 ratio stronger than 1:17?
Yes. A 1:15 ratio uses more coffee per unit of water, resulting in a higher concentration of dissolved solids and a stronger, more intense cup. A 1:17 ratio will produce a lighter, more tea-like cup, all else being equal.
Why does my pour over coffee taste sour even with the right ratio?
Sourness means under-extraction. Your ratio is likely fine, but your grind is too coarse, your water temperature is too low, or your pour was too fast. Grind finer first. This increases surface area and contact time, pulling more sweetness and balance from the beans.
How does water quality affect the ratio?
Poor water quality can limit extraction, making your coffee taste flat or off. If your water is very soft (low mineral content), it may struggle to pull flavors out, which can mimic under-extraction. If your water is very hard, it can over-extract bitter notes. Using filtered water is a more reliable variable than constantly tweaking your ratio. The minerals in water act as a catalyst for extraction.
Can I use volume (tablespoons) instead of weight for pour over?
No. A tablespoon of a light roast coffee weighs significantly more than a tablespoon of a dark roast due to density. Volumetric measurement introduces a huge, uncontrolled variable. A digital scale costing less than a bag of specialty coffee eliminates this problem forever. Consistency is impossible without one.
How do I adjust the ratio for multiple cups?
The grams-per-liter system scales perfectly. For two 300ml cups (600ml total), you need 36g of coffee (600 / 1000 * 60 = 36). The process is the same, though your pour structure and bloom water will scale up proportionally. Just ensure your brewer can handle the larger volume of grounds.
The Bottom Line
Lock in 60 grams of coffee per liter of water. Weigh everything. Grind finer if it’s sour, coarser if it’s bitter. Only after the flavor is balanced should you add or subtract coffee to suit your strength preference.
Remember the water retention. Your 300ml brew needs 336ml in the kettle. Your brewer and roast level will nudge the ideal ratio, light roasts toward 1:17, dark roasts toward 1:15, thick-filtered Chemex at 1:16. The tools are non-negotiable: a scale, a gooseneck, and a burr grinder. Once this framework is muscle memory, you can explore advanced techniques like by-pass brewing or fine-tune for specific single-origin characteristics. The perfect cup isn’t a secret ratio. It’s the process of listening to your coffee and knowing which variable to change.
{
“@context”: “https://schema.org”,
“@type”: “HowTo”,
“name”: “How to Find Your Perfect Pour Over Coffee to Water Ratio”,
“totalTime”: “PT10M”,
“tool”: [
{
“@type”: “HowToTool”,
“name”: “Digital kitchen scale with 0.1g precision”
},
{
“@type”: “HowToTool”,
“name”: “Pour-over dripper (e.g., Hario V60, Kalita Wave)”
},
{
“@type”: “HowToTool”,
“name”: “Gooseneck kettle”
}
],
“supply”: [
{
“@type”: “HowToSupply”,
“name”: “Freshly roasted coffee beans”
},
{
“@type”: “HowToSupply”,
“name”: “Filter paper for your dripper”
}
],
“step”: [
{
“@type”: “HowToStep”,
“name”: “Weigh your target water”,
“text”: “Decide how much coffee you want to drink. For a standard mug, start with 300 grams (about 10 oz) of water.”
},
{
“@type”: “HowToStep”,
“name”: “Calculate coffee dose using 60g/L”,
“text”: “For 300g of water, you need 18g of coffee (300 / 1000 * 60 = 18). Place your dripper and filter on the scale, tare it, and add the grounds.”
},
{
“@type”: “HowToStep”,
“name”: “Grind, bloom, and pour”,
“text”: “Grind coffee to a medium-fine consistency. Pour 50-60g of hot water to bloom for 45 seconds, then pour the remaining water in slow, steady circles.”
},
{
“@type”: “HowToStep”,
“name”: “Taste and diagnose”,
“text”: “If the coffee tastes sour or weak, grind finer next time. If it tastes bitter or harsh, grind coarser. Only adjust the ratio after the taste is balanced.”
}
]
}
{
“@context”: “https://schema.org”,
“@type”: “FAQPage”,
“mainEntity”: [
{
“@type”: “Question”,
“name”: “What is the best pour over coffee to water ratio for beginners?”,
“acceptedAnswer”: {
“@type”: “Answer”,
“text”: “Start with 60 grams of coffee per liter of water. For a standard mug, that’s 18g of coffee to 300g of water. Use a scale, grind medium-fine, and focus on a steady pour. Adjust grind size for taste before you ever change this ratio.”
}
},
{
“@type”: “Question”,
“name”: “Is a 1:15 ratio stronger than 1:17?”,
“acceptedAnswer”: {
“@type”: “Answer”,
“text”: “Yes. A 1:15 ratio uses more coffee per unit of water, resulting in a higher concentration of dissolved solids and a stronger, more intense cup. A 1:17 ratio will produce a lighter, more tea-like cup, all else being equal.”
}
},
{
“@type”: “Question”,
“name”: “Why does my pour over coffee taste sour even with the right ratio?”,
“acceptedAnswer”: {
“@type”: “Answer”,
“text”: “Sourness means under-extraction. Your ratio is likely fine, but your grind is too coarse, your water temperature is too low, or your pour was too fast. Grind finer first. This increases surface area and contact time, pulling more sweetness and balance from the beans.”
}
},
{
“@type”: “Question”,
“name”: “How does water quality affect the ratio?”,
“acceptedAnswer”: {
“@type”: “Answer”,
“text”: “Poor water quality can limit extraction, making your coffee taste flat or off. If your water is very soft (low mineral content), it may struggle to pull flavors out, which can mimic under-extraction. If your water is very hard, it can over-extract bitter notes. Using filtered water is a more reliable variable than constantly tweaking your ratio. The minerals in water act as a catalyst for extraction.”
}
},
{
“@type”: “Question”,
“name”: “Can I use volume (tablespoons) instead of weight for pour over?”,
“acceptedAnswer”: {
“@type”: “Answer”,
“text”: “No. A tablespoon of a light roast coffee weighs significantly more than a tablespoon of a dark roast due to density. Volumetric measurement introduces a huge, uncontrolled variable. A digital scale costing less than a bag of specialty coffee eliminates this problem forever. Consistency is impossible without one.”
}
},
{
“@type”: “Question”,
“name”: “How do I adjust the ratio for multiple cups?”,
“acceptedAnswer”: {
“@type”: “Answer”,
“text”: “The grams-per-liter system scales perfectly. For two 300ml cups (600ml total), you need 36g of coffee (600 / 1000 * 60 = 36). The process is the same, though your pour structure and bloom water will scale up proportionally. Just ensure your brewer can handle the larger volume of grounds.”
}
}
]
}
