
Ways to Make Ground Coffee Without Using a Coffee Maker
To make ground coffee without a coffee maker, you need to perform two separate tasks: grind whole beans using a kitchen tool like a blender, and then brew the grounds using an improvised method like the cowboy coffee technique or a DIY pour-over. The key is matching your improvised grind size to your chosen brewing method, coarse for immersion, fine for filtration.
Most guides treat grinding and brewing as one problem. They aren’t. A blender will never give you a perfect espresso grind, and boiling coffee directly on the stove will always risk bitterness. You have to pick the right tool for each job and accept a little mess.
This guide walks through both halves. We’ll cover how to get a usable grind from six common kitchen items, then detail three no-machine brewing methods that actually work.
Key Takeaways
- Use a blender or food processor for grinding, but pulse in short bursts. Continuous blending heats the beans and creates a muddy, bitter cup.
- The cowboy coffee method (boil, steep, settle) is the most forgiving for inconsistent grinds. A splash of cold water at the end forces the grounds to the bottom of the pot.
- Your grind size decides everything. Aim for a coarse, pebbly texture for immersion brewing (cowboy coffee). Aim for a finer, sand-like texture only if you have a fine mesh sieve or cloth for filtration.
- If your coffee tastes harsh and bitter, you over-extracted it. Steep for less time next round, or add a tiny pinch of salt to the finished cup to counteract the bitterness.
- Never boil coffee grounds at a full, rolling boil. It scalds the oils and guarantees astringency. Take the water off the heat for 30 seconds before adding the coffee.
How to Grind Beans Without a Grinder
Your first obstacle is turning whole beans into grounds. A dedicated burr grinder creates uniform particles, but your kitchen tools create a spectrum. Your goal is to control the chaos.
A clean, dry blender or food processor is your best bet. The blade chops rather than crushes, yielding a mix of chunks and powder. This inconsistency is actually fine for the brewing methods we’ll use.
Common mistake: Running the blender continuously for a minute, the friction heats the beans past 80°C, cooking off the volatile aromatics. Your coffee will smell flat and taste baked, even with fresh beans.
The Blender or Food Processor Method
- Measure your whole beans. Start with the amount you need for brewing, plus a little extra for waste.
- Pour beans into a clean, dry blender jar or food processor bowl. Ensure no moisture is present.
- Secure the lid. Pulse in 2-second bursts, shaking the container between pulses.
- Check consistency after 15 seconds. You want a mix of coarse chunks and smaller granules.
- Pulse for another 5-10 seconds if needed. Stop before it becomes a uniform powder.
- Dump the grounds into a bowl and pick out any obvious whole beans for a second round.
The Mortar and Pestle Method
This is for small batches, one cup at most. It’s labor-intensive but offers the most control. You feel the resistance change as the beans fracture.
Use a heavy ceramic or granite mortar. Add a small handful of beans. Press down with the pestle in a crushing motion, then use a circular grinding motion. It will take 3-4 minutes of steady work to get a coarse grind. Your forearm will feel it.
The Rolling Pin & Zip-Top Bag Method
Place beans inside a heavy-duty plastic freezer bag. Seal it, removing as much air as possible. Lay it on a solid cutting board. Roll over the bag firmly with a rolling pin, applying even pressure. Crush until the beans are broken into small, irregular pieces. This method is loud and can puncture the bag if you hit a bean edge-on.
The Hammer or Heavy Can Method
Wrap beans in a clean kitchen towel, creating a single layer pouch. Place the pouch on a solid, protected surface. Tap firmly with a hammer or the bottom of a heavy can. You’re aiming to crack and shatter, not pulverize. Unwrap and check progress. This is the least consistent method, but it works in a true pinch.
What About a Pepper Mill or Spice Grinder?
A dedicated spice grinder (like a Krups or Cuisinart model) works if it’s impeccably clean. Residual spices will ruin your coffee. A pepper mill is designed for smaller, drier peppercorns. Coffee beans are oilier and harder. You risk jamming the mechanism, and the grind will be too fine and dusty.
| Tool | Best For | Grind Consistency | Time & Effort |
|---|---|---|---|
| Blender | Medium to large batches | Coarse, uneven | 30 sec, low effort |
| Food Processor | Large batches | Coarse, slightly more even | 30 sec, low effort |
| Mortar & Pestle | Single serving, maximum control | Can be coarse or medium | 3–4 min, high effort |
| Rolling Pin | Small batch, no electricity | Very uneven, chunky | 2 min, medium effort |
| Hammer | Emergency use only | Extremely inconsistent | 2 min, high effort |
TL;DR: A blender on pulse mode is the fastest path to a workable coarse grind. Stop as soon as you see a mix of sizes, perfect uniformity is impossible and unnecessary.
The 3-Step Cowboy Coffee Method (And Why It Works)
This is the oldest and most robust way to brew without equipment. You boil water, add grounds, let it steep, and separate. The YouTube transcript got the core idea right: boil water, add coffee, let it sit, use cold water to settle the grounds.
The magic is in the timing and temperature. Get them wrong, and you get sludge.
Bring fresh, cold water to a rolling boil in a saucepan or pot. The moment it reaches a full boil, remove it from the heat. Wait 30 seconds. This lets the temperature drop to around 93°C, the ideal range for extraction without scalding.
Add your coarsely ground coffee. Use a standard ratio: 2 tablespoons of grounds for every 6 ounces of water. Stir gently to ensure all grounds are wet.
Now, let it steep. Set a timer for 4 minutes. This is the immersion phase, similar to a French press. The grounds will float, then slowly sink.
After 4 minutes, you’ll have a pot of brewed coffee with grounds suspended throughout. Here’s the settling trick from the transcript: pour about a quarter-cup of cold water into the center of the pot. Do not stir. The cold water sinks, dragging the heavier grounds down with it. Within 30 seconds, a thick layer of sludge forms on the bottom.
Carefully pour the clear coffee from the top into your mug, leaving the sludge behind. If a few fines slip through, it’s fine.
Why the cold water works: It rapidly cools the bottom layer of liquid. The coffee grounds, which are slightly denser than water, lose their buoyancy as the surrounding water cools and sinks. It’s a simple physical settlement.
I tried skipping the cold-water step once, pouring immediately after the steep. The first cup was clear. The second cup was half sludge. The third was undrinkable. That quarter-cup of cold water is the difference between coffee and mud.
TL;DR: Boil water, wait 30 seconds, add coarse grounds, steep 4 minutes, add a splash of cold water to settle grounds, pour carefully.
Improvised Pour-Over and Filtration Brewing
If you have a fine mesh sieve, a cloth napkin, or even paper coffee filters, you can mimic a pour-over. This method requires a slightly finer grind than cowboy coffee, aim for a texture like table salt.
The principle is simple: place your filter over a mug, add grounds, and slowly pour hot water over them. The water extracts the coffee as it passes through, leaving the grounds behind.
The DIY Pour-Over Setup
- Place your filter in a support. A fine mesh sieve over a mug works. A cloth napkin lined inside a colander works. If you have a Hario V60 or other cone, you’re ahead of the game.
- Add your medium-fine grounds to the filter. Rinse the filter with hot water first to preheat the mug and remove any paper taste from bleached coffee filters.
- Start with a “bloom.” Pour just enough hot water (93°C) over the grounds to saturate them, about twice the weight of the coffee. Let it sit for 30 seconds. You’ll see bubbles as gases escape.
- Slowly pour the remaining water in a spiral, keeping the water level consistent. Your total brew time should be around 3 minutes.
- Once the water drains through, discard the filter full of grounds.
The main challenge is flow control. Without a proper pour-over kettle, you’ll pour too fast. This leads to under-extraction and weak coffee. Pour in slow, small circles.
The “Sock” or Cloth Filter Method
This is a traditional method in many cultures. You need a clean, undyed cotton cloth (a handkerchief or nut milk bag). Shape it into a pouch, tie it, or secure it over a jar.
Add coarse grounds to the pouch, then submerge it in a pot of hot water (not boiling). Let it steep like a tea bag for 4-5 minutes, agitating occasionally. Remove the pouch and squeeze it gently. This makes a clean, full-bodied cup. Cloth filters like this allow more oils through than paper, giving a richer mouthfeel.
| Brew Method | Best Grind Size | Required Tool | Risk If Wrong |
|---|---|---|---|
| Cowboy Coffee | Coarse (sea salt) | Pot, cold water | Sludge in cup if not settled properly |
| DIY Pour-Over | Medium (table salt) | Fine sieve or cloth filter | Weak, watery coffee if pour is too fast |
| Cloth Steep | Coarse | Cotton cloth pouch | Over-extracted bitterness if steeped too long |
Choosing Your Grind Size for the Brew
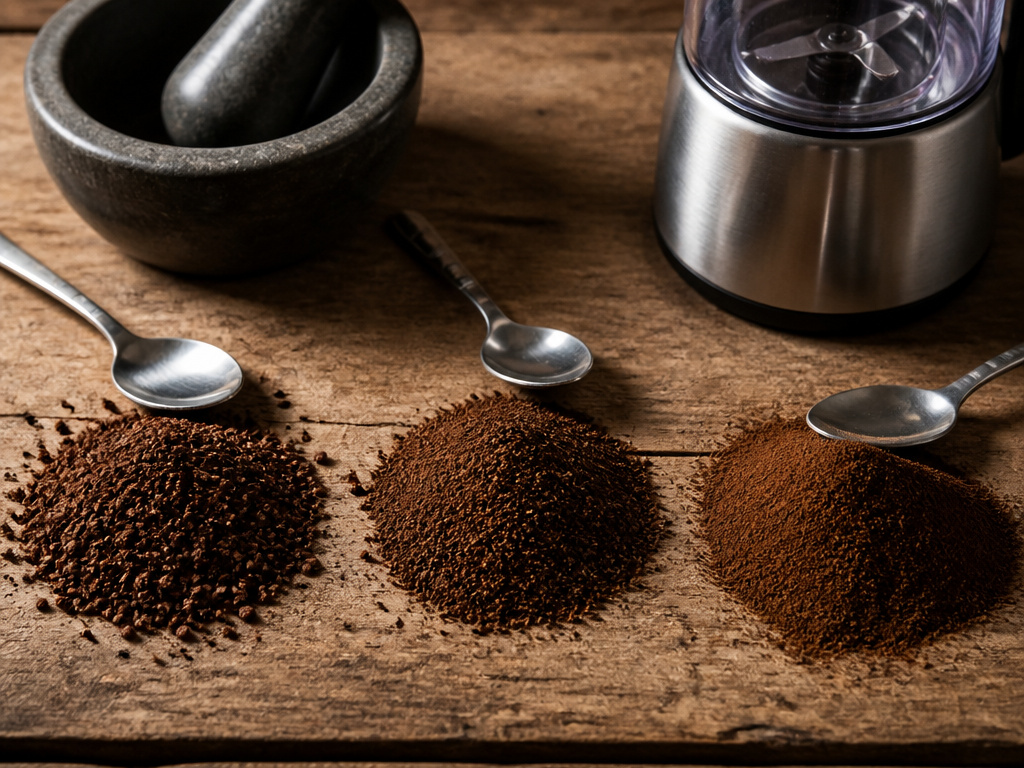
This is the non-negotiable link between your improvised grinding and your improvised brewing. Match them wrong, and the coffee is awful.
Coarse Grind (French Press Range)
- Looks like: Rough sea salt, breadcrumbs, small pebbles.
- Use for: Cowboy coffee, cloth steep method.
- Why it works: Large particles extract slowly. In immersion brewing, the water surrounds the grounds for minutes, so a coarse grind prevents over-extraction and bitterness.
- How to achieve it: Blender pulses, mortar and pestle with crushing focus.
Medium Grind (Pour-Over Range)
- Looks like: Regular table salt, smooth sand.
- Use for: DIY pour-over with a fine mesh sieve.
- Why it works: Smaller particles have more surface area, so they extract faster as water passes through them. This works for filtration methods where contact time is shorter.
- How to achieve it: More blender pulses, or grinding longer with a mortar and pestle. It’s harder to hit consistently without a burr grinder.
Fine Grind (Moka Pot Range. Use Caution)
- Looks like: Powdered sugar, flour.
- Use for: Not recommended for no-maker methods.
- Why it fails: Without the pressure of an espresso or Moka pot, fine grounds in an immersion or pour-over context will over-extract instantly, clog filters, and create a muddy, intensely bitter cup. Avoid this texture.
Common mistake: Grinding too fine for cowboy coffee, the grounds never settle, even with cold water, and you drink a thick, bitter paste. If this happens, pour the brew through a cloth filter or sieve to rescue it.
Fixing Common No-Maker Coffee Problems
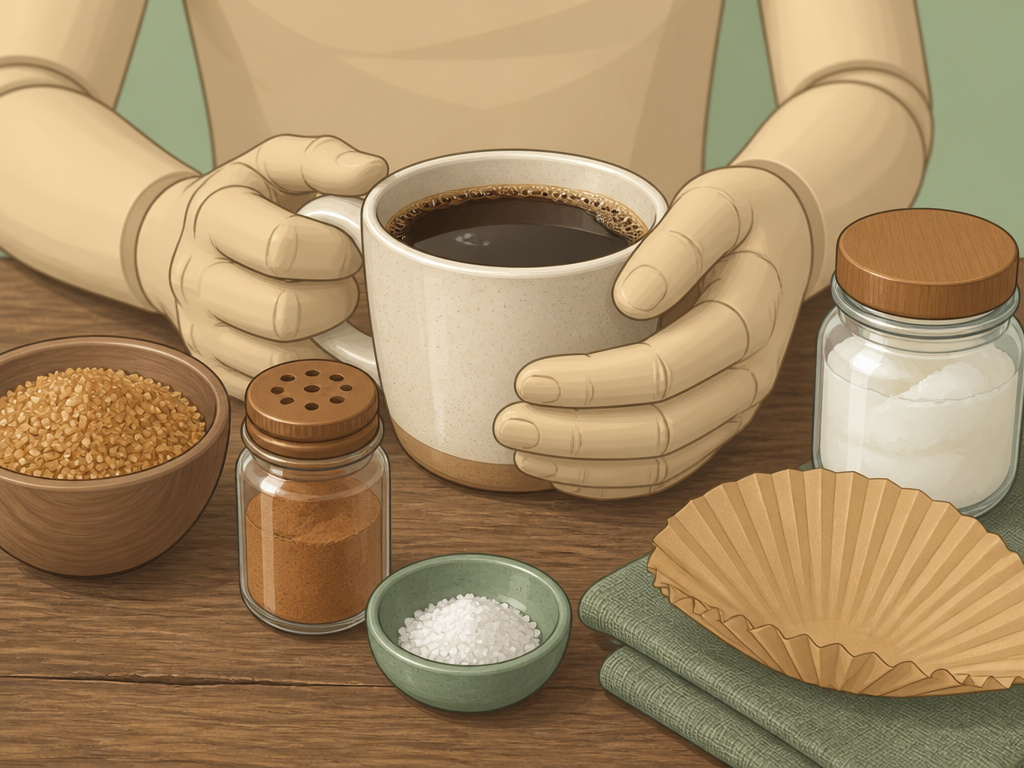
Your first attempt might be too weak, too bitter, or too gritty. Here’s how to course-correct without wasting beans.
Problem: Coffee is weak and sour.
Cause: Under-extraction. The water didn’t pull enough flavor from the grounds. Your grind is too coarse for your method, your water wasn’t hot enough, or your steep time was too short.
Fix: Next time, use a slightly finer grind, ensure your water is just off a boil (93°C), or increase the steep time by 30-second increments. For the current cup, a quick fix is to add a flavor-packed sweetener like brown sugar or a dash of cinnamon in coffee.
Problem: Coffee is harsh and bitter.
Cause: Over-extraction. The water pulled out too many bitter compounds. Your grind is too fine, your water was boiling, or you steeped for too long.
Fix: Next time, grind coarser, let boiling water cool for 45 seconds, or reduce steep time. For the cup in front of you, add a tiny pinch of salt in coffee. It neutralizes bitterness without making the coffee taste salty. Adding a fat like coconut oil coffee can also coat the palate and smooth the harsh edges.
Problem: Grounds in the cup.
Cause: Inadequate separation. The settling time was too short, your sieve was too coarse, or you poured too aggressively.
Fix: Let cowboy coffee settle for a full minute after adding cold water. Pour more slowly, stopping before you reach the sludge layer. For next time, use a double layer of paper coffee filters or a tighter-weave cloth.
Problem: Coffee tastes flat or baked.
Cause: The beans were heated during grinding. A blender run too long cooks the oils.
Fix: Grind in shorter pulses and let the blender cool between batches. Store your whole beans away from heat and light. Consider using almond milk as a creamer; its nutty flavor can mask some flat notes.
Frequently Asked Questions
Can I use a blender to grind coffee beans?
Yes, a blender is the most effective common kitchen tool for the job. Use the pulse function in 2-second bursts to achieve a coarse, uneven grind. Continuous blending overheats the beans and creates a fine powder that will over-extract and taste bitter.
What is the easiest way to brew coffee without a machine?
The cowboy coffee method is the easiest. Boil water, take it off the heat for 30 seconds, stir in coarse grounds, let it steep for 4 minutes, then add a quarter-cup of cold water to make the grounds sink to the bottom. Pour the clear coffee from the top.
How fine should I grind coffee for a DIY pour-over?
Aim for a medium grind, similar to table salt. If you’re using a fine mesh sieve or a cloth filter, this size allows for a 3-4 minute brew time as water passes through. A grind that’s too fine will clog and over-extract; a grind that’s too coarse will under-extract and taste weak.
Why did my homemade coffee turn out bitter?
Bitterness is almost always from over-extraction. The most common causes are using boiling water directly on the grounds, steeping for too long (over 5 minutes for immersion), or grinding the beans too finely. Let boiling water cool for 30 seconds and use a coarse grind for methods like cowboy coffee.
How can I make my coffee less bitter without sugar?
Add a very small pinch of salt to your brewed cup. The sodium ions block the bitterness receptors on your tongue. Start with literally two grains, stir, and taste. You can also add a fat like coconut oil coffee or a splash of almond milk to add a smooth, coating texture that mitigates harshness.
The Bottom Line
Making coffee without a maker is a two-stage puzzle: grinding and brewing. Your blender solves the first stage with a coarse, pulsed grind. The cowboy coffee method solves the second with a pot, some patience, and a splash of cold water. Don’t chase the perfect grind you get from a burr grinder; embrace the uneven texture. It works perfectly fine for immersion brewing.
Remember the timeline. Over-boil the water, and you scorch the coffee. Over-grind the beans, and you create bitter dust. Over-steep the brew, and you drink tannic sludge. Each stage has a hard stop. Hit those stops, and you’ll get a honest, robust cup every time. It won’t be your perfect pour-over, but it’s miles better than no coffee at all.
{
“@context”: “https://schema.org”,
“@type”: “HowTo”,
“name”: “How to Make Coffee Without a Coffee Maker”,
“totalTime”: “PT15M”,
“tool”: [
{
“@type”: “HowToTool”,
“name”: “Blender, food processor, or spice grinder”
},
{
“@type”: “HowToTool”,
“name”: “Medium saucepan or pot”
},
{
“@type”: “HowToTool”,
“name”: “Fine mesh sieve or cloth filter”
},
{
“@type”: “HowToTool”,
“name”: “Mug or heatproof carafe”
}
],
“step”: [
{
“@type”: “HowToStep”,
“name”: “Grind the beans to a coarse consistency”,
“text”: “Use a clean blender or food processor. Pulse in 2-second bursts for 15-20 seconds total to achieve a coarse, uneven grind resembling sea salt.”
},
{
“@type”: “HowToStep”,
“name”: “Boil water and add grounds”,
“text”: “Bring fresh water to a rolling boil in your pot. Remove from heat for 30 seconds, then stir in your grounds. Use a ratio of 2 tablespoons of coffee for every 6 ounces of water.”
},
{
“@type”: “HowToStep”,
“name”: “Steep and separate”,
“text”: “Let the coffee steep for 4 minutes. Pour a quarter-cup of cold water into the pot to make the grounds sink. Carefully pour the brewed coffee through a fine mesh sieve or cloth-lined colander into your mug.”
}
]
}
{
“@context”: “https://schema.org”,
“@type”: “FAQPage”,
“mainEntity”: [
{
“@type”: “Question”,
“name”: “Can I use a blender to grind coffee beans?”,
“acceptedAnswer”: {
“@type”: “Answer”,
“text”: “Yes, a blender is the most effective common kitchen tool for the job. Use the pulse function in 2-second bursts to achieve a coarse, uneven grind. Continuous blending overheats the beans and creates a fine powder that will over-extract and taste bitter.”
}
},
{
“@type”: “Question”,
“name”: “What is the easiest way to brew coffee without a machine?”,
“acceptedAnswer”: {
“@type”: “Answer”,
“text”: “The cowboy coffee method is the easiest. Boil water, take it off the heat for 30 seconds, stir in coarse grounds, let it steep for 4 minutes, then add a quarter-cup of cold water to make the grounds sink to the bottom. Pour the clear coffee from the top.”
}
},
{
“@type”: “Question”,
“name”: “How fine should I grind coffee for a DIY pour-over?”,
“acceptedAnswer”: {
“@type”: “Answer”,
“text”: “Aim for a medium grind, similar to table salt. If you’re using a fine mesh sieve or a cloth filter, this size allows for a 3-4 minute brew time as water passes through. A grind that’s too fine will clog and over-extract; a grind that’s too coarse will under-extract and taste weak.”
}
},
{
“@type”: “Question”,
“name”: “Why did my homemade coffee turn out bitter?”,
“acceptedAnswer”: {
“@type”: “Answer”,
“text”: “Bitterness is almost always from over-extraction. The most common causes are using boiling water directly on the grounds, steeping for too long (over 5 minutes for immersion), or grinding the beans too finely. Let boiling water cool for 30 seconds and use a coarse grind for methods like cowboy coffee.”
}
},
{
“@type”: “Question”,
“name”: “How can I make my coffee less bitter without sugar?”,
“acceptedAnswer”: {
“@type”: “Answer”,
“text”: “Add a very small pinch of salt to your brewed cup. The sodium ions block the bitterness receptors on your tongue. Start with literally two grains, stir, and taste. You can also add a fat like coconut oil coffee or a splash of almond milk to add a smooth, coating texture that mitigates harshness.”
}
}
]
}
