
Learn How to Make Coffee Concentrate That Lasts All Week Long
To make coffee concentrate, steep coarsely ground coffee in cold water at a 1:8 ratio by weight for 12 to 18 hours, then filter it thoroughly. This creates a strong, shelf-stable base you dilute with water or milk. The high coffee-to-water ratio and cold extraction are what define a true concentrate, not just strong brewed coffee.
Most people use the wrong ratio. They brew a strong pot of coffee, let it cool, and call it concentrate. That drink goes stale in two days. A real concentrate, made with the right coffee-to-water math, lasts in your fridge for a full week without losing its edge.
This guide walks through the cold-steep method that produces that shelf-stable base. We will cover the exact ratio, the grind size that prevents silt, and the filtration step that separates a clean concentrate from a muddy one. You will also get a direct comparison of the Toddy system versus a DIY jar setup.
Key Takeaways
- Use a 1:8 coffee-to-water ratio by weight (e.g., 100g coffee to 800g water). Volumetric cups are unreliable because grind density varies.
- Grind coarse, like sea salt. A fine grind over-extracts bitter compounds and creates sludge that clogs filters.
- Steep for 12–18 hours at room temperature. Going past 24 hours introduces an astringent, woody note that won’t dilute out.
- Filter twice: first through a mesh strainer, then through a paper filter or cheesecloth. Skipping the second pass leaves fine silt that turns the concentrate cloudy and gritty within days.
- Store in a sealed glass jar in the fridge for up to two weeks. Plastic containers can absorb flavors and shorten shelf life.
Why Coffee Concentrate, Not Just Strong Coffee?
Brewed coffee is a finished drink. Concentrate is an ingredient.
A coffee concentrate is a water-soluble extract prepared from roasted coffee beans using a cold or hot water extraction process, with a minimum soluble solids content of 25% by weight. This high concentration is what grants extended shelf stability compared to ready-to-drink brews.
The difference is shelf life and control. A pot of strong drip coffee peaks for about 30 minutes after brewing. Its volatile aromatics evaporate, its acids oxidize, and by hour four it tastes flat and stale. A properly made cold-brew concentrate, with its high dissolved solids content, resists that oxidation. The flavor stays locked in for up to two weeks refrigerated. You decide the strength of each cup by how much you dilute it.
TL;DR: Concentrate is a shelf-stable ingredient; strong brewed coffee is a perishable drink. The production method and final soluble solids content are different.
The Core 1:8 Ratio for Shelf Life
The ratio is non-negotiable. It is the engine for both strength and preservation.
For every 1 part coffee by weight, use 8 parts water by weight. In practical terms, that is 100 grams of coffee to 800 grams (or 800 milliliters) of cold, filtered water. This produces a concentrate that dilutes nicely at a 1:1 ratio with water or milk. A weaker ratio, like 1:12, makes a pleasant cold brew but it lacks the preservative concentration of soluble solids. It will start to taste muted after just four or five days.
Why weight? A cup of whole bean coffee weighs less than a cup of the same coffee ground. Volumetric measuring introduces a 15-20% error in your coffee amount. A kitchen scale removes the guess. If you must use volume, start with 1 cup of coarse grounds to 4 cups of water.
Common mistake: Measuring coffee by the scoop instead of weighing it, the resulting concentrate will be inconsistently strong from batch to batch, and weak batches spoil faster.
The beans matter, but not in the way you think. A very light roast can taste grassy and underdeveloped with cold extraction. A very dark roast can taste ashy. A medium or medium-dark roast provides the chocolate and nut notes that shine in concentrate. The choice between a single-origin coffee and a blend is about flavor preference, not technique. A blend often offers more consistent balance.
Equipment: From a Mason Jar to a Toddy System
You do not need specialized gear. A large glass jar, a spoon, and something to filter with will work.
The dedicated tool is the Toddy Cold Brew System. Its design solves two problems: filtration and sediment. The Toddy T2N model uses a proprietary felt filter and a stopper assembly at the bottom of its brewing container. You place the grounds in the filter, add water, and after steeping, you pull the stopper to drain the concentrate directly into the included carafe, leaving the grounds behind. It is efficient and produces a very clean concentrate. The trade-off is that it is a single-purpose appliance.
For a DIY approach, a 2-liter glass mason jar or a large pitcher is perfect. You will need a separate filtration setup. This method offers more flexibility for batch size. The French press is a popular middle ground, it has a built-in mesh plunger for a first filtration. However, its mesh is not fine enough to remove all silt, so a second pass through a paper filter is still recommended for clarity and longest shelf life.
| Brewing Vessel | Best For | Filtration Needed | Cleanup Factor |
|---|---|---|---|
| Toddy T2N System | Consistent, hands-off batches | Built-in (felt filter) | Easy – grounds stay in disposable filter |
| French Press | Quick first filtration | Required – needs a paper filter after plunging | Moderate – grounds stick to mesh |
| Large Glass Jar | Maximum batch-size flexibility | Required – needs a strainer + filter | Messier – requires pouring and handling wet grounds |
TL;DR: The Toddy is convenient but specific. A jar and a separate filter give you control. A French press is a decent hybrid if you double-filter.
The Step-by-Step Cold-Steep Process
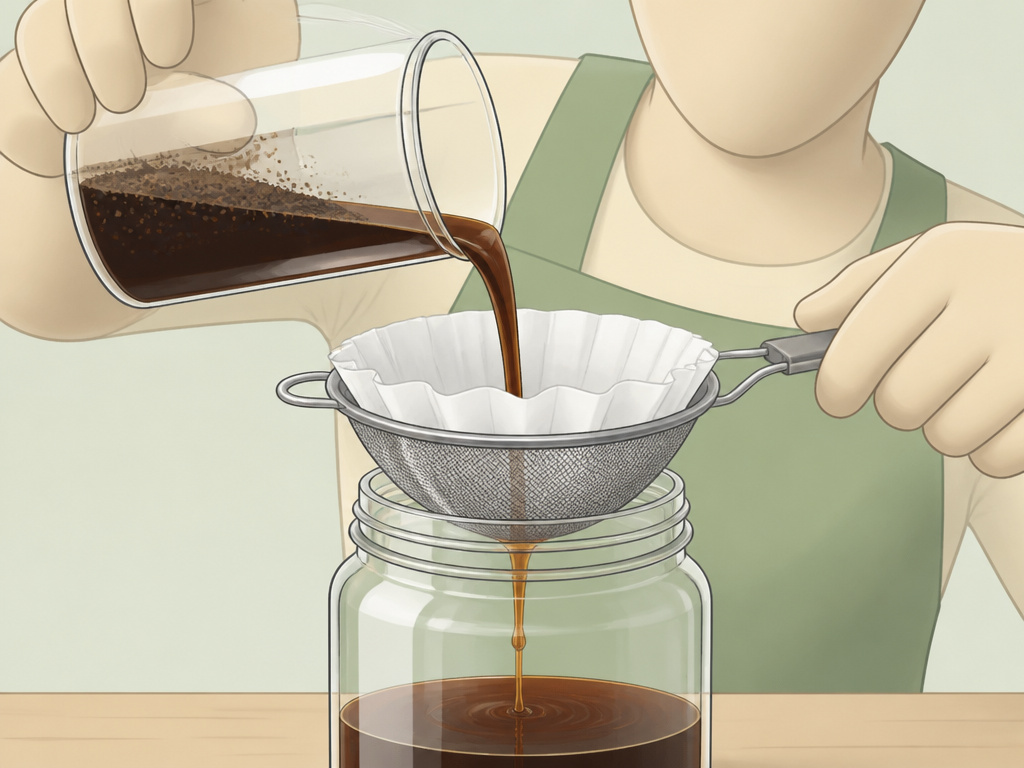
Follow this sequence. Rushing the steep or skipping a filtration layer is where batches fail.
Before you start: Use filtered water. Tap water minerals, especially chlorine, can bind with coffee oils and create off-flavors during the long steep. Also, ensure all your equipment is clean and free of soap residue, which will taint the concentrate.
Step 1: Grind the coffee. Set your burr grinder to the coarsest setting. The grounds should look like rough sea salt or breadcrumbs. A fine grind, like for drip coffee, will over-extract bitter compounds and turn your filtration into a hours-long clogged mess. If you only have a blade grinder or even a Ninja blender, pulse in very short bursts and shake the container between pulses to aim for a coarse, uneven consistency.
Step 2: Combine coffee and water. Add the coarse grounds to your clean brewing vessel. Slowly pour the measured cold water over them, making sure all grounds are fully saturated. Give it a gentle stir with a long spoon to break up any dry clumps. Do not whisk or agitate vigorously, you are not trying to create foam.
Step 3: Steep. Cover the jar or pitcher. You can use its lid or plastic wrap. Let it sit at room temperature, out of direct sunlight, for 12 to 18 hours. The longer end of that range yields a slightly stronger, more rounded flavor. I have pushed it to 24 hours with a very coarse grind. The result had a noticeable woody, astringent edge that even dilution could not mask. Eighteen hours is the sweet spot.
Step 4: Filter, this is the critical pass. Set up your filtration station. Place a fine-mesh strainer over a large bowl or pitcher. Line the strainer with a damp paper coffee filter or a double layer of damp cheesecloth. Slowly pour the steeped mixture through. The damp filter prevents it from absorbing your precious concentrate. Let it drain completely. This first pass removes all the grounds.
Step 5: Filter again for clarity. For the clearest concentrate with the longest shelf life, perform a second filtration. Rinse your first filter or get a new one, and slowly pour the already-strained liquid through it again. This catches the ultra-fine silt that passed through the first time. This silt is what makes concentrate cloudy and gives it a gritty mouthfeel after a few days in the fridge. Skipping this step is the difference between a professional-looking product and a muddy one.
Step 6: Store. Pour the finished, clear concentrate into a clean, airtight glass bottle or jar. Seal it and refrigerate immediately. Glass is ideal because it does not retain odors. Your concentrate is now ready to use and will keep for up to two weeks.
Filtration Methods: Speed vs. Clarity
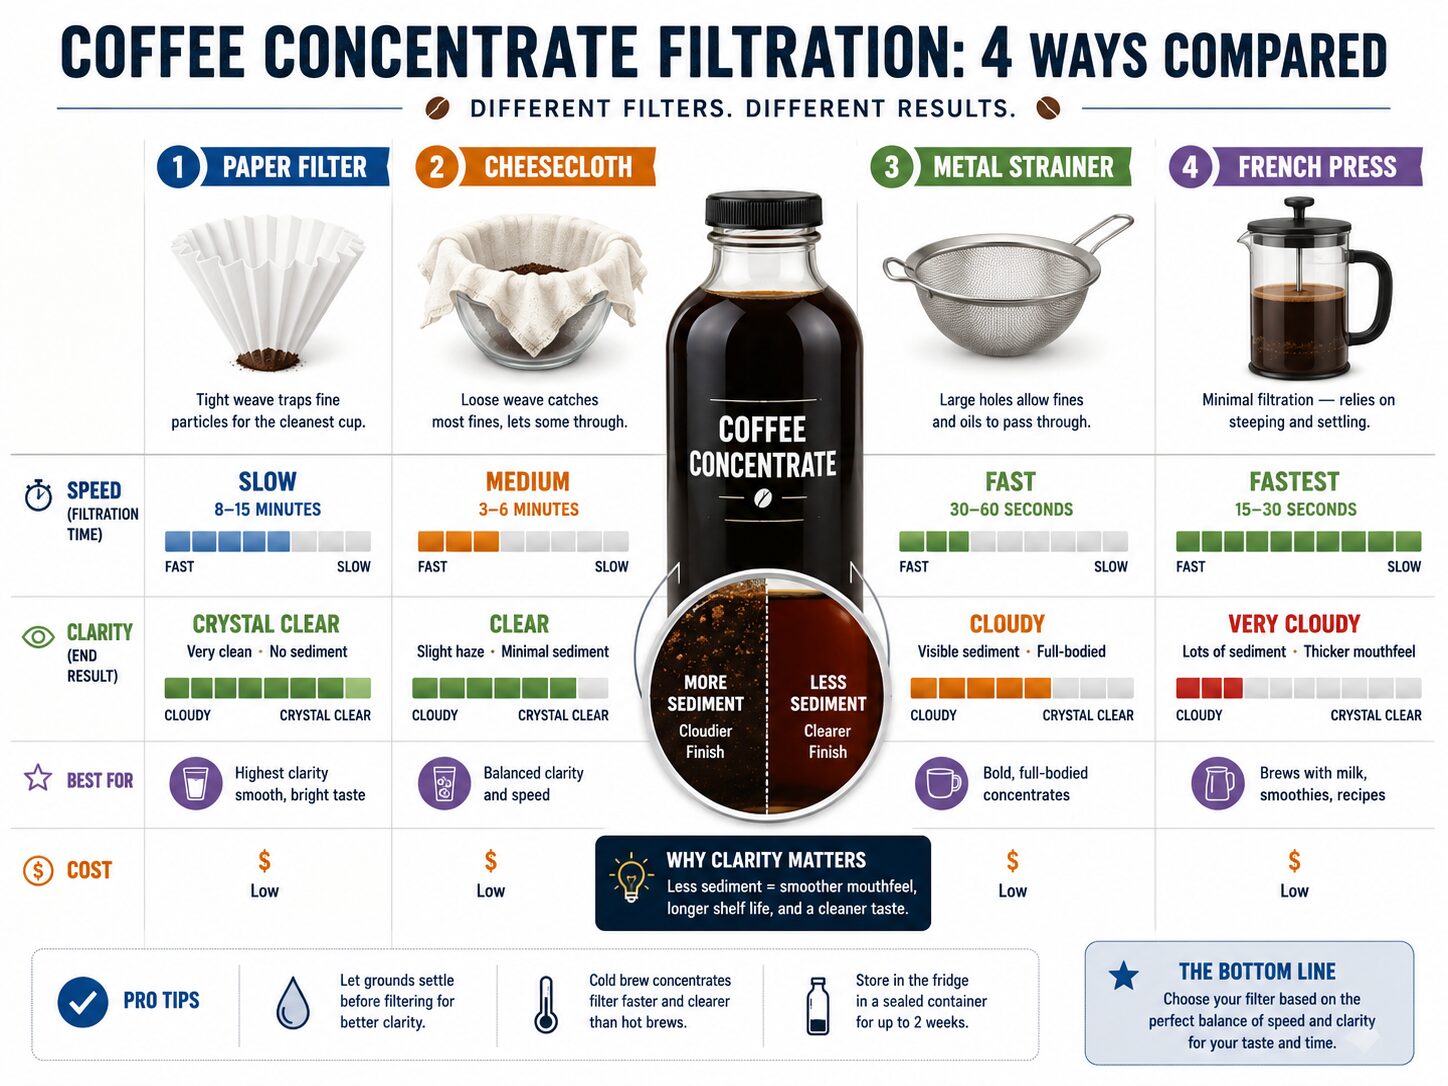
Your filter choice decides the final texture and how long you stand at the counter. Each has a trade-off.
The goal is to remove all solid particles, including microscopic fines. These fines continue to extract slowly in the fridge, making the concentrate taste increasingly bitter and gritty over time. The official Ethiopian coffee concentrate specification emphasizes the importance of clarity and the absence of sediment for both quality and stability.
| Filter Type | Best For | Time Required | Resulting Clarity |
|---|---|---|---|
| Paper Filter (e.g., #4 size) | Ultimate clarity, longest shelf life | Slow (can take 20-40 mins per batch) | Crystal clear, sediment-free |
| Cheesecloth (double layer) | Good clarity, faster than paper | Moderate (10-15 mins) | Mostly clear, may have faint haze |
| Fine-Mesh Metal Strainer | Quick first pass only | Fast (2-3 mins) | Cloudy, contains fine silt – not for final storage |
| French Press Plunge | Initial separation of grounds | Instant | Very cloudy – must be filtered again for storage |
Paper filters, whether bleached or unbleached, are the gold standard. They trap oils and the tiniest silt particles, yielding a brilliantly clear concentrate that stores beautifully. The trade-off is patience. If the filter clogs, do not force it. Let it drain at its own pace. For a faster paper filter process, some people use a dedicated pour-over cone like a Hario V60.
Cheesecloth is a good compromise. Use a double layer, and wet it first so it does not absorb your concentrate. It will let more oils through than paper, which can add a pleasant mouthfeel, but it may leave a slight haze. Nut milk bags fall into this same category.
I used a metal fine-mesh strainer alone for my first three batches. The concentrate tasted great on day one. By day four, a layer of fine sludge settled at the bottom of the bottle, and the flavor had a persistent chalky bitterness. Now I always use a paper filter for the final pass.
TL;DR: For maximum shelf life and clarity, filter through a paper filter. For speed with good results, use a double layer of pre-wetted cheesecloth.
Dilution and Serving: Making the Final Drink
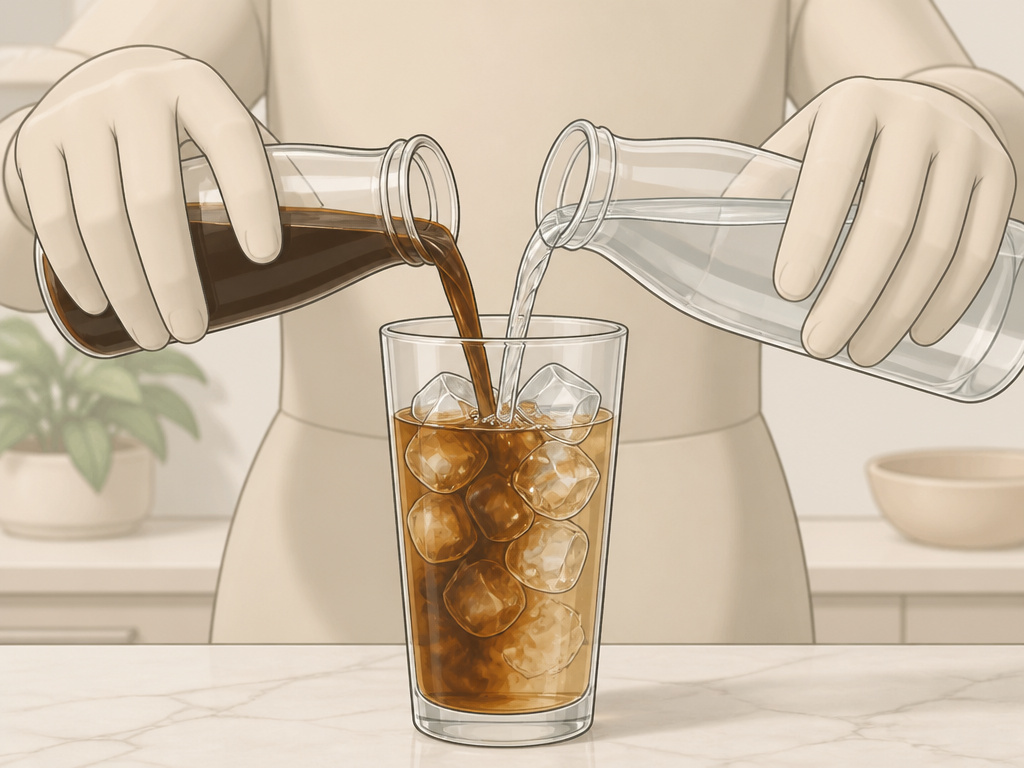
Concentrate is too strong to drink straight. Dilution is where you customize.
Start with a 1:1 ratio of concentrate to water, milk, or a milk alternative over ice. That is a standard strength. Adjust to taste. For a stronger kick, try 2 parts concentrate to 1 part water. For a milder drink, reverse it. The caffeine content of your final cup depends on this ratio and the original beans, but a 1:1 dilution from a standard concentrate is roughly equivalent to a strong drip coffee.
Beyond iced coffee, concentrate is versatile. Add a shot to a smoothie. Use it as the liquid in chocolate cake or brownie batter for a deep mocha flavor. Make a coffee ice cube tray to chill iced coffee without diluting it. You can even use it as a base for coffee cocktails.
Storage of the diluted drink is different from the concentrate. Once diluted, consume it within a day or two. You have reintroduced water and lowered the preservative concentration of soluble solids.
Troubleshooting Your Batch
Problems usually trace back to grind size, time, or filtration.
The concentrate tastes sour or weak. Your ratio was likely off, probably too much water. Always weigh your coffee and water. Alternatively, the steep time was too short, try 18 hours next time. The beans might also be a very light roast not suited for cold extraction.
The concentrate is bitter and astringent. The grind was too fine, or you steeped for too long (over 24 hours). Fine grounds over-extract tannins. Next time, grind coarser and cap the steep at 18 hours. Also, ensure your filtration was thorough; bitterness can come from fine silt left in the bottle.
Filtration is taking forever. The grind is too fine and is clogging the filter. For this batch, you may need to let it sit and drain slowly, do not squeeze the filter, as that forces bitter solids through. For the next batch, use a much coarser grind. If using a paper filter, try a cone-style filter in a dripper, which has more surface area than a flat-bottomed strainer.
The concentrate developed mold or an off smell in the fridge. The storage container was not perfectly clean or airtight. Always use a thoroughly cleaned glass jar with a tight seal. Do not store it in the vessel you brewed in, as grounds stuck to the sides can spoil. The concentrate itself, if made correctly, is hostile to microbial growth, but contamination from dirty equipment can introduce problems.
Frequently Asked Questions
How long does homemade coffee concentrate last?
Properly made and stored in a clean, airtight glass jar in the refrigerator, coffee concentrate will maintain peak flavor for up to two weeks. Signs it has gone bad are a vinegary smell, visible mold, or a distinctly sour taste beyond normal coffee acidity.
Can I use hot water to make coffee concentrate faster?
You can make a hot brew concentrate, but it is a different product. Using hot water (like in a Moka pot or strong drip method) extracts different acids and oils, resulting in a concentrate that is brighter and more acidic. It also has a much shorter shelf life, typically 3-4 days in the fridge, because the heat accelerates oxidation reactions that lead to staleness.
What’s the difference between cold brew and coffee concentrate?
All coffee concentrate is made via a cold brew method, but not all cold brew is a concentrate. “Cold brew” typically refers to a ready-to-drink beverage brewed at a ratio like 1:12. “Coffee concentrate” is brewed at a much stronger ratio (like 1:8) specifically to be diluted later. The concentrate has a higher soluble solids content for shelf stability.
Do I need a special grinder?
burr grinder set to coarse is ideal for consistency. Blade grinders or blenders can work if you pulse carefully, but they create a mix of fine and coarse particles that can lead to over-extraction and difficult filtration. For best results, invest in a burr grinder.
Can I use pre-ground coffee?
You can, if it is labeled for “cold brew” or “French press,” which indicates a coarse grind. Standard pre-ground coffee for drip machines is too fine and will make a bitter, sludgy concentrate. Always check the grind size.
Before You Go
Making real coffee concentrate boils down to three rules: weigh your coffee and water for a true 1:8 ratio, grind the beans coarse to avoid bitterness, and filter twice for a clean, stable product. The Toddy system simplifies the process, but a large jar, a strainer, and a pack of paper filters work perfectly. This method is about building a staple ingredient for your kitchen, not just a single drink. A batch in the fridge means iced coffee, coffee desserts, or a quick hot cup is always seconds away, with a flavor that holds up for the whole week. Skip the weak imitations. Build the base right.
{
“@context”: “https://schema.org”,
“@type”: “HowTo”,
“name”: “How to Make Coffee Concentrate at Home”,
“totalTime”: “PT18H20M”,
“tool”: [
{
“@type”: “HowToTool”,
“name”: “Large glass jar or pitcher (1.5-2 liter capacity)”
},
{
“@type”: “HowToTool”,
“name”: “Coarse-grind coffee beans”
},
{
“@type”: “HowToTool”,
“name”: “Fine-mesh strainer”
},
{
“@type”: “HowToTool”,
“name”: “Paper coffee filters or cheesecloth”
},
{
“@type”: “HowToTool”,
“name”: “Airtight glass storage bottle”
}
],
“step”: [
{
“@type”: “HowToStep”,
“name”: “Grind and measure”,
“text”: “Grind 1 cup (about 85 grams) of coffee beans to a coarse, sea-salt consistency. Add it to your clean brewing vessel.”
},
{
“@type”: “HowToStep”,
“name”: “Add cold water”,
“text”: “Pour 4 cups (about 950 ml) of cold, filtered water over the grounds, ensuring all are saturated. Stir gently.”
},
{
“@type”: “HowToStep”,
“name”: “Steep”,
“text”: “Cover the vessel and let it sit at room temperature for 12 to 18 hours. A longer steep yields stronger flavor.”
},
{
“@type”: “HowToStep”,
“name”: “Strain the concentrate”,
“text”: “Place a fine-mesh strainer lined with a damp paper filter or cheesecloth over a bowl. Slowly pour the steeped mixture through to separate the liquid from the grounds.”
},
{
“@type”: “HowToStep”,
“name”: “Store”,
“text”: “Transfer the strained coffee concentrate to a clean, airtight glass bottle. Refrigerate for up to two weeks.”
}
]
}
{
“@context”: “https://schema.org”,
“@type”: “FAQPage”,
“mainEntity”: [
{
“@type”: “Question”,
“name”: “How long does homemade coffee concentrate last?”,
“acceptedAnswer”: {
“@type”: “Answer”,
“text”: “Properly made and stored in a clean, airtight glass jar in the refrigerator, coffee concentrate will maintain peak flavor for up to two weeks. Signs it has gone bad are a vinegary smell, visible mold, or a distinctly sour taste beyond normal coffee acidity.”
}
},
{
“@type”: “Question”,
“name”: “Can I use hot water to make coffee concentrate faster?”,
“acceptedAnswer”: {
“@type”: “Answer”,
“text”: “You can make a hot brew concentrate, but it is a different product. Using hot water (like in a Moka pot or strong drip method) extracts different acids and oils, resulting in a concentrate that is brighter and more acidic. It also has a much shorter shelf life, typically 3-4 days in the fridge, because the heat accelerates oxidation reactions that lead to staleness.”
}
},
{
“@type”: “Question”,
“name”: “What’s the difference between cold brew and coffee concentrate?”,
“acceptedAnswer”: {
“@type”: “Answer”,
“text”: “All coffee concentrate is made via a cold brew method, but not all cold brew is a concentrate. \”Cold brew\” typically refers to a ready-to-drink beverage brewed at a ratio like 1:12. \”Coffee concentrate\” is brewed at a much stronger ratio (like 1:8) specifically to be diluted later. The concentrate has a higher soluble solids content for shelf stability.”
}
},
{
“@type”: “Question”,
“name”: “Do I need a special grinder?”,
“acceptedAnswer”: {
“@type”: “Answer”,
“text”: “burr grinder set to coarse is ideal for consistency. Blade grinders or blenders can work if you pulse carefully, but they create a mix of fine and coarse particles that can lead to over-extraction and difficult filtration. For best results, invest in a burr grinder.”
}
},
{
“@type”: “Question”,
“name”: “Can I use pre-ground coffee?”,
“acceptedAnswer”: {
“@type”: “Answer”,
“text”: “You can, if it is labeled for \”cold brew\” or \”French press,\” which indicates a coarse grind. Standard pre-ground coffee for drip machines is too fine and will make a bitter, sludgy concentrate. Always check the grind size.”
}
}
]
}
