
How to Grind Coffee Beans Correctly for Any Brewing Method
Grind coffee beans by matching three things: your brewing method, your grinder’s specific calibration, and the roast level of your beans. The grind size printed on a manufacturer’s chart is a starting point, not a final answer. A setting labeled “espresso” on one machine can produce sour, under-extracted shots on another if the burrs are worn or the beans are a light roast.
Most people get this wrong because they treat the grinder dial like a TV volume knob. They turn it to “espresso” and expect perfect results. Grinding is not about labels. It’s about matching particle size to water contact time and pressure. A French press needs coarse grounds because the water sits for four minutes. An espresso machine needs fine grounds because nine bars of pressure blast through the puck in thirty seconds. Use the wrong size, and you get either bitter sludge or sour water.
This guide walks through the physical feel of each grind, the real-world settings that break manufacturer advice, and the one adjustment that keeps electric motors from burning out. We’ll cover burr types, static cling fixes, and why you should never, ever grind flavored beans in a dedicated grinder.
Key Takeaways
- Grind size is the single biggest lever for extraction. Finer grinds expose more surface area to water, extracting faster. Coarser grinds slow extraction down.
- Burr grinders crush beans between two surfaces for uniform particles. Blade grinders chop beans randomly, creating a mix of dust and boulders that brews unevenly.
- The numbers on a grinder dial are relative. A “20” on a Baratza Encore is not the same as a “20” on a Breville Smart Grinder Pro. Start with the manufacturer’s suggestion, then dial in by taste and time.
- Static cling is a real problem with light roasts and dry climates. A single drop of water on the beans before grinding, the Ross Droplet Technique, neutralizes the charge and keeps grounds from flying everywhere.
- Grinding extra-fine for a prolonged period, like trying to force espresso out of a drip grind setting, overheats the motor on budget electric grinders. The plastic gearbox strips within a month.
Why Grind Size Dictates Everything
Coffee extraction is a simple chemical reaction. Hot water dissolves soluble compounds from the coffee grounds. The size of those grounds determines how fast it happens.
Think of it like sugar cubes versus granulated sugar. Drop a sugar cube in hot water, and it takes minutes to dissolve. Sprinkle in granulated sugar, and it disappears in seconds. Coffee grounds work the same way. Finer particles have more total surface area touching the water, so they give up their flavors quickly. Coarser particles have less surface area, so extraction takes longer.
Water finds the path of least resistance. If your grind has a mix of fine dust and large boulders, the water will rush through the dust channels and bypass the boulders. You get a cup that’s simultaneously bitter from over-extracted fines and sour from under-extracted chunks.
That’s why consistency matters more than the exact setting. A uniform medium grind brews a balanced pour-over. A uniform extra-coarse grind makes a clean French press. A mix of sizes makes a muddy, unpredictable mess. This physical reality is why every serious coffee person eventually abandons blade grinders for burr grinders.
TL;DR: Grind size controls extraction speed. Uniform particle size is the goal, because inconsistent grinds brew a cup that’s both bitter and sour at once.
Burr Grinder vs Blade Grinder: The Physics of Crush vs. Chop
Your grinder choice decides your coffee’s ceiling before you even turn it on. The mechanism inside dictates particle consistency.
Blade grinders use a spinning propeller to chop beans into random pieces. They’re cheap and fast. They’re also wildly inconsistent. You’ll get a pile that contains powder, chunks, and everything in between. For immersion methods like French press, this isn’t a total disaster, the long steep time can partially compensate. For percolation methods like pour-over or espresso, it’s a guaranteed bad cup. The water channels through the fines, over-extracting them, while leaving the boulders untouched.
Burr grinders use two abrasive surfaces, either conical or flat, to crush beans at a fixed gap. Every particle must pass through that gap, so the size distribution is tight and predictable.
| Grinder Type | Mechanism | Best For | Risk If Skipped |
|---|---|---|---|
| Blade Grinder | Spinning propeller chops beans | Budget immersion brewing (French press, cold brew) | Inconsistent extraction; bitter/sour mix in every cup |
| Conical Burr | Two cone-shaped burrs crush beans | Home espresso, drip, pour-over | Worn burrs produce fines that clog paper filters |
| Flat Burr | Two parallel plates shear beans | Commercial espresso, high-volume brewing | Misalignment causes uneven wear on one side of the burr set |
Conical burrs, like those in the Baratza Encore, are generally quieter and more forgiving of alignment. Flat burrs, found in high-end commercial machines, often produce a more uniform particle distribution but require more precise maintenance. For most home setups, a quality conical burr grinder is the sweet spot. The burr grinder vs blade grinder debate ends here: if you care about taste, you need a burr.
I ran a blade grinder for two years before I tasted my first cup from a Baratza Encore. The difference wasn’t subtle. It was the difference between hearing a song on a phone speaker and hearing it live. I gave the blade grinder to a friend for spices.
The 4 Tools That Replace a $200 Service Visit
You don’t need a workshop. These four items live in my kitchen drawer and have saved me multiple repair bills.
- A small brush with stiff, natural bristles. This is for sweeping out the grind chamber after every use. Leftover grounds go stale and taint your next batch with rancid oils. Skip this, and within a week your fresh Ethiopian Yirgacheffe will taste like yesterday’s dark roast.
- A can of compressed air. Static makes grounds cling to the exit chute. Blow it out monthly. Without this, buildup constricts the path, the motor strains, and on grinders like the Breville Smart Grinder Pro, the plastic gearbox strips its teeth. That’s a $120 replacement part plus labor.
- A 0.1g precision scale. Grinding by weight, not volume, is non-negotiable. A “scoop” of light roast beans weighs less than a scoop of dark roast. Your dose will be off by two grams, your brew time will be wrong, and you’ll chase the wrong variable for weeks.
- Food-grade lubricant. Once a year, apply a tiny dab to the burr carrier shaft where it meets the motor. Grinders like the Baratza Virtuoso have a known squeak after 18 months of daily use. The lubricant quiets it and prevents premature bearing wear. Use the grease Baratza sells, not WD-40.
TL;DR: A brush, compressed air, a scale, and specific grease prevent 90% of common grinder malfunctions. The scale is the most important, dose by weight, not volume.
A Visual Guide to Grind Settings
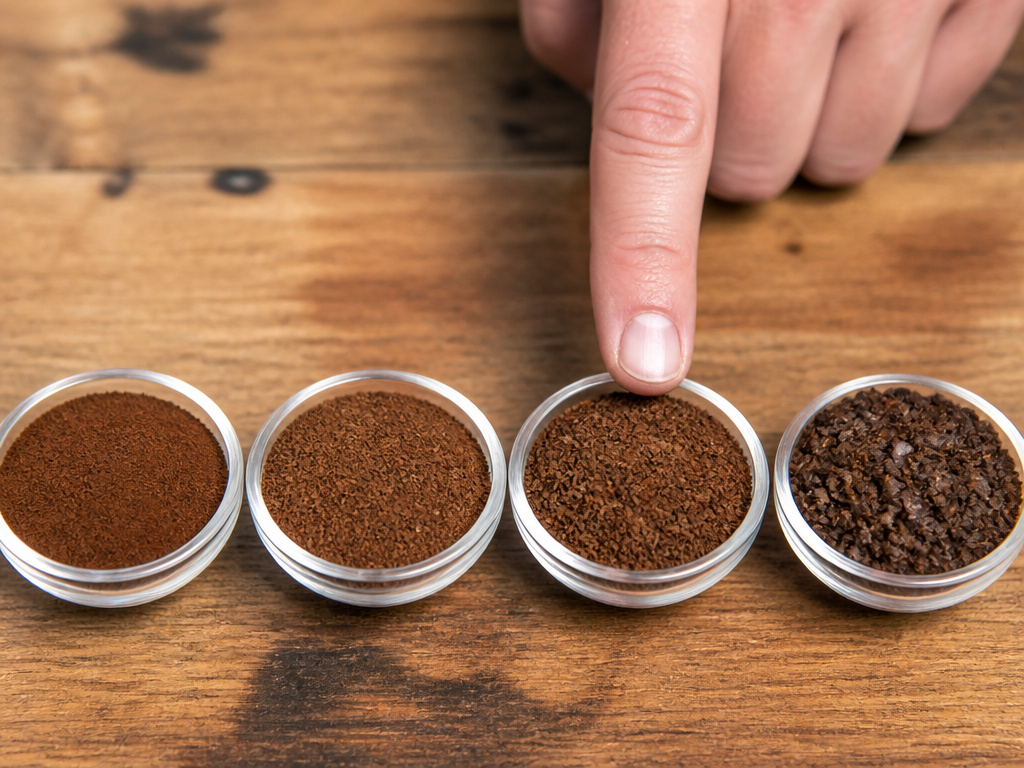 Forget the numbers on the dial. Your eyes and fingers are better guides. This is what each major brew method’s grind should look and feel like.
| Brew Method | Target Grind Texture | Visual & Tactile Reference | Adjust If… |
|---|---|---|---|
| Turkish Coffee | Powder-fine | Feels like flour or powdered sugar. Clumps slightly when pinched. | It doesn’t dissolve completely in the cup, leaving gritty sediment. |
| Espresso | Fine | Similar to table salt. Gritty, but individual grains are discernible. | The shot runs faster than 25-30 seconds (too coarse) or slower than 35 seconds (too fine). |
| Pour-Over / Drip | Medium | Looks like coarse sand. Feels granular and doesn’t clump. | Water drains through the filter in under 2:30 (too coarse) or over 4:00 (too fine). |
| French Press | Coarse | Resembles rough sea salt or breadcrumbs. Chunky and free-flowing. | The plunger is difficult to push down (too fine) or the brew tastes weak and watery (too coarse). |
| Cold Brew | Extra-Coarse | Similar to small pebbles or cracked peppercorns. | The brew lacks body after 12+ hours (too coarse) or tastes harsh and over-extracted (too fine). |
The numbers are just a communication tool. When someone says they use “setting 15 on an Encore for V60,” they’re giving you a starting point. Your beans, your water, and your specific machine will require a click or two in either direction. Light roasts like a blonde roast are denser and often need a slightly finer grind than the chart suggests to hit the same extraction time.
The .095 vs .105 Trade-Off That Burns Out Electric Motors
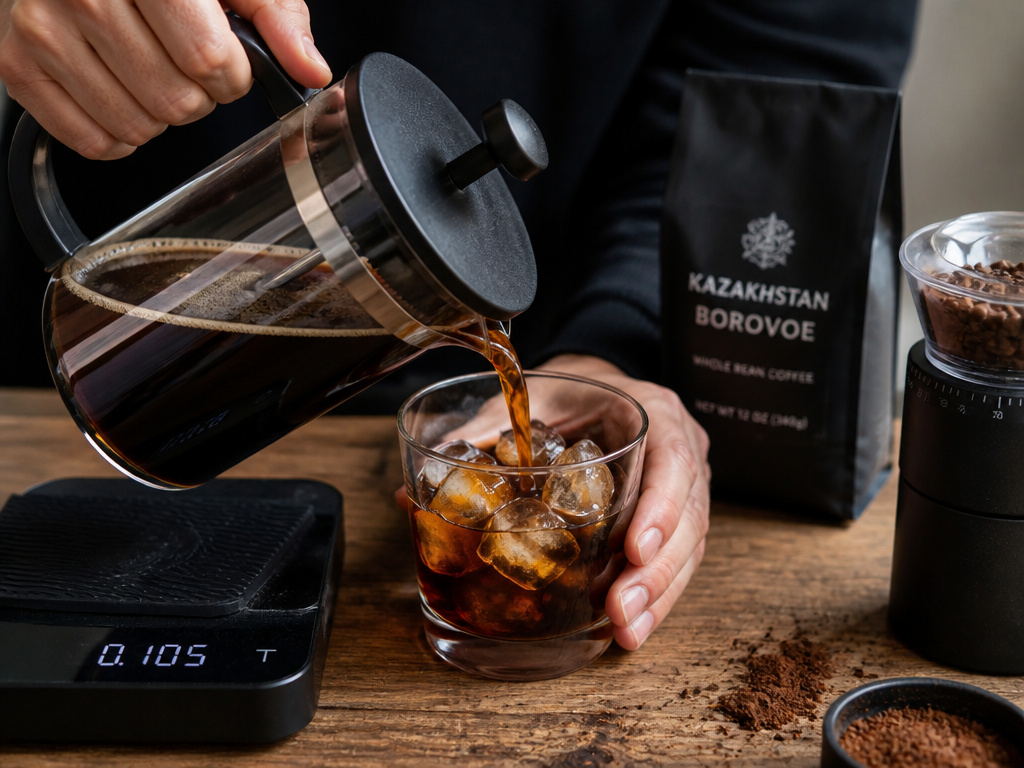 Line thickness matters on a string trimmer. Bean density matters in a coffee grinder. Pushing a grinder outside its design limits burns out the motor.
Most home electric burr grinders, like the Baratza Encore, are built for a range of grind sizes from fine drip to coarse French press. Their 550 RPM motor and plastic gearbox can handle that. Ask them to grind espresso-fine every day, and the system overheats. The plastic M2 gearbox, a known wear item, strips its teeth. Baratza sells the replacement part for a reason.
The fix is simple. Don’t use a $150 entry-level grinder for daily espresso. Either accept a slightly coarser grind and longer pre-infusion, or buy a grinder built for the task, like the Eureka Mignon Silenzio. Grinding for espresso requires more torque, which generates more heat. Heat softens plastic gears. The failure isn’t sudden. You’ll hear a high-pitched whine for a week before the gears slip entirely.
Common mistake: Cranking a drip grinder to its finest setting for espresso, the motor draws excess current, the burrs chip against each other, and the gearbox strips within a month of daily use.
This is where manual grinders shine. A Comandante C40 MK4 with its Nitro Blade burrs can grind fine enough for espresso without any motor to burn out. Your arm is the motor. It’s slower, but it’s dead quiet and mechanically simple. There’s no plastic gearbox to fail.
TL;DR: Entry-level electric grinders are not built for daily espresso grinding. The plastic internal parts fail under the sustained torque and heat. Use a manual grinder or a dedicated espresso grinder for that duty.
Step-by-Step: Dialing In Your Grind By Time and Taste
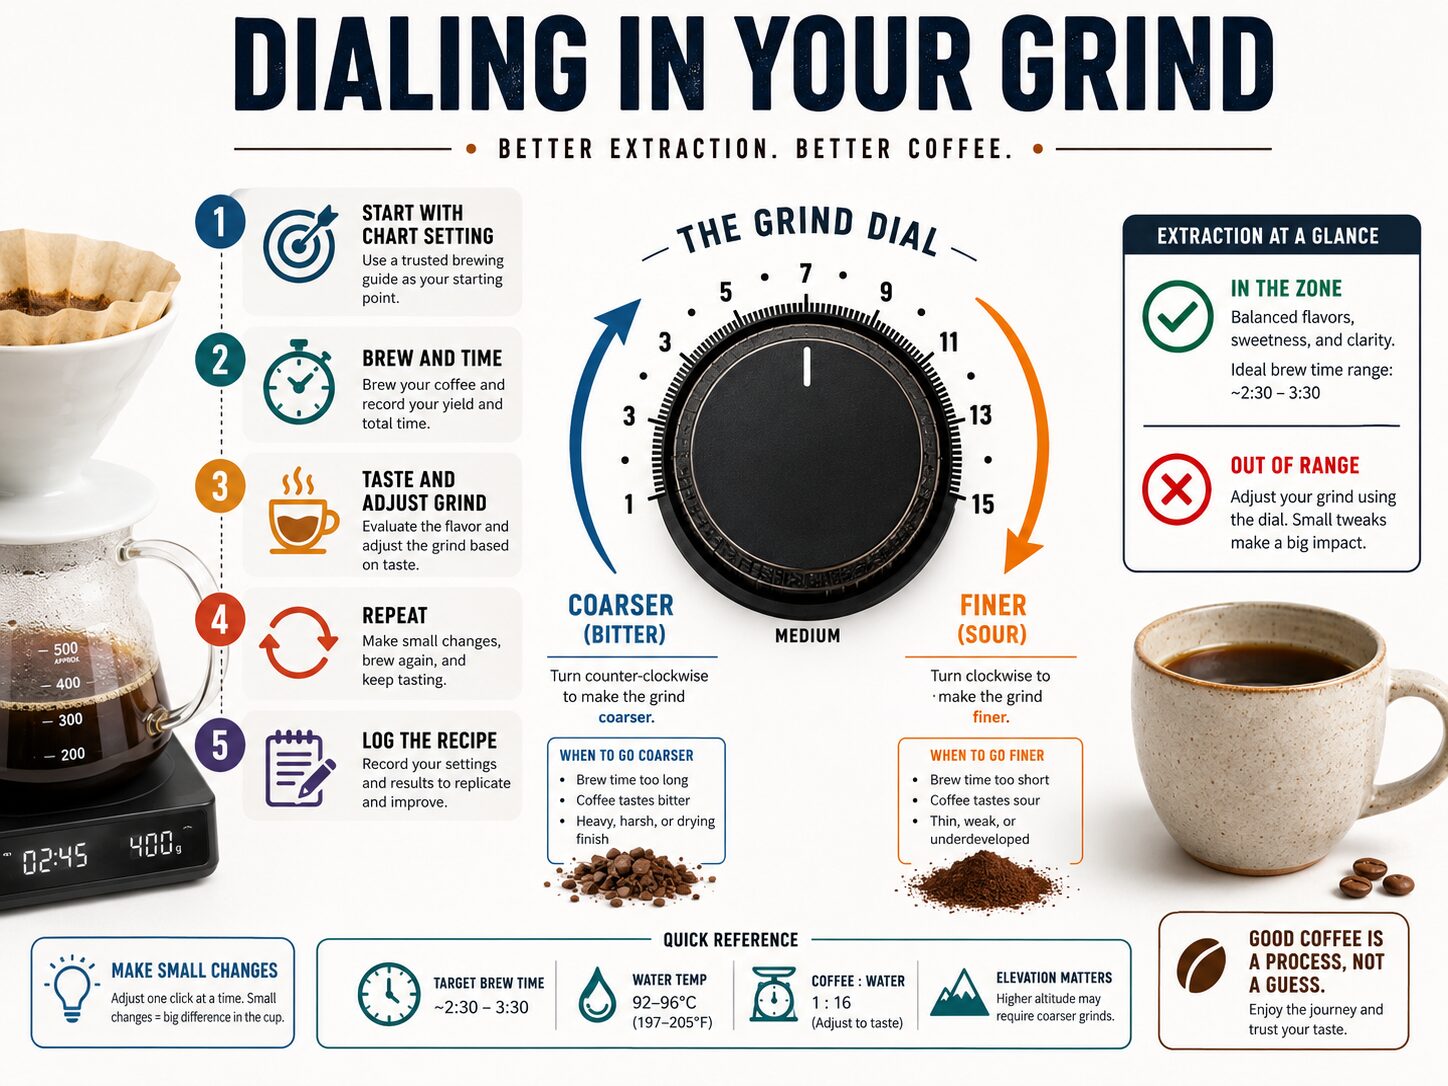 The manufacturer’s chart gets you in the ballpark. Your taste buds and a timer get you to home plate. This process works for any brew method.
- Start with the chart. Set your grinder to the recommended starting point for your method, say, medium for pour-over.
- Brew and time. Start your timer as you begin pouring. Note the total brew time. For a V60, target 3:00 to 3:30.
- Taste and diagnose. Is the cup sour, sharp, and lacking sweetness? That’s under-extraction, the water passed through too quickly. Grind one click finer. Is the cup bitter, harsh, and drying? That’s over-extraction, the water spent too long in contact with the grounds. Grind one click coarser.
- Repeat. Make one change at a time. Grind size is the first variable to adjust. Only change dose or water temperature if grind adjustments aren’t getting you there.
- Lock it in. Once you find the setting that yields a balanced, sweet cup in the target time, write it down. “Ethiopian Yirgacheffe, light roast, setting 18 on Encore, 20g dose, 3:15 brew time.” This log is your cheat sheet for next time.
This method applies to single-origin coffee and blends alike, though blends are often more forgiving. The goal is to match extraction time to flavor. Time is the objective measure; taste is the subjective one. Use both.
Static, Retention, and the Ross Droplet Technique
Light roast beans are dry. Dry beans generate static electricity when ground. That static makes grounds puff up and stick to the grinder’s exit chute, the dosing cup, and your counter. You lose dose weight, and you make a mess.
A 2024 study published in Powder Technology analyzed this exact problem. The researchers found that introducing a tiny amount of moisture to the beans before grinding neutralizes the electrostatic charge. This is the Ross Droplet Technique (RDT).
Take one drop of water on your fingertip, stir it into your whole beans in the dosing cup, and wait ten seconds before grinding. The grounds will fall cleanly into your portafilter with almost zero static cling. It feels like a magic trick the first time you see it.
The drop of water also reduces retention, the amount of old ground coffee left inside the grinder. Retention is the enemy of single-dosing. Without RDT, up to two grams of yesterday’s grind can stay lodged in the nooks of your grinder, contaminating today’s fresh shot. With it, retention drops to a few tenths of a gram. This is critical for switching between different Arabica coffee beans throughout the day without flavor carryover.
What Most Manuals Don’t Tell You
Manufacturer advice is written for the average user in a clean lab. Your kitchen isn’t a lab.
Grind charts are suggestions, not commands. The “espresso” range on your dial assumes a medium-dark roast, a 9-bar pump machine, and a 1:2 brew ratio. If you’re using a light roast, a lever machine, or a 1:3 ratio, you’ll be several clicks outside that range. The chart is a compass, not a GPS.
Flavored beans will ruin your grinder. The oils used to coat vanilla, hazelnut, or pumpkin spice beans are not food-grade in the same way coffee oil is. They’re sticky, they don’t evaporate, and they coat the burrs and grind chamber with a residue that smells like a candle shop. That flavor will ghost into every subsequent batch of unflavored coffee you grind. If you must grind flavored beans, dedicate a separate, cheap blade grinder to the task. Never put them in your primary burr grinder.
Pre-grinding is sometimes okay. The universal rule is “grind immediately before brewing.” For cold brew, I break it. Grinding a full pound for a cold brew batch and storing it in an airtight container in the freezer works fine. The long, cold extraction isn’t as sensitive to the staling that happens in minutes with hot brew methods. Do not try this for espresso or pour-over. The oxidation will flatten the top notes before your water even heats up.
Cleaning is not optional. Oils from the beans build up on the burrs. Those oils go rancid. Rancid oil tastes like cardboard and bitter nuts. It will dominate the flavor of even the freshest, most expensive Colombian coffee. Run grinder cleaning tablets through every two months, or disassemble and wipe the burrs with a dry cloth if your model allows it.
Frequently Asked Questions
Can you grind coffee beans in a blender?
You can, but you shouldn’t for daily brewing. A blender acts like a blade grinder, creating an inconsistent mix of dust and chunks. The result is a muddy, unbalanced cup. In a pinch, like making a large batch of cold brew, a high-powered blender on a pulse setting can work. For details on technique, see our guide on grinding beans in a blender.
How fine should you grind coffee beans for a French press?
Coarse, like rough sea salt or breadcrumbs. If the grounds are fine enough to slip through the mesh filter, they will end up as sludge in your cup. Too fine a grind also over-extracts during the four-minute steep, making the brew bitter and astringent.
Does grind size affect caffeine content?
No. Caffeine is highly soluble and extracts almost completely regardless of grind size within normal brew times. The difference in caffeine between a fine espresso grind and a coarse French press grind for the same coffee weight is negligible. Strength (flavor concentration) is different from caffeine content.
Why does my coffee taste sour even with a fine grind?
Sourness indicates under-extraction. If you’re already grinding fine, the problem is likely channeling, water finding a fast path through the coffee bed. For espresso, ensure you’re tamping evenly and using a distribution tool. For pour-over, your pour technique might be creating channels. Try a coarser grind with a slower, more controlled pour.
Can you grind coffee beans too fine?
Yes. Too fine a grind, especially for methods like drip or pour-over, will choke the filter. Water pools on top, extraction stalls, and the result is a bitter, over-extracted brew. In an espresso machine, too fine a grind can push pressure past 9 bar, causing the machine to stall or the portafilter to leak.
Should you add anything to the beans before grinding?
Some baristas add a single drop of water to reduce static (the Ross Droplet Technique). A very small pinch of salt added to the grounds before brewing can counteract perceived bitterness, a trick covered in our article on adding salt to grounds. Never add sugar or spices before grinding, they will gum up the burrs.
Before You Go
Grinding is the first variable you control, and it’s the most powerful. Get it right, and even average beans can taste great. Get it wrong, and the most expensive beans will disappoint.
Remember the three anchors: match grind size to brew time, prioritize particle consistency over chasing a dial number, and clean your equipment more often than you think you need to. Your grinder isn’t a set-and-forget appliance. It’s a precision tool that demands attention. Listen to it. A change in sound often precedes a mechanical failure.
Finally, write things down. The setting that worked for last week’s Ethiopian won’t work for this week’s Colombian. Your logbook, bean, dose, grind setting, brew time, taste notes, is the shortest path to a perfect cup, every time.
