
How to Clean Your Coffee Pot with White Vinegar in 5 Steps
To clean a coffee pot with white vinegar, use a 1:1 vinegar-water solution, start a brew cycle, pause it halfway for a 60-minute soak to dissolve limescale, then finish. Run three full water-only rinse cycles to flush all residue and prevent a sour taste in your next brew.
To clean a coffee pot with white vinegar, use a 1:1 vinegar-water solution in the reservoir, start a brew cycle, pause it halfway to let the solution soak for 60 minutes, then finish the cycle. Follow with three complete water-only rinse cycles to flush all vinegar residue. The 60-minute soak is critical for dissolving hard limescale deposits that a quick pass-through will miss.
Most people rush the process. They run a full vinegar cycle straight through, dump it, and run one quick rinse. The machine looks clean, but the internal tubing still holds dissolved minerals that re-deposit within a week. Your next pot of coffee tastes faintly sour, and the heating element works harder.
This guide walks through the exact steps, explains why the soak time matters, and shows you how to get every last trace of vinegar out so your coffee tastes like coffee again.
Key Takeaways
- A 60-minute soak with the vinegar solution inside the machine dissolves limescale that a fast cycle leaves behind.
- Always run three full water-only brew cycles after descaling. One rinse leaves enough vinegar to ruin the next pot.
- Never use vinegar full-strength in a Keurig or single-serve machine. The Keurig K-Duo manual specifies a 10 oz vinegar dose followed by three 12 oz water rinse brews.
- If a vinegar odor lingers, a baking soda solution brew neutralizes it. Skip this step and your coffee will taste off.
- Clean the external carafe and filter basket separately with soapy water. Vinegar only handles the internal plumbing.
Why Vinegar Works (And When It Doesn’t)
Vinegar’s acetic acid reacts with calcium carbonate, the main compound in limescale. The reaction produces water, carbon dioxide gas, and soluble calcium acetate, which washes away. That’s the theory.
In practice, the reaction needs time. A 5-minute pass-through of vinegar-water touches the deposits but doesn’t dissolve them fully. The remaining scale re-crystallizes inside the narrow tubes and on the heating element. You get a false clean.
A 60-minute soak with the vinegar solution sitting in the water reservoir and internal tubing gives the acid time to fully penetrate and break down the mineral matrix. The Keurig K-Duo Series Brewer Use & Care Guide recommends a descale cycle every 3 months, which aligns with the buildup rate in most municipal water supplies.
The method fails on two fronts. First, vinegar will not remove oily coffee residue from the carafe or basket. That requires detergent. Second, vinegar can damage rubber seals and gaskets in some older or specialty machines if used too frequently or at full strength. Always check your Braun coffee maker manual or Black & Decker coffee maker guide for manufacturer-specific warnings.
TL;DR: Vinegar dissolves limescale via a chemical reaction that needs a full hour of contact time. It does not cut through coffee oils.
The 7-Step Vinegar Descale Process
Follow this sequence exactly. Skipping the soak or shorting the rinse is why most DIY descaling attempts fail.
- Empty everything. Dump old coffee, discard the used filter, and remove any grounds from the basket. A clean start matters.
- Mix your solution. For a standard drip machine, a 1:1 ratio of white vinegar to water fills the reservoir. For a Keurig, use the manufacturer’s ratio, often 10 oz of vinegar topped with water, as specified in the manual.
- Start the cycle, then pause. Place an empty carafe on the warming plate. Start a brew cycle without a filter. When the reservoir is about half empty, pause the cycle. Turn the machine off. Let it sit for 60 minutes.
- Complete the brew. After the hour, turn the machine back on to finish the cycle. You’ll see cloudy, warm vinegar-water in the carafe.
- Rinse three times. Dump the vinegar water. Fill the reservoir with fresh water only. Run a full brew cycle and discard that water. Repeat this two more times. Three cycles is the minimum to clear the vinegar taste.
- Hand-wash the carafe and basket. Use warm, soapy water and a non-abrasive sponge. Vinegar didn’t touch these parts.
- Reassemble and run a test. Put the clean, dry carafe and basket back. Run one final water-only cycle through to ensure everything is seated and heating correctly. Discard that water.
Common mistake: Running only one rinse cycle after descaling, leftover vinegar in the internal lines taints the next several pots of coffee with a sour, astringent note that mimics over-extraction.
The pause is the step everyone wants to skip. Don’t. The difference between a 5-minute cycle and a 60-minute soak is the difference between a temporarily clearer machine and one that stays scale-free for months.
What Type of Vinegar to Use
You need white distilled vinegar, typically labeled 5% acidity. This is the standard grocery-store variety.
Apple cider vinegar or cleaning vinegar has impurities and odors that linger. Malt vinegar will smell. White wine vinegar is a waste of money. The pure, clear white distilled vinegar is the only type that fully rinses out.
Cleaning vinegar, sold at higher concentrations like 6% or 10%, works faster but is more aggressive on rubber seals. I stick with standard 5% for my monthly maintenance. The extra minute of soak time is cheaper than replacing a leaky gasket.
| Vinegar Type | Acidity | Best For | Risk If Used |
|---|---|---|---|
| White Distilled | 5% | All coffee makers | None when diluted |
| Cleaning Vinegar | 6–10% | Severe, neglected scale | May degrade seals over time |
| Apple Cider | 5% | Not recommended | Leaves persistent sweet odor |
| Malt Vinegar | 5% | Not recommended | Leaves persistent savory odor |
TL;DR: Only white distilled vinegar at 5% acidity. Everything else leaves a smell or damages parts.
The Critical Rinse: Why Three Cycles?
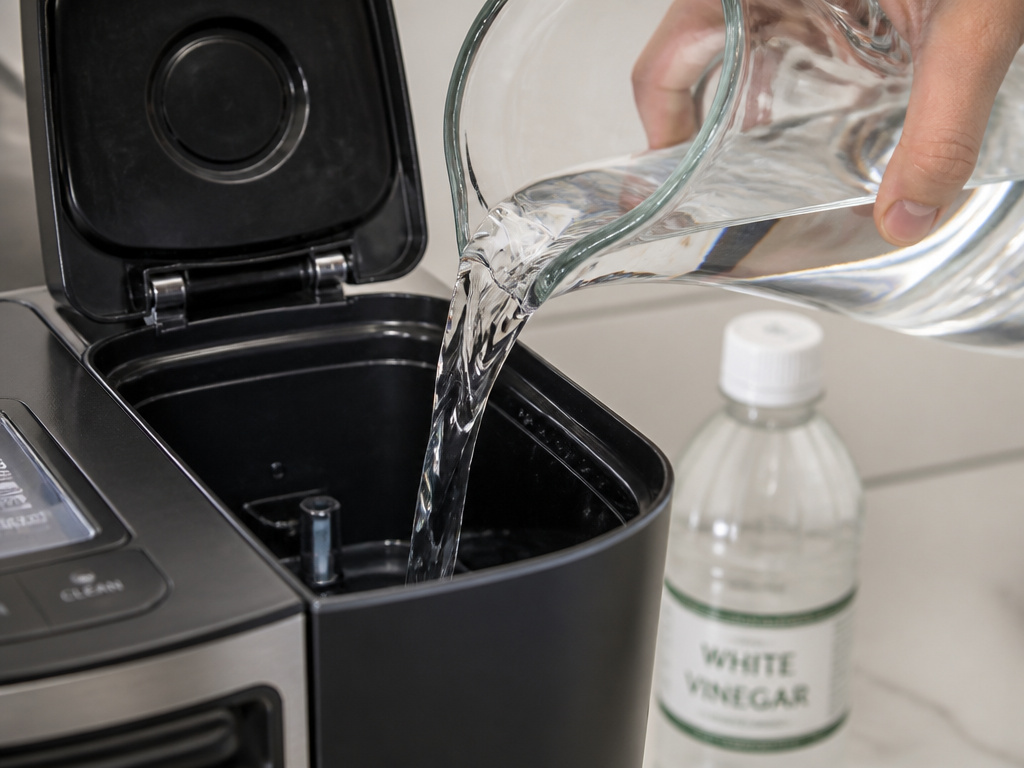
Vinegar is tenacious. A single water cycle flushes the reservoir and the most direct tubing. The second cycle pulls residual vinegar from the pump and smaller channels. The third cycle guarantees what’s in the heating chamber and outlet pipe is pure water.
Skipping to two cycles often leaves a faint sourness. I learned this the hard way with a Breville coffee machine filter system. One rinse after descaling, and the next coffee batch tasted like someone had squeezed a lemon into the pot. The machine’s complex internal path needed the extra flush.
For Keurig and pod machines, the Bunn coffee pot filters and internal needles are especially vulnerable to clogging by re-hardened minerals if not fully rinsed. Three cycles are non-negotiable.
Run three full water-only brew cycles after the vinegar descale. Two leaves enough residual acid to taint your next pot, and one guarantees it.
The third cycle also reheats the entire system, ensuring any final droplets evaporate. A damp, vinegar-laced machine stored overnight will grow mildew. The third cycle heats it dry.
When to Use Baking Soda (And When to Avoid It)
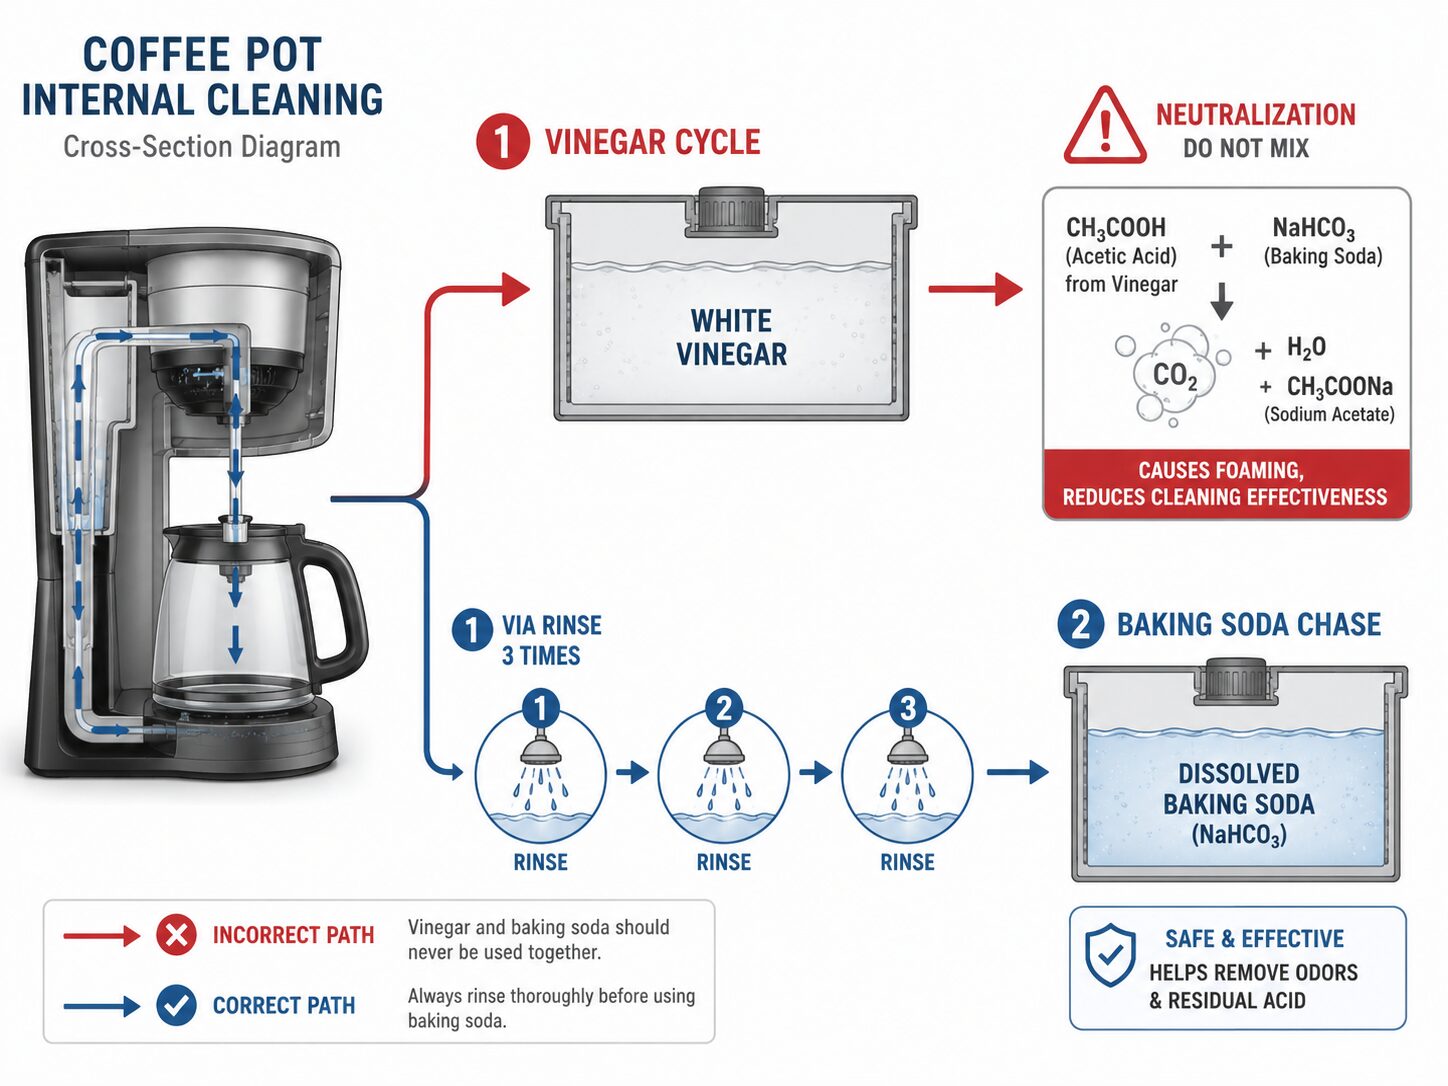
Baking soda is a base. Vinegar is an acid. If you mix them in the same cycle, they neutralize each other into saltwater and carbon dioxide foam, accomplishing nothing.
Use baking soda only as a follow-up, separate step if a vinegar odor persists after the three rinse cycles. Dissolve one tablespoon of baking soda in a full reservoir of water. Run that through a complete brew cycle. Then run two more plain water rinse cycles.
This baking soda chase neutralizes any last traces of acetic acid smell. It’s a fix for older machines with porous plastic internals that absorb vinegar.
Do not use baking soda as a primary descaler. It does not dissolve limescale. It can leave a sodium residue that accelerates future scale buildup.
How Often Should You Descale?

The answer depends on your water hardness and how much coffee you brew.
- Soft water / daily use: Every 3 months.
- Hard water / daily use: Every 4–6 weeks.
- Soft water / weekly use: Every 6 months.
- Hard water / weekly use: Every 3 months.
Hard water leaves mineral deposits faster. The Keurig K-Duo manual’s 3-month recommendation assumes typical municipal water and daily brewing. If your kettle develops a white film after a week, move to the 4–6 week schedule.
You’ll know it’s time when the machine takes longer to brew, the coffee tastes flat or slightly metallic, or you see visible scale flakes in the carafe. Waiting until the heater fails is a $100 repair.
TL;DR: For most daily brewers on city water, descale every 90 days. For well water or visible scale, do it monthly.
What About the Carafe Stains Vinegar Won’t Touch?
Vinegar descales the machine’s internals. It does almost nothing for the baked-on coffee oils and tannins staining the glass carafe. Those need mechanical abrasion or a chemical designed for organic residue.
For glass carafes, make a paste of baking soda and water. Scrub with a soft sponge. For plastic or thermal carafes, use a dilute solution of dish soap and warm water. Never use steel wool or abrasive pads, they scratch.
For ceramic or stoneware mugs, the same baking soda paste works. The key is the mild abrasive action, not the chemistry.
I keep a dedicated soft-bristle brush for carafe cleaning. A bottle brush with a long handle reaches the bottom curve where stains concentrate.
If you use paper filters, switching between bleached vs unbleached coffee filters can affect residue. Unbleached filters sometimes leave more paper fibers, but they don’t change the oil buildup. For a truly clean carafe, hand-wash it with soap after every use, not just when you descale.
Descaling a Keurig or Single-Serve Machine
The principle is the same, but the execution differs. You cannot just pour vinegar into the reservoir.
- Check the manual. The Braun coffee maker instructions for a specific model or the Keurig guide will give the exact vinegar amount and cycle name. For the Keurig K-Duo, it’s 10 oz of vinegar.
- Use the descale mode. Most Keurigs have a dedicated descale cycle under settings. It controls the pump and heater to avoid damage.
- Skip the pod. Run the cycle with no K-Cup or pod in place.
- Rinse with water pods. Many manuals instruct you to use “water pods” or run multiple rinse cycles. Follow that. Three is still the magic number.
- Clean the needle. After the process, use a paperclip to clear the exit needle of any dislodged scale debris.
The internal tubing in these machines is narrower. Incomplete rinsing leads to clogs faster. Be meticulous.
Frequently Asked Questions
Can I use lemon juice instead of vinegar?
Yes, but it’s less effective and more expensive. Citric acid works on limescale, but the concentration in lemon juice is variable. Commercial descaling solutions use powdered citric acid for consistency. For a home remedy, white vinegar is cheaper and more reliable.
How do I get the vinegar smell out of my coffee pot?
Run a brew cycle with a tablespoon of baking soda dissolved in water. Follow it with two water-only rinse cycles. The baking soda neutralizes the residual acetic acid. If the smell persists, the internal plastic may have absorbed it, several more plain water cycles over subsequent days will eventually clear it.
Is it safe to use vinegar in a stainless steel coffee pot?
Yes, diluted white vinegar is safe for stainless steel. Do not let full-strength vinegar sit for extended periods, as it can potentially dull the finish. Always rinse thoroughly.
Can descaling with vinegar damage my coffee maker?
If you follow the instructions, dilute properly, don’t overuse it, and rinse thoroughly, vinegar is safe for most machines. Damage occurs from using vinegar full-strength too frequently, which can degrade rubber seals and gaskets over many years. Always check your manufacturer’s manual.
Why does my coffee taste bad after cleaning with vinegar?
You likely didn’t rinse enough. Residual vinegar in the lines taints the next several brews. Run three full water-only brew cycles after the vinegar cycle, not just one. If the taste remains, run a baking soda cycle as described above.
What’s the difference between cleaning and descaling?
Cleaning removes coffee oils, grounds, and stains from the carafe, basket, and exterior. Descaling removes mineral deposits (limescale) from the internal heating element and water channels. Vinegar is for descaling. Soap and water are for cleaning. You need to do both.
Before You Go
Descaling with white vinegar isn’t a single quick cycle. It’s a 60-minute soak followed by three full rinse cycles. That soak is what dissolves the scale that makes your machine slow and your coffee taste off. The three rinses are what keep the next pot from tasting like salad dressing.
Match your vinegar ratio to your machine, 1:1 for most drip pots, the manufacturer’s spec for Keurigs. And wash the carafe separately with soap. The vinegar never touches it.
Your machine will brew faster, the heater will last longer, and your coffee will taste clean. That’s the point.
{
“@context”: “https://schema.org”,
“@type”: “HowTo”,
“name”: “How to Clean a Coffee Pot with White Vinegar”,
“totalTime”: “PT90M”,
“tool”: [
{
“@type”: “HowToTool”,
“name”: “White distilled vinegar”
},
{
“@type”: “HowToTool”,
“name”: “Fresh water”
},
{
“@type”: “HowToTool”,
“name”: “Soft sponge or cloth”
},
{
“@type”: “HowToTool”,
“name”: “Baking soda (optional, for odor removal)”
}
],
“supply”: [],
“step”: [
{
“@type”: “HowToStep”,
“name”: “Empty the coffee pot”,
“text”: “Discard any old coffee and grounds. Remove and discard the used filter.”
},
{
“@type”: “HowToStep”,
“name”: “Mix vinegar and water”,
“text”: “For a standard 12-cup drip machine, use a 1:1 ratio of white vinegar to water in the reservoir. For Keurig machines, follow the manual’s specific ratio, often 10 oz vinegar to full reservoir.”
},
{
“@type”: “HowToStep”,
“name”: “Start the brew cycle and pause”,
“text”: “Start a brew cycle without a coffee filter. Halfway through, pause the machine and let the vinegar solution sit in the system for 60 minutes to dissolve limescale.”
},
{
“@type”: “HowToStep”,
“name”: “Complete the cycle”,
“text”: “After the soak, restart the machine to finish the brew cycle. Discard the hot vinegar-water mixture from the carafe.”
},
{
“@type”: “HowToStep”,
“name”: “Rinse thoroughly”,
“text”: “Fill the reservoir with fresh water only. Run a complete brew cycle and discard the water. Repeat this rinse process two more times to flush all vinegar residue.”
},
{
“@type”: “HowToStep”,
“name”: “Clean the carafe and filter basket”,
“text”: “Wash the glass carafe and plastic filter basket with warm, soapy water. Rinse and dry completely before reassembling.”
},
{
“@type”: “HowToStep”,
“name”: “Remove vinegar odor (optional)”,
“text”: “If a vinegar smell persists, run one brew cycle with a tablespoon of baking soda dissolved in water, followed by two final water-only rinse cycles.”
}
]
}
{
“@context”: “https://schema.org”,
“@type”: “FAQPage”,
“mainEntity”: [
{
“@type”: “Question”,
“name”: “Can I use lemon juice instead of vinegar?”,
“acceptedAnswer”: {
“@type”: “Answer”,
“text”: “Yes, but it’s less effective and more expensive. Citric acid works on limescale, but the concentration in lemon juice is variable. Commercial descaling solutions use powdered citric acid for consistency. For a home remedy, white vinegar is cheaper and more reliable.”
}
},
{
“@type”: “Question”,
“name”: “How do I get the vinegar smell out of my coffee pot?”,
“acceptedAnswer”: {
“@type”: “Answer”,
“text”: “Run a brew cycle with a tablespoon of baking soda dissolved in water. Follow it with two water-only rinse cycles. The baking soda neutralizes the residual acetic acid. If the smell persists, the internal plastic may have absorbed it, several more plain water cycles over subsequent days will eventually clear it.”
}
},
{
“@type”: “Question”,
“name”: “Is it safe to use vinegar in a stainless steel coffee pot?”,
“acceptedAnswer”: {
“@type”: “Answer”,
“text”: “Yes, diluted white vinegar is safe for stainless steel. Do not let full-strength vinegar sit for extended periods, as it can potentially dull the finish. Always rinse thoroughly.”
}
},
{
“@type”: “Question”,
“name”: “Can descaling with vinegar damage my coffee maker?”,
“acceptedAnswer”: {
“@type”: “Answer”,
“text”: “If you follow the instructions, dilute properly, don’t overuse it, and rinse thoroughly, vinegar is safe for most machines. Damage occurs from using vinegar full-strength too frequently, which can degrade rubber seals and gaskets over many years. Always check your manufacturer’s manual.”
}
},
{
“@type”: “Question”,
“name”: “Why does my coffee taste bad after cleaning with vinegar?”,
“acceptedAnswer”: {
“@type”: “Answer”,
“text”: “You likely didn’t rinse enough. Residual vinegar in the lines taints the next several brews. Run three full water-only brew cycles after the vinegar cycle, not just one. If the taste remains, run a baking soda cycle as described above.”
}
},
{
“@type”: “Question”,
“name”: “What’s the difference between cleaning and descaling?”,
“acceptedAnswer”: {
“@type”: “Answer”,
“text”: “Cleaning removes coffee oils, grounds, and stains from the carafe, basket, and exterior. Descaling removes mineral deposits (limescale) from the internal heating element and water channels. Vinegar is for descaling. Soap and water are for cleaning. You need to do both.”
}
}
]
}
