
How to Clean Your Coffee Percolator Without Damaging It
To clean a coffee percolator, disassemble it, soak stained parts in a baking soda solution, scrub with a plastic pad and soap, then descale mineral deposits with a vinegar-water solution. Never immerse the electrical base in water or use abrasive cleaners like steel wool.
Most people reach for vinegar first. That’s the mistake. Pouring vinegar directly onto baking-soda-stained stainless steel creates a weak acid that etches the surface. The percolator comes out of the descaling cycle with a cloudy, permanent stain where the coffee film used to be.
This guide walks through the correct sequence, drawn from Presto and Hamilton Beach manuals, to get your percolator clean without damaging it. You’ll need dish soap, baking soda, white vinegar, and about 45 minutes.
Key Takeaways
- Never submerge the electrical base. Wipe it with a damp cloth only.
- Use baking soda first to cut through coffee oils, then vinegar separately to dissolve mineral scale.
- Scrub only with a plastic scouring pad or soft brush; steel wool scratches stainless steel permanently.
- For a Presto 02811, use 3 tablespoons of vinegar in a full pot of water. For a Hamilton Beach 40614, use 1/2 cup.
- Run a clean water cycle after descaling until you can’t smell vinegar, usually twice.
What You’ll Need (And What to Avoid)
Gather a plastic scouring pad, dish soap, white vinegar, baking soda, and a soft cloth. A bottle brush helps with the narrow perk tube.
Before you start: The electrical base assembly is not submersible. Getting water into the thermostat or wiring housing can cause a short circuit the next time you plug it in. Wipe it with a damp cloth, never rinse it under the tap.
You need two cleaners because they target different residues. Coffee oils and film respond to baking soda’s mild abrasion and alkalinity. Hard water minerals like calcium carbonate, the white, chalky scale inside the perk tube, dissolve in acetic acid from vinegar.
The wrong tool leaves a permanent mark. Steel wool pads and abrasive powdered cleansers will scratch the polished stainless steel interior. Those scratches then trap coffee residue and become impossible to clean fully. Stick to plastic or nylon.
A common pick among percolator owners is the Libman scrubber, its nylon bristles are stiff enough for baked-on film but won’t mar the surface.
The 7-Step Weekly Clean
Disassemble the percolator. Pull out the basket, the flat basket cover, and the long perk tube. Rinse everything under warm water to flush out loose grounds.
Sprinkle about 1/4 cup of baking soda into the empty pot. Pour in enough boiling water to cover the stained areas and to submerge the other parts. Let it soak for at least ten minutes. Thirty is better for heavy buildup.
The baking soda loosens the greasy coffee oils. You’ll see the water turn a murky brown.
Now scrub. Use the plastic pad and a drop of dish soap on the pot’s interior, the underside of the lid, and all the removable parts. Pay attention to the basket, grounds get stuck in the perforations. A bottle brush works for the perk tube’s interior.
Rinse everything under warm running water until the water runs clear and you don’t feel any grit.
Dry all parts completely with a soft cloth before reassembling. Trapped moisture breeds mildew, and you’ll smell it in your next pot of coffee.
TL;DR: Soak in baking soda and hot water for 10–30 minutes, scrub with a plastic pad and soap, rinse, and dry. Skip the baking soda and the oils stay, turning rancid.
The Baking Soda + Vinegar Reaction That Stains Stainless
Vinegar and baking soda neutralize each other. The fizz is carbon dioxide gas escaping, leaving behind water and a neutral salt solution. On stainless steel, that mild salt solution can interact with the protective chromium oxide layer, especially if the surface is already warm from a baking soda soak.
Pouring vinegar onto baking-soda residue creates a weak, etching solution. The result is often a cloudy, dull patch on the stainless steel that no amount of polishing will remove.
The correct sequence is non-negotiable. Clean with baking soda and soap first. Rinse thoroughly. Descale with vinegar and water separately, after all baking soda residue is gone. This keeps the two chemicals from meeting on the metal surface.
If you’ve already etched your percolator, a paste of baking soda and water might polish out very light cloudiness. It won’t fix deep etching. Prevention is simpler.
This is why a burr coffee grinder matters for more than just flavor, finer, consistent grounds create less sludge and oily residue to bake onto the pot in the first place.
Descaling: What the Manuals Actually Say
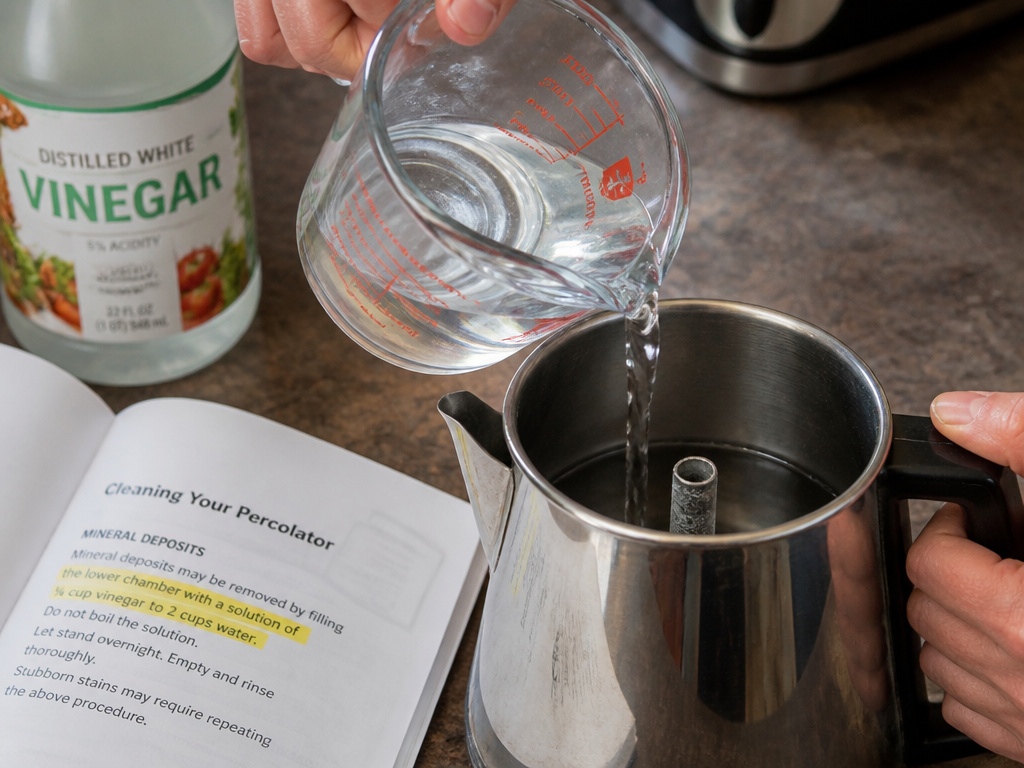
Mineral scale builds up from heating hard water. It looks like white chalk inside the perk tube and on the heating element. Left unchecked, it insulates the heating element, making the percolator work harder and eventually fail.
The official Presto 02811 manual says to fill the percolator with water to the MAX line, add 3 tablespoons of white vinegar, and perk for 20 minutes. The Hamilton Beach 40614 guide says to use 1/2 cup of vinegar for a full 12-cup pot, then perk for 20 minutes.
| Percolator Model | Water Fill | Vinegar Amount | Perk Time |
|---|---|---|---|
| Presto 02811 | To MAX line | 3 tablespoons | 20 minutes |
| Hamilton Beach 40614 | To 12-cup mark | 1/2 cup | 20 minutes |
After the vinegar cycle, empty the pot. Fill it with fresh water to the same level and run another full perk cycle to rinse. Do this until you can’t smell vinegar in the steam, usually two cycles.
Common mistake: Skipping the rinse cycles after descaling, the next pot of coffee will taste sharply acidic and metallic, and the smell lingers in the kitchen for hours.
Descaling frequency depends on your water hardness. If you see white deposits inside the tube after a month, do it monthly. With soft water, every three months is enough.
For machines with a built-in water filter, like some Breville models, regular coffee machine water quality maintenance can stretch the descaling interval. The filter cartridge reduces mineral content before it ever reaches the heating element.
How to Clean a Percolator That’s Been Sitting
A neglected percolator grows more than stains. Mold and mildew can take hold in the damp basket and tube. The smell is unmistakable, musty and sour.
Start with a visual inspection. Look for fuzzy black or green spots, especially under the basket lip and inside the perk tube.
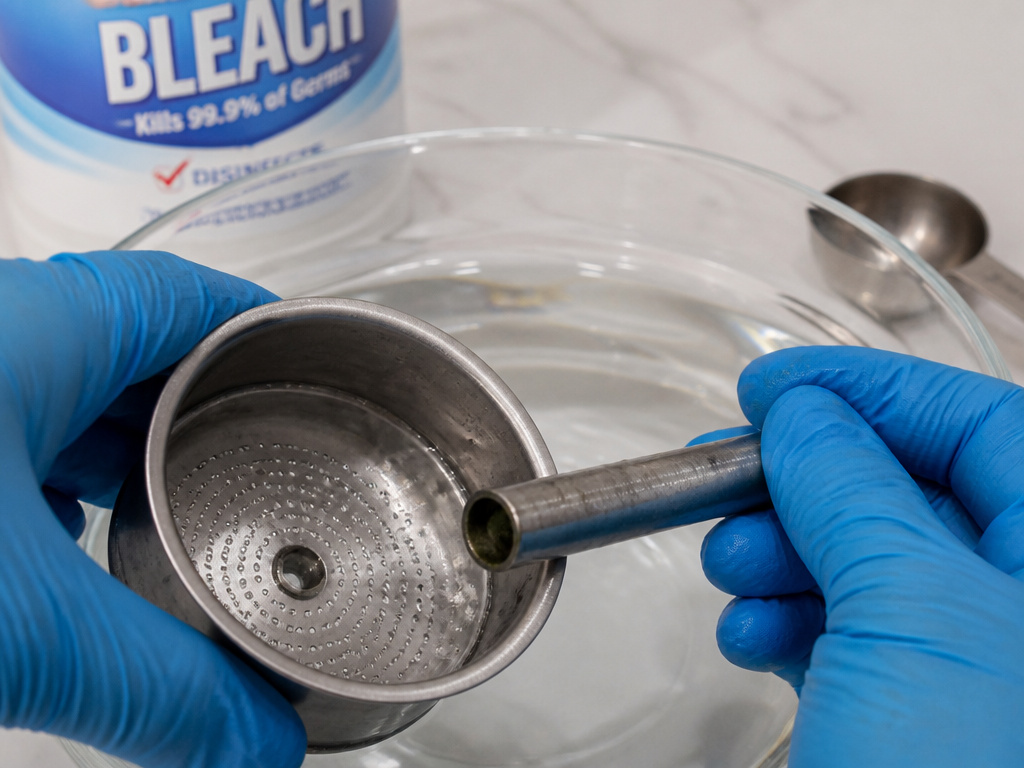
If you see mold, wear gloves. Mix one tablespoon of bleach with one gallon of cool water. Submerge all non-electrical parts, pot, lid, basket, tube, and soak for 10 minutes. Rinse every part under running water for at least two minutes. The bleach smell must be completely gone.
After the bleach soak, proceed with the standard baking soda and vinegar cleaning steps. The bleach kills the biological growth; the baking soda and vinegar remove the stains and scale it left behind.
Dry it even more thoroughly than usual. Let every component air-dry in a warm, sunny spot for a full day before reassembling. Any residual dampness will restart the mold cycle.
TL;DR: For mold, a 10-minute bleach-water soak comes first. Rinse thoroughly, then follow the standard baking soda and vinegar cleaning sequence. Dry completely for 24 hours.
Stainless Steel vs. Aluminum Care
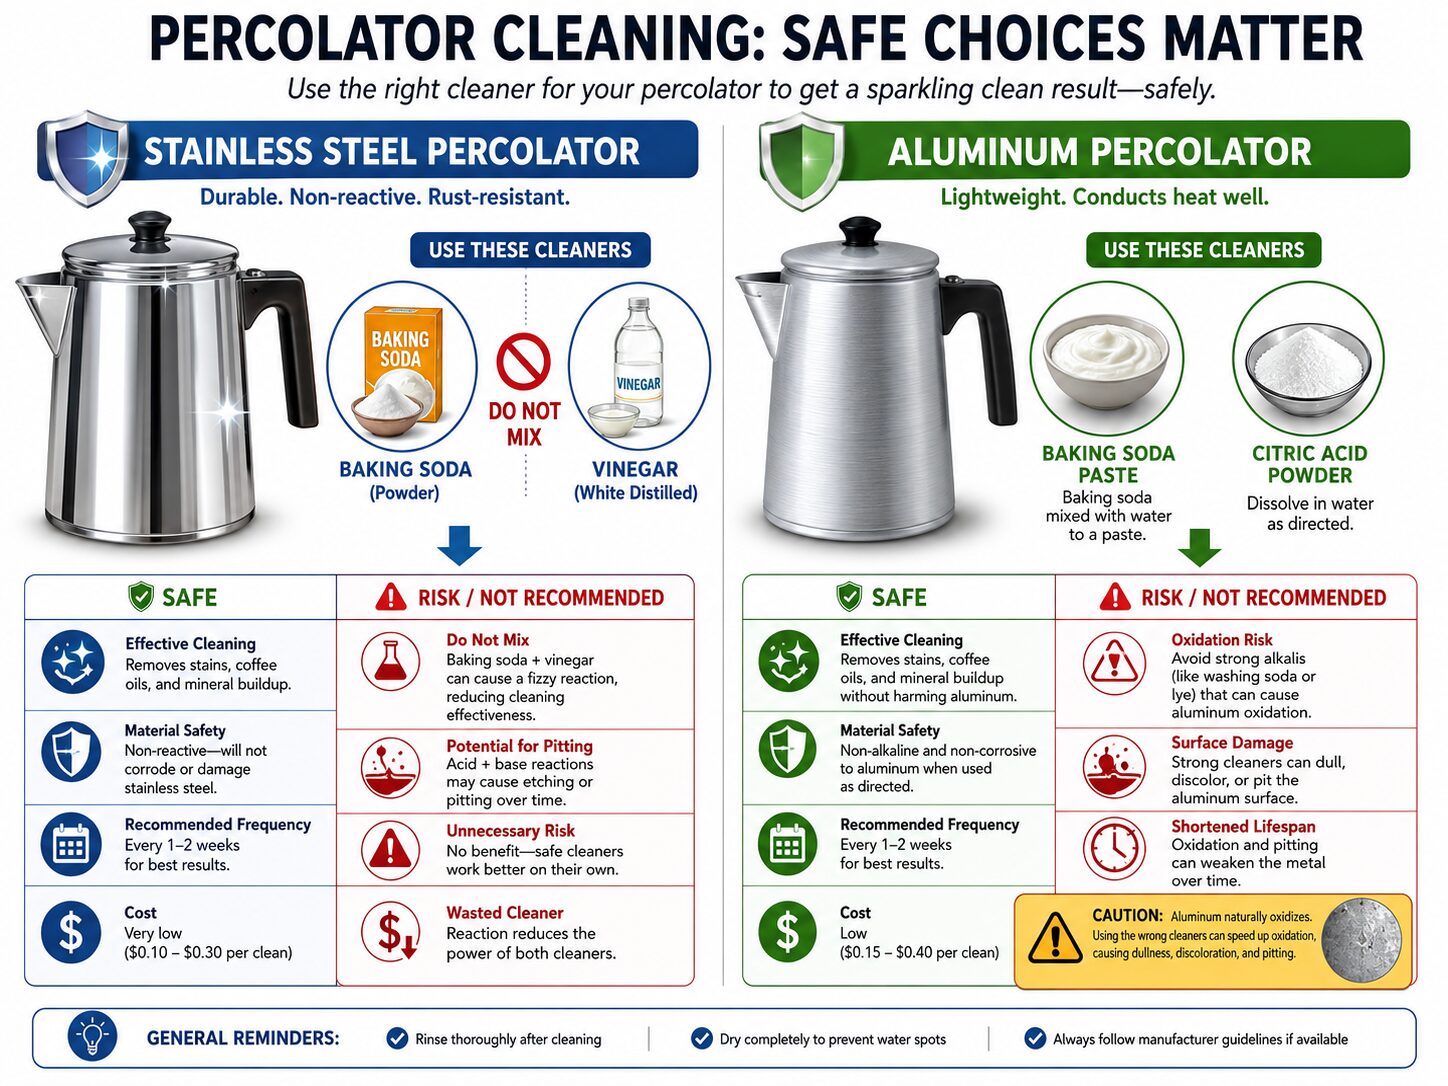
Most modern percolators are stainless steel. Older models might be aluminum. The cleaning chemistry differs.
Stainless steel is non-reactive. You can safely use baking soda and vinegar (separately) without damaging the metal itself, though as noted, mixing them on the surface can cause etching. Aluminum is reactive. Vinegar and baking soda can oxidize the surface, leading to dark gray or black discoloration.
For an aluminum percolator, skip the vinegar descale. Use a citric acid powder instead, following the package directions. For general cleaning, a paste of baking soda and water is safe, but rinse it off quickly and dry immediately to prevent oxidation.
Always check the manufacturer’s machine support resources for specific material guidance. Using the wrong cleaner voids warranties and can cause permanent damage.
| Material | Safe Cleaner | Risk | Alternative Descaler |
|---|---|---|---|
| Stainless Steel | Baking soda, Vinegar (separate) | Etching if mixed on surface | Commercial descaling solution |
| Aluminum | Baking soda paste, Citric acid | Oxidation, dark staining | Lemon juice (weaker acid) |
Why Your Percolator Still Smells Like Coffee
You cleaned it. You descaled it. It still smells like old coffee. The culprit is usually the silicone or rubber gasket around the lid or basket assembly.
Coffee oils soak into porous silicone over time. Dish soap and vinegar don’t reach them. The smell comes back with heat.
Remove the gasket if possible. Soak it in a solution of warm water and a denture-cleaning tablet for an hour. The effervescence and enzymes cut through the embedded oils. Rinse well.
If the gasket is fixed in place, make a thick paste of baking soda and water. Pack it onto the gasket and let it sit for 30 minutes. Scrub gently with a soft toothbrush, then rinse.
If the smell persists, the gasket may need replacement. Consult your brewer’s user manuals for part numbers, a fresh gasket costs a few dollars and completely solves the problem.
This is also true for other hidden parts. The paper coffee filters you use can leave a papery taste if they’re low-quality, and that scent blends with old coffee oil in a way that’s hard to pinpoint.
Frequently Asked Questions
Can I use lemon juice instead of vinegar to descale my percolator?
Yes, but it’s less effective. The citric acid in lemon juice is weaker than acetic acid in vinegar. You’ll need more juice and a longer perk time, and it may not fully remove heavy scale. Stick with white vinegar for reliable results.
How often should I clean my coffee percolator?
Give it a basic clean with soap and water after every use. Do a full cleaning with baking soda for oils once a week. Descale with vinegar every 1–3 months, depending on your water hardness. Visible white mineral deposits mean it’s time.
Is it safe to put the percolator pot in the dishwasher?
Check your manual. Most stainless steel pots and glass lids are dishwasher-safe on the top rack. The electrical base, plastic knob, and any parts with heating elements are never dishwasher-safe. Hand-wash those.
Why did my stainless steel percolator turn rainbow colors after cleaning?
Heat causes a thin oxide layer on stainless steel to refract light, creating rainbow patterns. It’s harmless and doesn’t affect performance. It usually appears after a vinegar cycle or when the pot is heated while still wet. It will fade with subsequent uses.
Can I use coffee pot cleaning tablets in my percolator?
Only if the manufacturer approves. Some tablets contain bleach or strong acids that can damage seals and gaskets. For a sustainable brewing routine, the baking soda and vinegar method is safer for most models.
Before You Go
Clean the percolator after every use with hot soapy water. Hit it with baking soda once a week to prevent oily buildup. Descale with vinegar every few months based on your water. Never mix baking soda and vinegar directly on the stainless steel.
Keep the electrical base dry. Use only plastic or nylon scrubbers. Follow the manual’s specific volumes for your model, three tablespoons for Presto, half a cup for Hamilton Beach.
The difference is in the cup. A clean percolator brews coffee that tastes like coffee, not like yesterday’s stale grounds or chemical residue. It’s a five-minute habit that pays off every morning.
{
“@context”: “https://schema.org”,
“@type”: “HowTo”,
“name”: “How to Clean a Coffee Percolator”,
“totalTime”: “PT45M”,
“tool”: [
{
“@type”: “HowToTool”,
“name”: “Plastic scouring pad or soft-bristle brush”
},
{
“@type”: “HowToTool”,
“name”: “Measuring cups and spoons”
},
{
“@type”: “HowToTool”,
“name”: “Dish soap”
},
{
“@type”: “HowToTool”,
“name”: “White vinegar”
},
{
“@type”: “HowToTool”,
“name”: “Baking soda”
}
],
“supply”: [
{
“@type”: “HowToSupply”,
“name”: “Warm water”
},
{
“@type”: “HowToSupply”,
“name”: “Paper towels or a soft cloth”
}
],
“step”: [
{
“@type”: “HowToStep”,
“name”: “Disassemble and rinse”,
“text”: “Unplug the percolator. Remove the basket, basket cover, and perk tube. Rinse all parts with warm water to remove loose coffee grounds.”
},
{
“@type”: “HowToStep”,
“name”: “Soak with baking soda”,
“text”: “Sprinkle 1/4 cup of baking soda into the empty percolator pot. Add boiling water to cover the stained areas and the disassembled parts. Let it soak for 10-30 minutes to loosen oils and residue.”
},
{
“@type”: “HowToStep”,
“name”: “Scrub with a plastic pad”,
“text”: “Use a plastic scouring pad or soft brush with dish soap to scrub the interior, lid, and all removable parts. Rinse everything thoroughly with warm water.”
},
{
“@type”: “HowToStep”,
“name”: “Descale with vinegar solution”,
“text”: “Fill the percolator to the MAX line with clean water. Add the manufacturer-recommended amount of white vinegar (3 tbsp for Presto, 1/2 cup for Hamilton Beach). Reassemble and run a full 20-minute perk cycle.”
},
{
“@type”: “HowToStep”,
“name”: “Rinse and flush”,
“text”: “Empty the vinegar solution. Fill the percolator with fresh water to the MAX line and run another full perk cycle to flush out any residual vinegar taste. Repeat the flush cycle if you smell vinegar.”
},
{
“@type”: “HowToStep”,
“name”: “Dry completely”,
“text”: “Wipe all parts dry with a soft cloth or paper towel. Let the base and pot air-dry fully before reassembling for storage.”
}
]
}
{
“@context”: “https://schema.org”,
“@type”: “FAQPage”,
“mainEntity”: [
{
“@type”: “Question”,
“name”: “Can I use lemon juice instead of vinegar to descale my percolator?”,
“acceptedAnswer”: {
“@type”: “Answer”,
“text”: “Yes, but it’s less effective. The citric acid in lemon juice is weaker than acetic acid in vinegar. You’ll need more juice and a longer perk time, and it may not fully remove heavy scale. Stick with white vinegar for reliable results.”
}
},
{
“@type”: “Question”,
“name”: “How often should I clean my coffee percolator?”,
“acceptedAnswer”: {
“@type”: “Answer”,
“text”: “Give it a basic clean with soap and water after every use. Do a full cleaning with baking soda for oils once a week. Descale with vinegar every 1–3 months, depending on your water hardness. Visible white mineral deposits mean it’s time.”
}
},
{
“@type”: “Question”,
“name”: “Is it safe to put the percolator pot in the dishwasher?”,
“acceptedAnswer”: {
“@type”: “Answer”,
“text”: “Check your manual. Most stainless steel pots and glass lids are dishwasher-safe on the top rack. The electrical base, plastic knob, and any parts with heating elements are never dishwasher-safe. Hand-wash those.”
}
},
{
“@type”: “Question”,
“name”: “Why did my stainless steel percolator turn rainbow colors after cleaning?”,
“acceptedAnswer”: {
“@type”: “Answer”,
“text”: “Heat causes a thin oxide layer on stainless steel to refract light, creating rainbow patterns. It’s harmless and doesn’t affect performance. It usually appears after a vinegar cycle or when the pot is heated while still wet. It will fade with subsequent uses.”
}
},
{
“@type”: “Question”,
“name”: “Can I use coffee pot cleaning tablets in my percolator?”,
“acceptedAnswer”: {
“@type”: “Answer”,
“text”: “Only if the manufacturer approves. Some tablets contain bleach or strong acids that can damage seals and gaskets. For a sustainable brewing routine, the baking soda and vinegar method is safer for most models.”
}
}
]
}
