
A Complete Guide on How to Calibrate Your Coffee Machine
To calibrate a coffee machine, you must hit three specific targets: a brew ratio of 1:2 (18g coffee in, 36g espresso out), an extraction time of 25-30 seconds, and a brew pressure of 9 bar. The grind setting is your primary control lever for time, dose for strength, and temperature for flavor clarity.
Most people start by turning the grind dial and hoping for the best. That’s the mistake. You’re chasing a moving target without a fixed starting point.
This guide walks through the calibration sequence that actually works, from setting your baseline to diagnosing the three most common off-target shots. We’ll cover the tools you need, the numbers you’re aiming for, and the one adjustment that fixes 80 percent of bad extractions.
Key Takeaways
- Start with a 1:2 brew ratio (18g coffee to 36g espresso) and a 25-30 second extraction time as your non-negotiable baseline.
- Grind size is your primary adjustment knob for extraction time; one click finer can add 3-5 seconds to your shot.
- Your machine’s manual is a starting suggestion, not a law; Breville Barista Express Impress owners often need to set the grinder to 5-10, not the recommended 15.
- Water quality directly impacts calibration; hard water requires a coarser grind and can scale a machine’s heating element within six months.
- Pressure is the last thing you adjust, and only if you have a machine with a built-in gauge or a portafilter pressure gauge.
What are the three main targets for calibration?
You need a scale, a timer, and fresh coffee. The goal is to lock in three variables so your machine produces the same quality shot every time.
First, the brew ratio. This is your dose weight versus your beverage weight. The Specialty Coffee Association’s Golden Cup Standard targets 55 grams of coffee per liter of water, which for a double shot translates to an 18g dose yielding about 36g of liquid espresso. That 1:2 ratio is your anchor. Change the dose, and you change the strength of the drink. A 1:1.5 ratio (18g in, 27g out) tastes more intense. A 1:2.5 ratio (18g in, 45g out) tastes milder. Pick one and stick with it for the calibration run.
Second, the extraction time. Start your timer the moment the pump engages. Stop the shot when you hit your target beverage weight. For that 1:2 ratio, you want the liquid to finish dripping into the cup between 25 and 30 seconds. Time is controlled almost entirely by grind size.
Grind size determines how quickly water can pass through the coffee puck. Finer grounds create more resistance, slowing the flow and increasing contact time. Coarser grounds let water rush through, shortening extraction. The difference between a 20-second sour shot and a 35-second bitter shot is often just two clicks on a quality grinder.
Third, the brew pressure. Most home espresso machines, including the Breville Barista Express series, are preset at the factory to deliver 9 bar of pressure. Prosumer machines like the La Marzocco Linea Mini have an adjustable bypass valve. The manual states turning it clockwise increases pressure, counter-clockwise decreases it. You shouldn’t touch pressure until dose, grind, and time are dialed in. It’s the fine-tuning knob, not the main control.
TL;DR: Lock your dose at 18g, your output at 36g, and your time target at 25-30 seconds. Adjust grind to hit the time.
How do you dial in grind size without a pressure gauge?
You use the clock. Grind size is the single most powerful variable you control.
Start with your machine’s manual. The Breville Barista Express Impress manual suggests a starting grind setting of 15. Ignore that. On fresh, light-roast beans, setting 15 will likely produce a gushing 15-second shot. The community consensus on forums like Home-Barista.com is that you need to go significantly finer, often to settings between 5 and 10, to achieve proper resistance. Your first calibration shot is a test. Weigh 18g of coffee, grind at the manual’s suggested setting, tamp evenly, and pull the shot. Stop at 36g output.
Note the time. – Under 20 seconds? Your grind is too coarse. – Over 35 seconds? Your grind is too fine. – Between 25-30 seconds? You’re in the ballpark.
Now adjust. On most grinders, one numbered click finer will add 3-5 seconds to your extraction time. Go one click, pull another test shot, and note the new time. This is iterative. You’ll waste 100g of coffee getting it right. That’s normal.
Common mistake: Chasing taste before time — if your shot pulls 36g in 18 seconds, it will taste sour and weak no matter what you do. Lock the time window first, then tweak for flavor.
The real test is taste. A shot that hits 28 seconds but tastes hollow might need a slightly finer grind or a half-gram more coffee. A shot that hits 32 seconds but tastes bitter might need a slightly coarser grind. This is where you move from calibration into personal preference.
| Symptom | Likely Cause | Immediate Fix |
|---|---|---|
| Shot runs fast (<22s), tastes sour | Grind too coarse | Go 2-3 clicks finer |
| Shot runs slow (>35s), tastes bitter | Grind too fine | Go 2-3 clicks coarser |
| Shot time is good (25-30s), tastes sour | Under-extracted center | Grind slightly finer OR increase dose by 0.5g |
| Shot time is good, tastes bitter | Over-extracted edges | Grind slightly coarser OR decrease dose by 0.5g |
When should you adjust dose versus grind?
Dose controls strength, grind controls extraction time. Change one at a time.
Stick with 18g as your baseline dose. If your grind is dialed to produce a 28-second shot but the flavor is weak, increase the dose to 18.5g. The higher dose creates a thicker puck, increasing resistance and extraction. Your shot time will now be longer—maybe 32 seconds. To compensate, you might need to go one click coarser to bring the time back to 28 seconds. You’ve increased strength without over-extracting.
The inverse is also true. A 18g dose pulling a 28-second shot that tastes too intense? Drop the dose to 17.5g. The shot will run faster, so you’ll need to go one click finer to maintain the 28-second window. You’ve decreased strength without under-extracting.
I ran a Breville Barista Express for two years on the factory-set 15 grind setting. Every shot was fast and sour. I blamed the beans. Moving to a setting of 8 added 12 seconds to the extraction and the flavor shifted from lemon juice to dark chocolate. The manual was wrong for my setup.
Here’s the rule: adjust grind to correct time, adjust dose to correct strength. Never change both in the same test. You’ll lose track of what fixed what.
What about temperature and pressure?
These are secondary variables. Mess with them only after grind and dose are locked.
Brew temperature is set by your machine. The SCA Golden Cup Standard recommends 90–96°C (195–205°F). Most home machines default to the middle of that range. If your dialed-in shot tastes flat or muted, a higher temperature can increase extraction and brightness. A lower temperature can reduce bitterness. On a machine like the Breville Dual Boiler, you can adjust this in 1°C increments. On simpler machines, you’re stuck with the preset. Don’t fight it.
Brew pressure is the most over-adjusted variable. The La Marzocco Linea Mini manual specifies 9 bar as the recommended brew pressure, adjustable via a bypass valve. Some professional baristas experiment with lower pressures (6-8 bar) for light roasts to enhance sweetness. Unless you have a pressure gauge on your portafilter or a machine with a built-in gauge, you cannot know your pressure. Guessing is a waste of beans.
If you do have a gauge and your pressure reads low (under 8 bar) with a properly dialed grind, you might have a pump or valve issue. That’s a service call, not a calibration step.
Why does my calibration change with new beans?

Coffee is agricultural. Bean density, roast level, and age change the rules.
A dark roast is more porous and brittle. It extracts faster. When you switch from a medium to a dark roast using the same grind setting, your shot time will drop by 5-8 seconds. You must grind finer to compensate. A light roast is denser. It extracts slower. Switching to a light roast will lengthen your shot time, requiring a coarser grind.
Freshness matters too. Beans degas carbon dioxide over time. Very fresh beans (1-5 days post-roast) can create channeling and uneven extraction. Let them rest a week. Older beans (4+ weeks) lose solubility. You’ll need a finer grind to hit your target time, and the cup will lack vibrancy.
This is why keeping a log is non-negotiable. Note the bean, roast date, dose, grind setting, output weight, time, and taste. When you buy that bean again, you start from your logged setting, not from scratch.
| Bean Variable | Effect on Calibration | Typical Adjustment Needed |
|---|---|---|
| Dark Roast | Less dense, extracts faster | Grind 2-3 clicks finer than medium roast |
| Light Roast | More dense, extracts slower | Grind 2-3 clicks coarser than medium roast |
| Very Fresh (<7 days) | Gassy, can channel | Slightly coarser grind, or let beans rest |
| Older (>4 weeks) | Less soluble, stales | Grind 1-2 clicks finer to hit time |
| High Altitude | Water boils at lower temp | May need slightly finer grind |
What tools do you actually need?

You need three things: a scale, a timer, and a notebook. Fancy gear is optional.
A digital scale with 0.1g resolution is the foundation. Weigh your dose. Weigh your output. Guesswork adds variables. Your phone’s stopwatch works fine for timing. The notebook is for logging each shot’s parameters. Without a log, you’re calibrating from memory, which fails.
A burr vs blade grinder is the next upgrade. Blade grinders produce inconsistent particles, making calibration impossible. A decent conical burr grinder, even a budget one, gives you repeatable adjustments.
For water, consider a Breville coffee machine filter if your machine supports it. Hard water leaves scale, which alters heat transfer and flow rate over time. A filter extends service intervals.
You do not need a pressure gauge, a bottomless portafilter, or a distribution tool to calibrate. Those are diagnostic tools for later refinement.
How do water and altitude break your calibration?
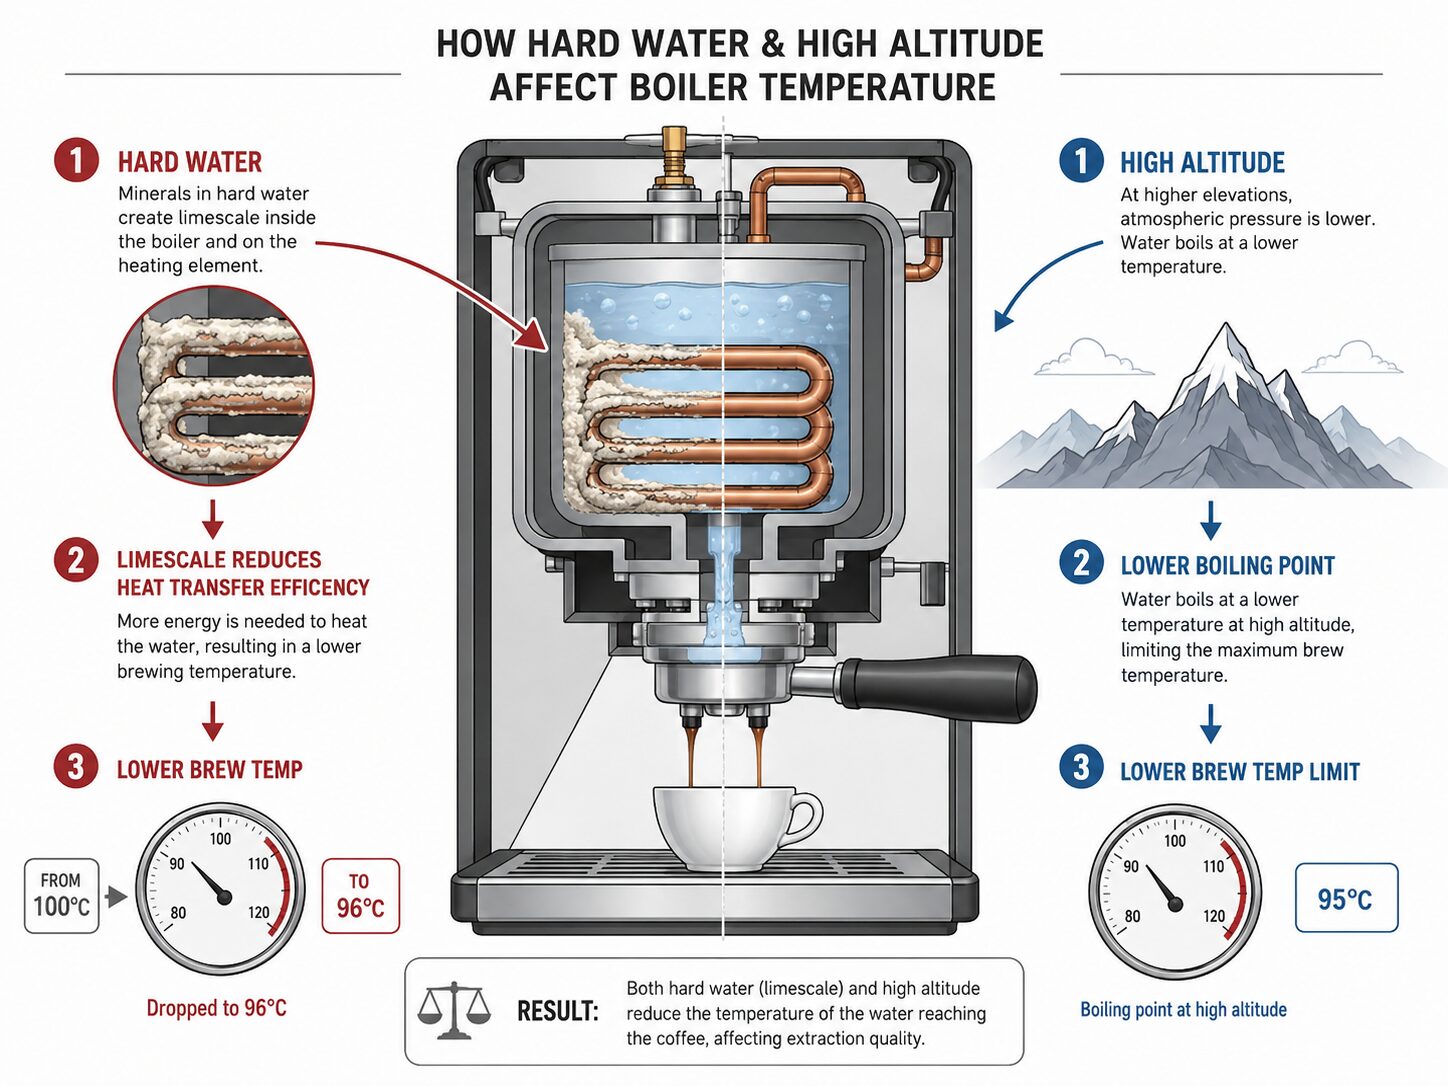
Two hidden variables: mineral content and air pressure.
Water hardness directly impacts extraction. The SCA handbook emphasizes that water composition significantly impacts flavor. Hard water (high in calcium and magnesium) extracts coffee differently than soft water. It can also scale the heating element in an electric machine. I’ve seen a scaled machine lose 4°C of brew temperature within six months, which makes every shot taste muted. If your calibration drifts over months and descaling doesn’t fix it, look at your water source. Using filtered or Third Wave Water recipe packets creates a consistent baseline.
Altitude changes the boiling point of water. At 5,000 feet, water boils at 95°C instead of 100°C. If your machine heats by thermostat, it might deliver water several degrees cooler than at sea level. The fix is a slightly finer grind to compensate for the lower extraction efficiency. This is a known adjustment in high-altitude cities like Denver.
These factors explain why a calibration that works perfectly in one kitchen fails in another. It’s not your technique. It’s the environment.
Common mistake: Calibrating with distilled water — the lack of minerals actually hinders extraction, leading to weak, sour shots regardless of grind. Always use water with some mineral content, even if it’s just a pinch of baking soda in a gallon of distilled.
Frequently Asked Questions
My shot hits 36g in 25 seconds but still tastes sour. What now?
Your grind is dialed for time, but the coffee is under-extracted in the center of the puck. Increase your dose by 0.5g (to 18.5g). This creates a thicker puck, increasing resistance and extraction. If that doesn’t work, try a slightly finer grind. Also, ensure your beans are not too fresh—less than 5 days off roast can cause channeling and sourness.
The manual says start at grind setting 15, but my shot gushes in 15 seconds. Is my machine broken?
Probably not. Manufacturer settings are averages. For fresh, light-roast, or dense beans, you often need to go much finer. Drop to setting 10, then 8, then 6, pulling a test shot at each until your time enters the 25-30 second window. This is normal, especially for machines with integrated grinders like the Breville Barista Express Impress.
Can I calibrate a machine without a built-in grinder?
Absolutely. The process is identical. You use a standalone burr grinder. The advantage is more precise adjustment. Follow the same steps: lock your dose and target output, then adjust the grinder’s setting until the shot time is correct. The Braun coffee maker manual for drip machines emphasizes clean equipment, but for espresso, the calibration principle is universal.
How often should I re-calibrate?
Re-calibrate whenever you change coffee beans, especially if switching roast levels (light to dark). Also re-calibrate if you notice a gradual drift in shot times over weeks, which could indicate grinder burr wear or scale buildup. For daily use with the same beans, a quick check every few bags is sufficient.
Does filter type affect calibration?
For espresso machines, the filter basket is fixed. For pour-over or drip machines, the bleached vs unbleached filters debate is about taste and environmental impact, not calibration. However, a Bunn coffee pot filters change could slightly alter flow rate. Stick with one filter type during your calibration run for consistency.
My pressure gauge reads under 9 bar even with a fine grind. What’s wrong?
First, ensure your grind is fine enough to create resistance—if the shot still runs fast, grind finer until the gauge moves. If the gauge still reads low with a choked puck (no flow), you may have a failing pump, a clogged line, or a faulty gauge. Consult your machine’s support guide, like the Black & Decker coffee maker manual for diagnostic steps, though for espresso-specific issues, the manufacturer’s website is better.
The Bottom Line
Calibrating a coffee machine is about controlling variables. Start with the three targets: 18g dose, 36g output, 25-30 second time. Use grind to hit the time, dose to tweak strength, and leave temperature and pressure alone until the basics are locked. Your machine’s manual gives you a starting point, but your palate and your beans write the final settings. Keep a log. Accept that switching from a blend vs single origin coffee or from a medium to a blonde roast coffee beans means starting over. The goal isn’t a single perfect setting. It’s knowing which knob to turn when the cup in your hand isn’t right.
