
Finding the Right Pour Over Coffee Ratio: How Much to Use
Start with a 1:17.5 coffee-to-water ratio. That means for every gram of coffee, you use 17.5 grams of water. For a standard 350ml cup, that’s 20g of coffee. This ratio lands in the middle of the Specialty Coffee Association’s Golden Cup standard and is the most reliable starting point for any dripper, any bean.
Most people get this wrong because they use volume, scoops and tablespoons, instead of weight. A scoop of dark roast is half the weight of a scoop of light roast. Your morning brew swings from weak to brutal because of it.
This guide covers why that 1:17.5 number works, when to break it, and how your grinder decides everything before the water even touches the grounds.
Key Takeaways
- The SCA’s Golden Cup ratio is 55 grams of coffee per liter of water (roughly 1:18). Start at 1:17.5 for a slightly stronger, more forgiving brew.
- Your grinder’s consistency matters more than hitting a perfect ratio. A Baratza Encore with worn burrs will over-extract at any ratio.
- Light roasts need a tighter ratio (closer to 1:16) to pull out enough sweetness. Dark roasts need a wider one (closer to 1:18.5) to avoid bitterness.
- Always use a 0.1g resolution scale. A 2g error on a 20g dose is a 10% strength shift you will taste immediately.
- Pre-ground coffee loses about 60% of its aromatic compounds in 15 minutes. Dose up by 1-2 grams if you must use it.
The Golden Cup Standard and Why It’s a Starting Point
The Specialty Coffee Association defines the “Golden Cup” as 55 grams of coffee per liter of water, with a tolerance of plus or minus 10%. That’s a range from 50 g/L to 60 g/L, or a coffee-to-water ratio between 1:16.7 and 1:20.
The SCA Golden Cup standard specifies 55 g/L ±10% extraction for optimal flavor balance, equating to a brew strength between 1.15% and 1.35% total dissolved solids. This is the industry benchmark for a balanced cup.
It’s a benchmark, not a commandment. I’ve served coffee from a 10-cup Chemex at their recommended 1:17.6 ratio that tasted perfect for a crowd. I’ve also pulled a single V60 at 1:15 for a dense Ethiopian natural that needed the extra push. The standard gives you a center line. Your palate and your gear draw the boundaries.
TL;DR: The SCA’s 55 g/L (1:18) is your baseline. Adjust in 0.5-gram increments from there.
Your Grinder is Your First Line of Defense
You can nail a 1:17.5 ratio and still get a terrible cup. The reason is almost always the grinder. A blade grinder or a burr grinder with dull blades creates a mix of dust and boulders. The dust over-extracts into bitterness while the boulders under-extract into sourness. No ratio can fix that.
A consistent medium-coarse grind is non-negotiable. For a standard flat-bed brewer like the Kalita Wave or a V60, you want grounds that look like coarse sand. For a thicker, heavier brewer like the Chemex or a Fellow Stagg [XF], you might go one click coarser to account for the thicker filter and longer draw-down time.
Common mistake: Chasing the perfect ratio with a bad grind, you’ll over-extract the fines and under-extract the chunks, creating a cup that’s simultaneously bitter, sour, and weak. Upgrade the grinder before you buy a third scale.
I ran a Baratza Encore for years. When the burrs finally wore out, the grind distribution widened. My 1:17 brews started tasting hollow and astringent no matter the bean. I replaced the burrs with the M2 upgrade kit, and the flavor snap came back in the next brew. The ratio hadn’t changed. The tool had.
The 1:17.5 Starting Point and How to Adjust It
Set your scale to grams. Tare it with your dripper and filter. Add 20 grams of coffee. Now pour water until the scale reads 350 grams. That’s 1:17.5. Brew it. Taste it.
If the coffee tastes…
– Sour, sharp, or salty: The brew is under-extracted. Use 1-2 grams more coffee next time (a tighter ratio, like 1:16.5) OR grind finer.
– Bitter, dry, or hollow: The brew is over-extracted. Use 1-2 grams less coffee next time (a wider ratio, like 1:18.5) OR grind coarser.
The adjustment is iterative. Change only one variable at a time. I keep a brewing journal for new beans: ratio, grind setting, taste notes. After three brews, the pattern is clear.
| Roast Level | Recommended Ratio | Why It Works |
|---|---|---|
| Light Roast | 1:16 to 1:17 | Denser bean structure requires more coffee per water to extract enough sweetness. |
| Medium Roast | 1:17 to 1:18 | Balanced solubility; the SCA’s 55 g/L (1:18) is ideal here. |
| Dark Roast | 1:18 to 1:19 | More porous, easier to over-extract; a wider ratio avoids bitterness. |
Why Roast Level Changes Everything
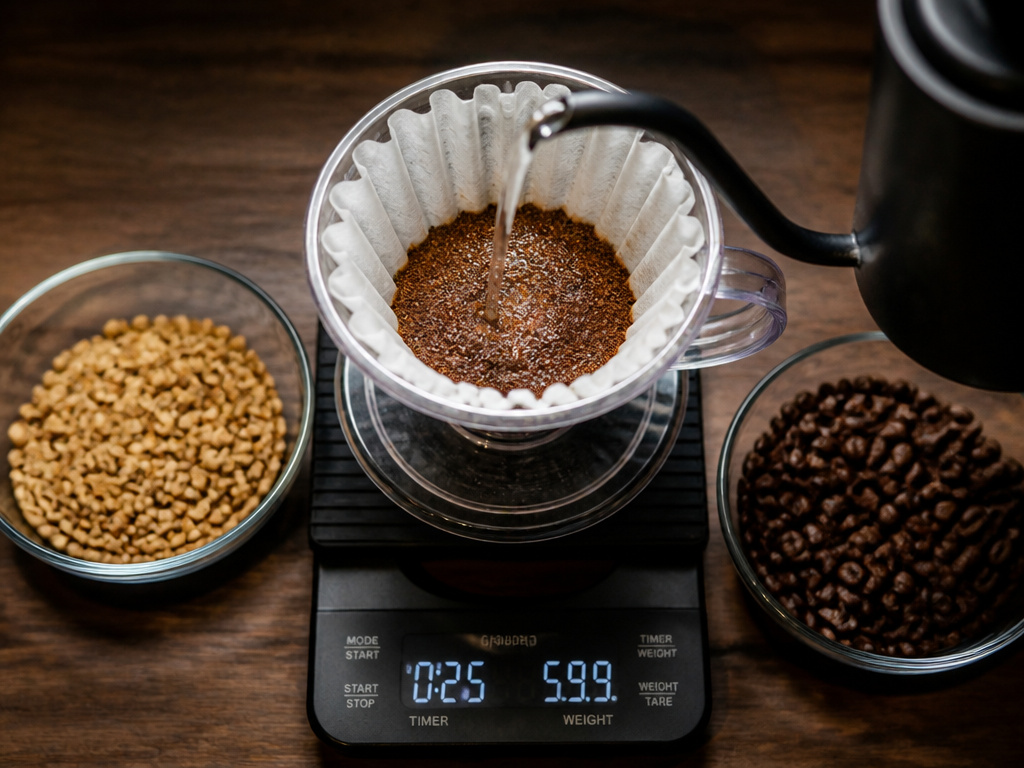
A light roast Ethiopian is a rock. A dark roast Sumatran is a sponge. The physical density of the bean dictates how much water it takes to pull the flavors out.
Light roasts retain more cellular structure. They need more energy (heat) and more time (contact) to yield their sugars. A tighter ratio, more coffee per water, increases the extraction yield because there’s less water to do the work. It forces a more efficient pull. Go too wide, and the cup tastes thin and tea-like.
Dark roasts are brittle and porous. They give up their flavors, and their bitter compounds, quickly. A wider ratio dilutes the brew, preventing those bitter notes from dominating. This is why your blonde roast beans need a different approach than a French roast.
The choice between a blend vs single origin matters here, too. A blend is engineered for consistency across ratios. A single-origin, like a specific Arabica vs Colombian coffee lot, has sharper peaks and valleys in its flavor profile. It often needs a more precise ratio to highlight its unique character.
The Non-Negotiable Tools: Scale and Kettle
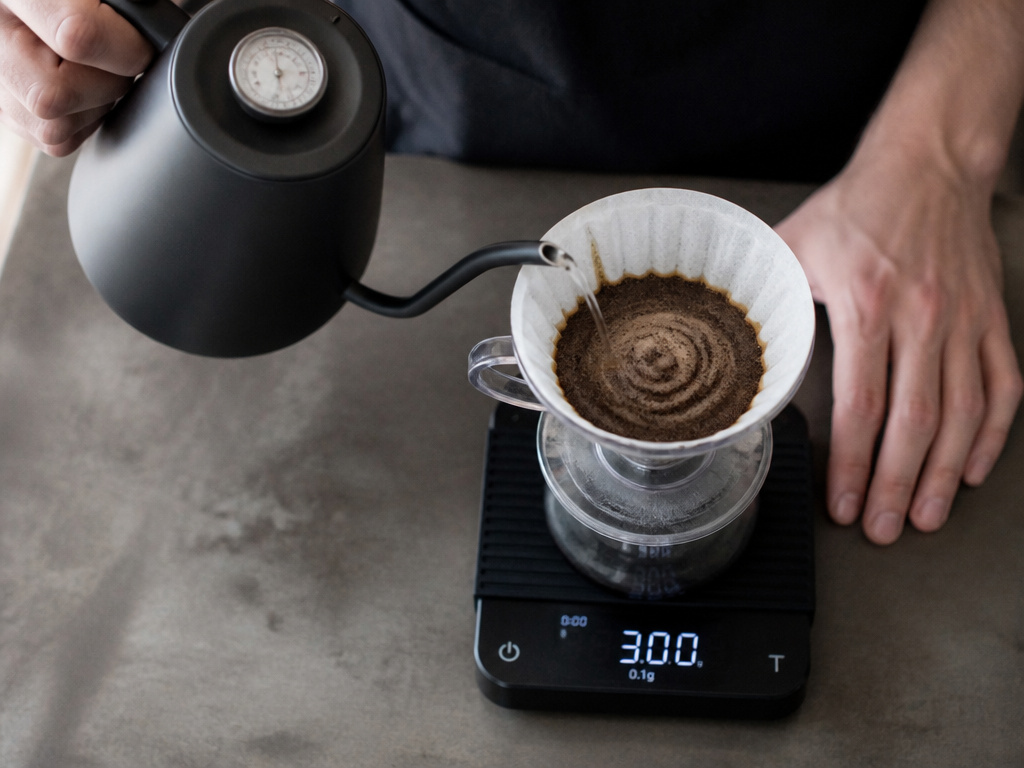
Your tablespoon is lying to you. A scoop of whole bean light roast weighs about 7 grams. A scoop of oily, dark roast whole beans can weigh as little as 4 grams. That’s a 75% difference in dose before you even grind. Volume measurement is why home brew fails.
You need a 0.1g resolution scale. The $20 model from Amazon works. Place your dripper on it, tare to zero, add coffee, tare again, pour water. The second tare is critical. It lets you track water poured versus water in the carafe, accounting for what the grounds absorb.
A gooseneck kettle is control. The thin spout lets you pour in a slow, steady spiral, saturating all the grounds evenly. A regular kettle dumps water in the center, creating channels that over-extract one spot and under-extract the rest. It’s the difference between watering a garden with a hose or a sprinkler.
I used a regular kettle for two years before switching. The first brew with a gooseneck was a revelation, the same beans, same ratio, same grind, but the acidity was brighter, the body was cleaner. The tool didn’t change the recipe. It changed the execution.
When to Break the Rules: Cold Brew and Pre-Ground Coffee

The rules assume hot water and fresh grounds. Two common situations break them.
Cold brew concentrate is a different beast. You’re steeping, not percolating. Ratios like 1:4 or 1:5 are common because you’re making a concentrate to dilute later with water or milk. The SCA standard does not apply here. Strength is the goal, not balance.
Pre-ground coffee is a compromise. Grinding exposes surface area to oxygen. Aromatic compounds start evaporating immediately. After 15 minutes, you’ve lost about 60% of what makes that coffee smell good. The stale, flat taste that follows is under-extraction of the remaining flavors.
If you must use pre-ground, bump your dose by 1-2 grams. The extra coffee compensates for the lost aromatics. It’s a band-aid, not a cure. The real fix is investing in a burr vs blade grinder for consistent fresh grounds.
The Step-by-Step Pour Over Setup
This isn’t just about weight. It’s about sequence.
- Boil filtered water. Tap water minerals can mute flavors. Heat to 205°F (96°C) for medium roasts, 208°F (98°C) for lights, 200°F (93°C) for darks.
- Weigh and grind. Dose 20g of beans. Grind to a medium-coarse sand consistency. Skipping the scale here guarantees inconsistency.
- Rinse the filter. Place it in your dripper, set it over your carafe or mug, and pour hot water through it. This removes the paper taste and preheats the brewer. Dump the rinse water.
- Add coffee and bloom. Add grounds to the rinsed filter. Tare your scale. Start a timer and pour 60g of water, evenly saturating all the grounds. Let it sit for 30-45 seconds. This lets gas escape. If you skip the bloom, the gas forms bubbles that block water flow, causing uneven extraction.
- Pour in stages. After the bloom, pour in a slow, steady spiral, keeping the water level about an inch above the coffee bed. Pour to your target weight (350g for a 1:17.5 ratio). The entire brew should finish draining between 2:30 and 3:30 minutes.
- Swirl and serve. Give the carafe a gentle swirl to integrate the brew. Pour and taste immediately.
Frequently Asked Questions
Can I use tablespoons instead of a scale?
No. A tablespoon of whole bean coffee can vary from 4 to 7 grams depending on roast and grind. That variation will ruin your consistency. A $20 scale is the single best investment for better pour over.
What’s the best coffee-to-water ratio for a V60?
Hario’s official manual recommends a 1:20 ratio (12g coffee to 240ml water). I find that produces a slightly weak cup. Start at 1:17.5 (13g to 225ml) and adjust from there. The V60’s fast flow rate can handle a slightly tighter ratio.
How does filter paper affect the ratio?
Thicker papers like Chemex or bleached vs unbleached filters from other brands slow the draw-down. This increases contact time. If you switch from a fast filter (like a V60 tabbed filter) to a thick one, you may need to grind a touch coarser or use a slightly wider ratio (0.5 more grams of water) to avoid over-extraction.
My coffee is always bitter. What ratio should I use?
First, try a coarser grind. If it’s still bitter, use less coffee. Move from 1:17.5 to 1:18.5 (e.g., 19g coffee to 350g water). Also, ensure your water isn’t too hot, dark roasts do better at 200°F.
Can I reuse coffee grounds for a second cup?
Do not reuse grounds for pour over. The first pour extracts nearly all soluble flavors. A second pour will only pull out bitter, astringent compounds. It will taste like stale tea. Compost your used grounds instead, especially if you use biodegradable coffee filters.
The Bottom Line
Forget the scoop. The answer to how much coffee for pour over is 20 grams for a 350ml cup, a 1:17.5 ratio. Weigh it. Write it down. Taste it.
Then adjust. Light roasts want more coffee, dark roasts want less. Your grinder’s consistency dictates the ceiling of your brew. And if you’re tweaking your ratio before you’ve upgraded from a blade grinder, you’re solving the wrong problem.
The perfect cup isn’t a secret number. It’s the process of measuring, tasting, and knowing why you change one thing at a time. Start at 1:17.5. Your taste buds will tell you where to go next.
