
How to Grind Coffee Beans in a Blender: The Ultimate Guide
To grind coffee beans in a blender, use short, 1-second pulses and shake the jar between bursts. This minimizes heat and creates a more even grind, though results will still be inconsistent compared to a proper coffee grinder. It works best for coarse methods like French press, not espresso.
Most people overload the jar and hold the button down. That creates a cloud of fine dust that cakes under the blades while whole beans bounce around the top. The motor groans, the beans heat up, and you get a bitter, muddy brew.
This guide walks through the forced blender method step-by-step, explains exactly why the results are so poor, and shows when a specialized accessory like a Vitamix Dry Grains Container changes the equation. If you care about flavor, you’ll also see the stark difference a real grinder makes.
Key Takeaways
- A standard blender jar produces an inconsistent grind; a dedicated dry grains container like the Vitamix accessory performs significantly better.
- Use a strict pulse-and-shake rhythm (1-second pulses, 3-second rests) to minimize heat and avoid powdering the beans directly under the blades.
- Grind size inconsistency is the primary flaw, it causes simultaneous over-extraction (bitterness from fines) and under-extraction (sourness from boulders).
- For espresso or Turkish coffee, a blender is functionally useless. It can approximate a coarse grind for cold brew in a pinch.
- The friction heat from prolonged blending begins to cook volatile flavor compounds, flattening the coffee’s aroma within about 30 seconds of total run time.
Why a Blender Is a Compromise, Not a Solution
Blenders are designed for shearing and liquefying, not precision cutting. The physics are wrong. A blade spins at 20,000–30,000 RPM, impacting beans with blunt force. This smashing action, rather than a clean cut, is why you get a random particle distribution.
Common mistake: Holding the blend button for 10+ seconds, the beans directly under the blades turn to superheated powder while whole beans remain at the top. The resulting cup tastes both bitter and sour, with a flat, baked aroma.
A burr grinder, like the Breville BDC650BSS with its 60 precise settings or the KitchenAid KCG8433 with 70 settings, uses two abrasive surfaces to shear beans into uniform particles. Consistency is everything. Water flows through consistent particles at a predictable rate, extracting flavors evenly. With a blender’s inconsistent grind, water rushes through the large chunks (under-extracting) and gets stuck in the fine powder (over-extracting).
TL;DR: Blenders smash; grinders cut. Smashing gives you unpredictable particles, and unpredictable particles make bad coffee.
The Mechanics of Blade vs. Burr
To understand the blender’s limitation, you need to see what happens inside the jar. The blade assembly is typically a four-pronged, sharp-edged star. When it spins, it creates a vortex that pulls ingredients down the sides into the cutting path. Dense, hard coffee beans don’t behave like soft fruit or ice.
They bounce. This bouncing leads to uneven exposure to the blades. The result isn’t a spectrum, it’s a binary mess of dust and rubble.
| Grinding Method | Mechanism | Particle Outcome | Best For |
|---|---|---|---|
| Blender Blade | Impact / Smash | Highly inconsistent; fines + boulders | Emergency coarse grind (cold brew) |
| Burr Grinder | Shear / Crush | Highly consistent; uniform particle size | Any method (espresso, pour over, French press) |
| Dry Grains Container | Pulverize | Moderately consistent; fewer large boulders | Coarse to medium grind (drip, French press) |
The specialized Vitamix Dry Grains Container has differently angled blades designed for a pulverizing action on dry ingredients. It’s an exception that proves the rule, even Vitamix acknowledges a standard wet container isn’t right for the job by selling a separate accessory. This container reduces bouncing and produces a more usable, though still not excellent, grind for methods like drip coffee.
The core issue remains mechanical. Without controlled particle size, you cannot control extraction.
The Step-by-Step Blender Method (If You Must)
If the blender is your only option, this method minimizes damage and maximizes drinkability. It will not produce great coffee, but it can produce coffee.
Before you start: Unplug the blender before handling the blades. Coffee bean fragments are sharp and can stick in the blade seal. Wipe the base with a dry cloth after grinding, any residual oils attract moisture and can lead to rancidity in the gasket over time.
-
Use a small batch. Measure 1/4 to 1/2 cup of beans. Overfilling is the top cause of failure. Too many beans create a cushion that prevents any from reaching the blades effectively.
Consequence: You’ll run the blender for 45 seconds, hear a high-pitched whine, and find half the beans still whole. The motor will be hot to the touch. -
Employ the pulse-and-shake rhythm. Secure the lid. Pulse for 1 second, then stop for 3 seconds. Repeat this 5–7 times. The goal is to break the beans incrementally, not vaporize them.
Consequence: Holding the button creates friction heat. After about 15 seconds of continuous blending, the jar will feel warm. That heat is cooking the aromatic oils (called volatiles) that give coffee its fruity, floral notes. What’s left tastes like generic “roasted” flavor. -
Shake and inspect. Turn off the blender, pick up the jar, and shake it vigorously. This moves ground coffee away from the blades and brings whole beans back into the cutting path. Look at the texture. After the first round of pulses, it should resemble rough gravel.
-
Pulse to target texture. For French press or cold brew, stop when the largest pieces are about the size of coarse sea salt. For drip coffee, pulse another 3–5 times until the mix looks like a coarse sand. You will still see a wide variety of sizes.
> I tried to grind for a pour-over with a Ninja blender last year. After two minutes of pulsing and shaking, I still had boulders the size of peppercorns. I sifted them out and used them for cold brew, which was the only method forgiving enough to handle them. -
Sift and brew immediately. Pour the grounds through a fine mesh sieve over your brewer. This removes the largest chunks and some of the finest dust. Use the grounds within minutes. Ground coffee stales rapidly, and the increased surface area from a blender’s dust accelerates this.
TL;DR: Small batches, short pulses, constant shaking. Expect a coarse, uneven grind and brew it immediately in a forgiving method like a French press.
When a Blender Can Actually Work: The Dry Container Exception

The research notes a critical edge case: the Vitamix Dry Grains Container. This isn’t a marketing gimmick. The container is taller and narrower, with a different blade geometry designed to create a cascading, grinding action for dry grains.
The blades in the Dry Grains Container are specifically designed to create a pulverizing action that grinds whole grains into fresh flours and kneads dough.
This official spec changes the conversation. If you own this accessory, you are not “grinding coffee in a blender” in the conventional sense. You are using a specialized dry-ingredient processor. The results are closer to a low-end blade grinder than to the chaos of a standard blender jar.
The performance is still far below any burr grinder. But for someone who already owns a Vitamix and this container, it represents a viable path to a passable coarse or medium grind. It won’t do espresso. It will struggle with a uniform fine grind for drip. But for French press or cold brew, it can get the job done.
The takeaway is specific. The tool defines the outcome.
The Real Risks: Damage and Flavor Loss
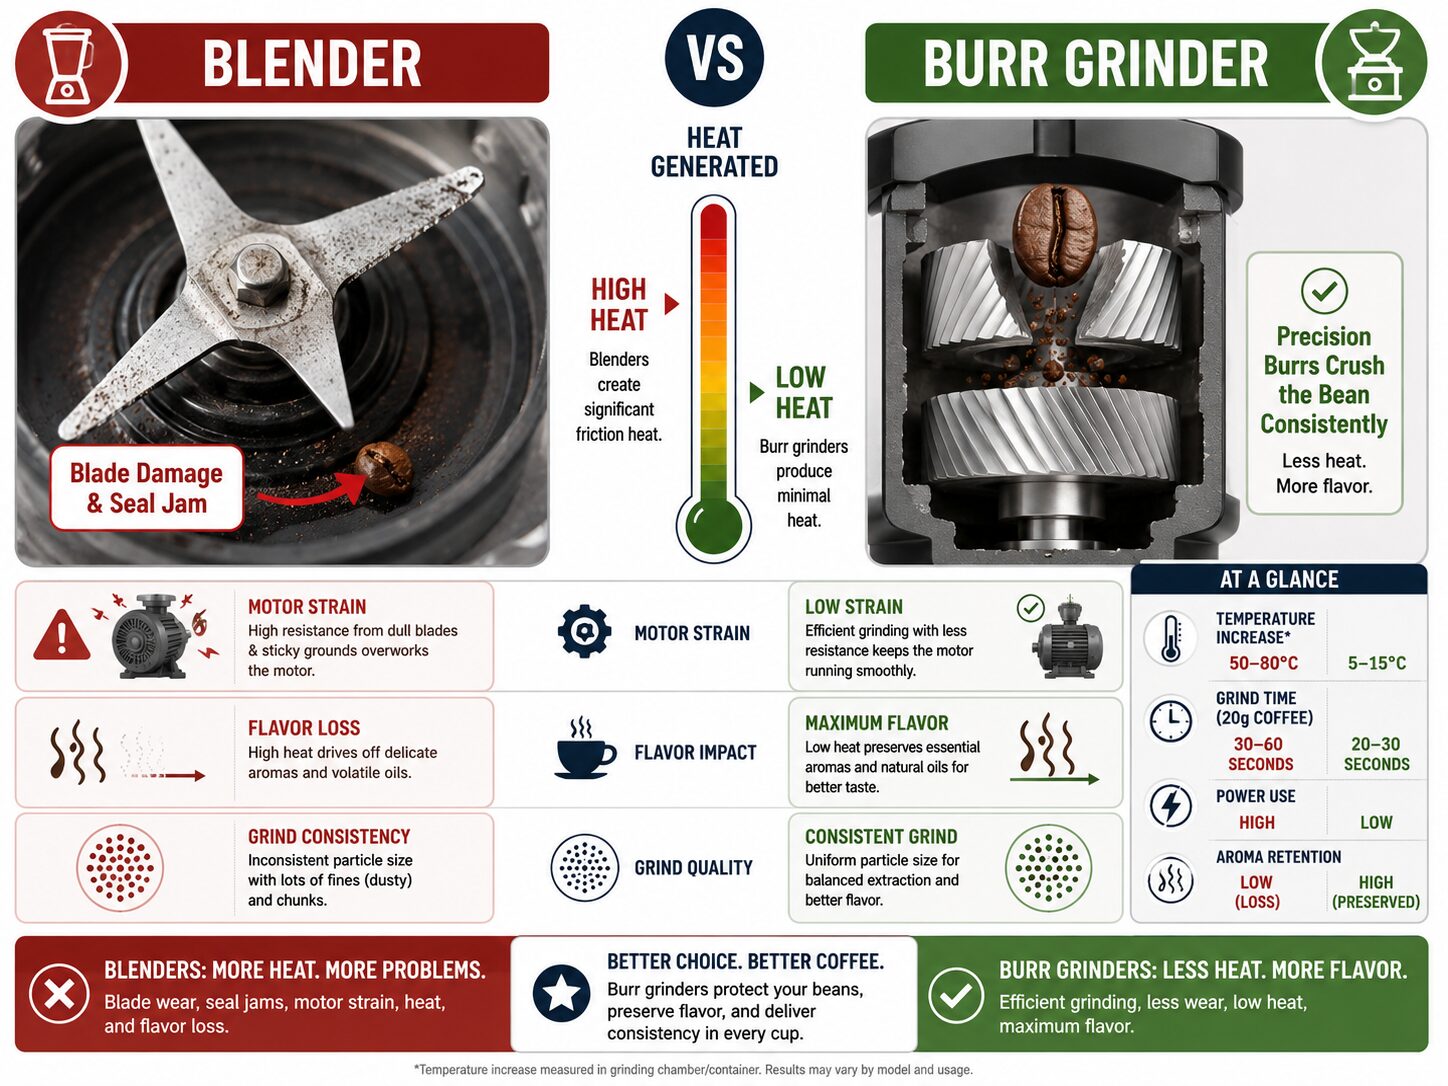
Using a blender for coffee isn’t just about subpar coffee. There are tangible risks to your equipment and your beans.
- Blade Damage: Coffee beans are dense and hard. Repeated impact against stainless steel blades can dull them over time. More critically, bean fragments can jam in the rubber seal at the base of the blade assembly. This compromises the seal, leading to leaks when you return to blending liquids.
- Motor Strain: The blender motor is designed for high-speed bursts through variable textures. Grinding a full cup of dense beans is a sustained, high-torque load it wasn’t engineered for. You’ll hear the pitch change, that’s the motor straining. Doing this repeatedly can shorten the appliance’s lifespan.
- Flavor Degradation: Heat is the silent killer. The friction from blade impact raises the temperature of the grounds. Volatile aromatic compounds evaporate. Oils oxidize faster. What you smell during grinding isn’t just fresh coffee; it’s the flavor leaving. A burr grinder generates minimal heat because it uses a slow, crushing action.
Common mistake: Storing blender-ground coffee, the inconsistent particle size and increased surface area cause it to go stale and taste flat within hours, not days. If you use this method, brew the entire batch immediately.
This table outlines the specific trade-offs:
| Risk Factor | Blender (Standard Jar) | Burr Grinder | Mitigation |
|---|---|---|---|
| Grind Consistency | Very Poor | Excellent | Use dry grains container; sift aggressively |
| Heat Generation | High (30+ seconds of run time) | Low | Strict pulse rhythm; small batches |
| Equipment Wear | High (blade dulling, seal jamming) | Low (burrs wear over years) | Clean blade seal thoroughly after use |
| Flavor Preservation | Poor (rapid volatile loss) | Excellent | Grind immediately before brewing |
Frequently Asked Questions
Can a Ninja blender grind coffee beans?
Yes, a Ninja blender can grind coffee beans using the same pulse method as any standard blender. Its high-power motor may heat the beans slightly faster. The results will be similarly inconsistent. For specific tips, our guide on how to grind coffee in a Ninja blender details the process.
Will grinding coffee ruin my blender blades?
It will dull them faster than blending soft foods and risks jamming small fragments in the blade assembly seal. It’s not a one-time killer, but it’s added wear. For longevity, a dedicated grinder is better.
What’s the difference between a blender and a blade grinder?
blade grinder is a blender in miniature, a small jar with a spinning blade. The principle is identical. The main advantage of a dedicated blade grinder is size; it’s easier to get a somewhat more even grind in a small cup than in a large pitcher. The fundamental flaw of inconsistent particles remains. For a deep dive, see our comparison of burr vs blade grinders.
Can I make espresso with blender-ground coffee?
No. Espresso requires an extremely fine, uniform, and compacted puck of coffee. The inconsistent grind from a blender will cause water to channel through the path of least resistance, resulting in a sour, weak, and messy shot. It is functionally impossible.
Is a dry grains container worth it just for coffee?
If you already own a compatible blender (like a Vitamix) and only need coarse grinds for French press or cold brew, it can be a reasonable single-tasker. If you drink drip coffee, espresso, or pour-over, investing in a real burr grinder will improve your coffee far more. The container is a workaround, not a solution.
The Bottom Line
You can force a blender to break coffee beans apart. The resulting brew will be a stark lesson in why grind consistency matters. The method is a last resort, defined by a strict pulse-and-shake cadence and an acceptance of significant flavor compromise.
The blender’s role in coffee is best limited to mixing pre-ground coffee into a smoothie. For anyone serious about flavor, the jump from a blender to an entry-level burr grinder is the single most impactful upgrade you can make. It’s the difference between hearing about tasting notes and actually tasting them. Your machine’s descaling procedures and your choice of bleached vs unbleached filters matter, but they can’t fix a broken foundation. Start with the grind.
