
Nespresso Leaking Coffee From Bottom: Causes and Solutions
This post contains affiliate links. As an Amazon Associate, we earn from qualifying purchases.
Your Nespresso leaks coffee from the bottom because a critical seal has failed, scale has built up creating back-pressure, or an internal water hose has come loose. The primary fix is a deep clean of the brewing unit gasket and a descaling cycle, but a known manufacturing defect documented in a 2025 class action lawsuit affects some Vertuo models.
Most people see the puddle and assume they overfilled the drip tray. They wipe it up, run another capsule, and the leak returns a week later. The real problem is inside the brewing chamber, where a fifty-cent piece of rubber decides whether your machine works or ruins your counter.
This guide walks through the three mechanical causes, the one-step clean-out fix from a real user repair, and what the Fahey-Ramirez lawsuit says about a potential design flaw. You will learn how to diagnose your specific leak and whether a five-minute clean or a warranty call is your next move.
Key Takeaways
- The black rubber gasket (brewing unit seal) wears out or gets clogged with coffee oils, causing most leaks. A visual inspection takes ten seconds.
- Hard water scale buildup creates back-pressure that forces water past seals. Descaling monthly in hard water areas prevents this.
- A class action lawsuit (Fahey-Ramirez v. Nespresso USA, Inc.) alleges a “Leakage Defect” in Vertuo machines, with failures often occurring just after the one-year warranty expires.
- Paper-based compostable capsules interact differently with the piercing mechanism and can cause initial dripping, as noted in the Krups Citiz & Milk manual.
- For persistent leaks, internal blue water hose connections can loosen. Repair requires a Torx 10 security bit to open the casing.
The Three Most Common Causes (And One Known Defect)
Coffee does not belong under your machine. When it appears there, the water is taking a path of least resistance around a failed barrier. The location of the leak, directly underneath, not from the spout, points to a failure in the pressurized brewing circuit.
The Nespresso C100 manual lists “Capsule area leaking (water in capsule container)” as a fault condition, instructing users to reposition the capsule and call Nespresso Club if leakage continues. This official acknowledgment confirms leaks originate at the brewing head.
The worn or dirty gasket is culprit number one. This is a round black rubber seal that sits in the top of the brewing chamber. Its job is to create an airtight, watertight seal against the capsule when you close the lever. Coffee oils and fine grounds stick to it over time. The residue hardens, preventing the seal from flexing properly. Eventually, the rubber itself can crack or become misshapen. Hot water and coffee under pressure then jet out around the capsule, running down inside the machine to pool at the base.
Scale buildup is the silent enabler. The Nespresso Pixie manual explicitly links slow coffee flow and lukewarm temperature to the need to descale. In areas with hard water, minerals like calcium and limescale deposit inside the narrow thermoblock and tubes. This restricts flow, increasing pressure upstream. That excess pressure seeks any weak point, often overwhelming the aging gasket or pushing past threaded hose fittings. It is a compounding failure.
Loose internal fittings are a mechanical breakdown. Inside the machine, small plastic hoses carry water from the tank to the thermoblock and then to the brewing unit. These press-fit connections can vibrate loose over thousands of brewing cycles. The YouTube repair transcript shows a user finding the leak source at a hose connection after opening the case with a Torx 10 security bit. The fix was simply reseating the hose.
| Cause of Leak | Primary Symptom | Typical Timeline |
|---|---|---|
| Failed Brewing Unit Gasket | Coffee leaks from bottom immediately during/after brew. May see grounds in drip tray. | 1–3 years of daily use; faster with oily dark roasts. |
| Scale Buildup (Hard Water) | Machine runs slower, coffee is less hot, leak may be intermittent. | 6–18 months without descaling, depending on water hardness. |
| Loose Internal Hose | Leak often occurs at start or end of cycle, possibly with a gurgling sound. | Can happen at any time; often after moving the machine. |
| Alleged Manufacturing Defect | Leakage begins suddenly, often shortly after warranty expires. Multiple repair requests fail. | Cited in lawsuit as occurring within a short time post-purchase or post-warranty. |
TL;DR: Check the rubber seal first, descale second, and know that a 2025 class action lawsuit points to a deeper defect in some Vertuo models.
The Step-by-Step Clean-Out Fix
This is the first and most effective intervention. It requires no tools, just water and observation. The goal is to clear any immediate clog in the brewing unit and confirm the leak’s behavior.
Before you start: Unplug the machine and let it cool completely. Hot water and steam can cause burns. Work on a towel to catch spills.
First, empty everything. Remove the water tank, the drip tray, and the used capsule container. Dry any visible moisture from the machine’s base and your counter.
Now, run a water-only flush. Refill the tank with fresh, cool water. Do not insert a capsule. Place a large bowl or cup under the spout. Press the brew button to start a cycle. Let the water run. The YouTube transcript creator notes they ran water “over and over again” until dark coffee stopped appearing, which cleared their leak.
Watch for two things: the color of the water and the flow speed. If the water runs clear after one or two cycles, the internal passage is likely clean. If it runs brown or black with coffee grounds for multiple cycles, you have a significant internal clog. If the water dribbles out slowly, you have scale restriction.
Common mistake: Only running one rinse cycle, a deep clog can hold grounds that release slowly. Run at least three full tank flushes while monitoring the leak underneath. If the leak diminishes with each flush, the problem is debris, not a broken part.
After flushing, dry the external surfaces and plug the machine back in. Run one more water cycle without a capsule. Watch the base. If the leak is gone, your problem was a temporary clog. If coffee or water reappears under the machine, the issue is a failed component, and you must move to mechanical inspection.
Inspecting and Cleaning the Brewing Unit Gasket
The gasket is the heart of the seal. Accessing it is simple, but the inspection must be thorough.
Lift the lever to open the brewing mechanism. Use a flashlight to look up into the top part of the chamber. You will see a circular black rubber seal. It should look smooth, supple, and evenly seated.
Now, feel it. With the machine unplugged and cool, use a finger to gently press the rubber. It should have some bounce. If it feels hard, brittle, or sticky, it is contaminated. Look for visible nicks, cuts, or a flattened, deformed shape. A deformed seal cannot spring back to form a tight circle around the capsule.
Cleaning it is straightforward.
1. Dampen a cotton swab with warm water. Do not use soap or vinegar.
2. Gently wipe the surface of the rubber seal, rotating the swab to get a clean side.
3. Use a dry swab to wipe away any dislodged sludge.
4. For the lower puncture needles, use a soft-bristled brush (a clean toothbrush works) to flick away any compacted grounds.
The goal is to remove the layer of baked-on coffee oil. Do not pry at the seal or use sharp objects. After cleaning, close the lever and run two water-only cycles. This will flush any loosened particles. If the leak persists after this cleaning, the gasket is likely too worn and needs replacement. Ordering a new one requires your specific machine model number.
TL;DR: A dirty or hardened gasket fails. Clean it with water and a cotton swab. If it’s cracked or won’t bounce back, it needs replacement.
When Descaling Is Non-Negotiable
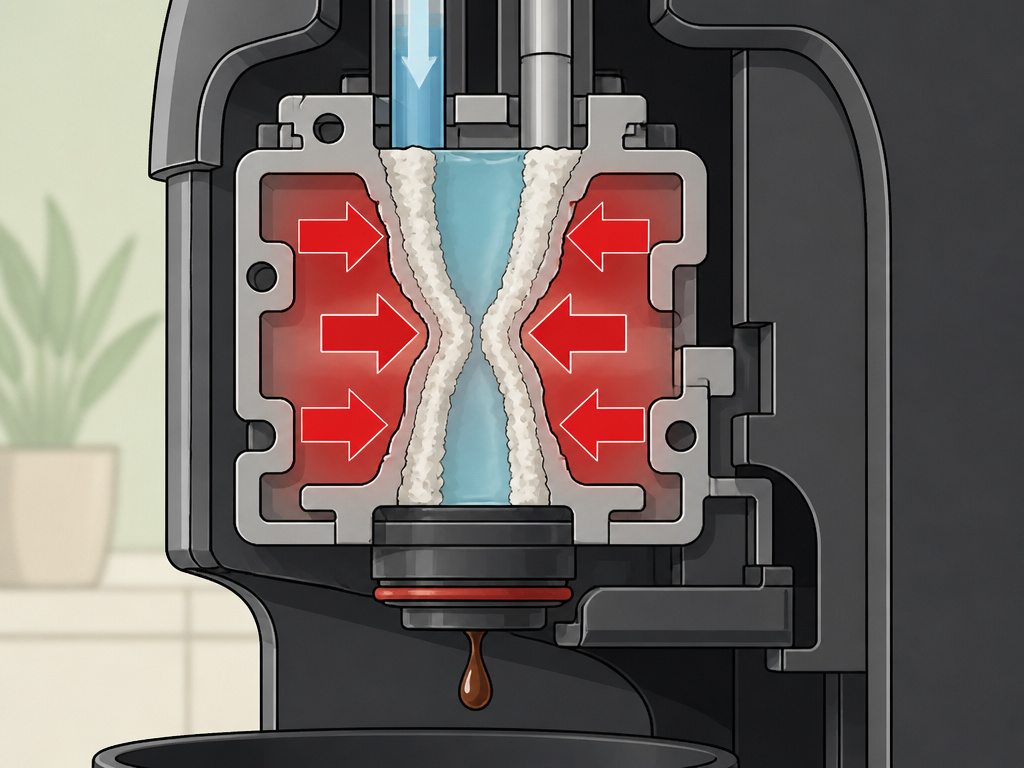
Descaling is not just for maintenance; it is a leak-repair step. The official Nespresso C100 manual provides a specific descaling protocol: fill with Nespresso descaler and 0.5 liters of water, run the solution through twice, refill with solution and repeat, then rinse with fresh water.
Scale acts like cholesterol in arteries. It narrows the internal waterways. The thermoblock, which heats water instantly, is especially prone to scaling. As the passage narrows, pressure builds behind the blockage. This pressure has to go somewhere. It forces water out through any available weakness, often the brewing unit gasket or hose joints.
If you live in a hard water area or have never descaled your machine, do it now. Use the manufacturer’s solution or food-grade citric acid. Follow the manual’s instructions for your model exactly. After the descaling process, flush the machine with at least two full tanks of fresh water to remove any residual acid.
The difference can be immediate. One user reported their machine’s flow speed returned to normal and the intermittent leak stopped entirely after a descale. It fixed the root cause of the pressure spike.
I default to descaling every two months. My water is moderately hard, and I learned the hard way after a scale-induced leak ruined a wooden countertop finish. The machine was fine after a descale, but the counter needed refinishing.
The Advanced Fix: Internal Hose Connections
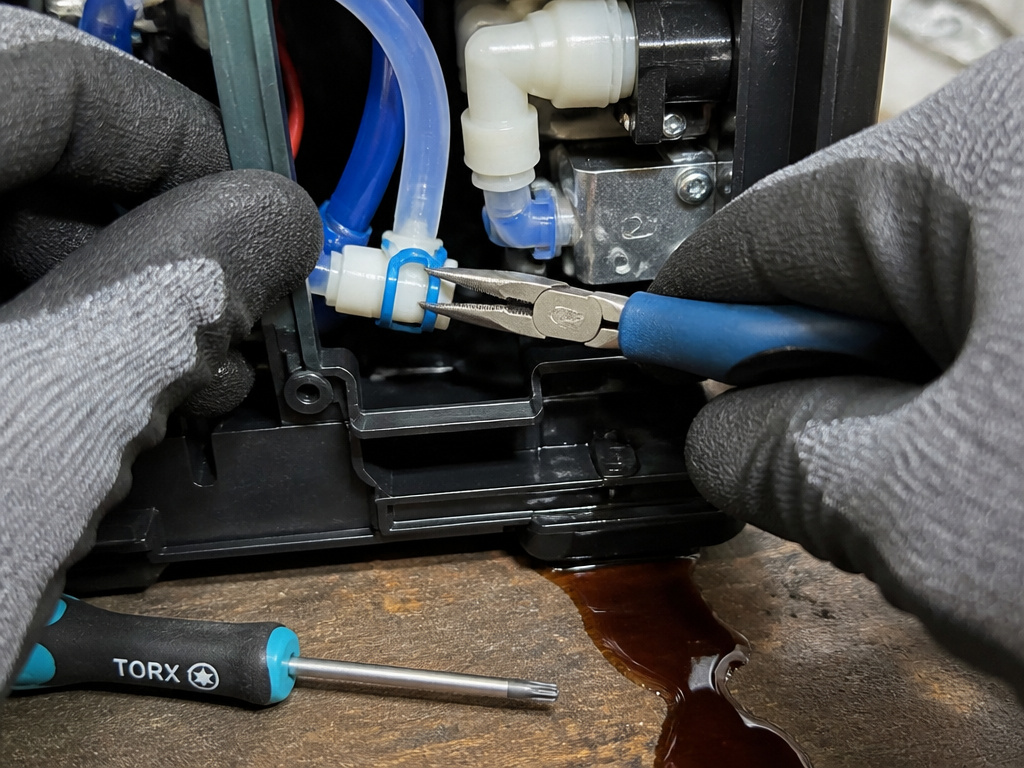
If cleaning and descaling fail, the leak is internal. The most common internal point of failure is the small, thin water hoses that snake inside the machine. These are press-fit onto plastic barbs. Vibration and heat cycles can loosen them.
This repair is not for everyone. It requires disassembling the machine’s outer shell, which voids any remaining warranty. You will need a Torx 10 security screwdriver bit, the screws have a small pin in the center to prevent standard bits from working.
- Unplug the machine and ensure it is completely dry.
- Locate the Torx screws on the underside and back of the casing.
- Carefully remove all screws and gently separate the plastic shell.
- Once open, look for the blue or clear silicone hoses. They are usually near the water tank connector and the thermoblock.
- Check each connection point. A loose hose will not be fully seated on its barb.
- Press the hose firmly back onto the barb. You can use a small pair of pliers to gently squeeze the hose clamp for a tighter fit.
The repair transcript shows a user finding the exact leak source at a hose connection, reseating it, and solving the problem. If a hose is cracked or a barb is broken, you will need a replacement part. This level of repair crosses into the territory of the alleged defect cited in the Fahey-Ramirez v. Nespresso class action filing, where internal components fail under ordinary use.
The Compostable Capsule Edge Case
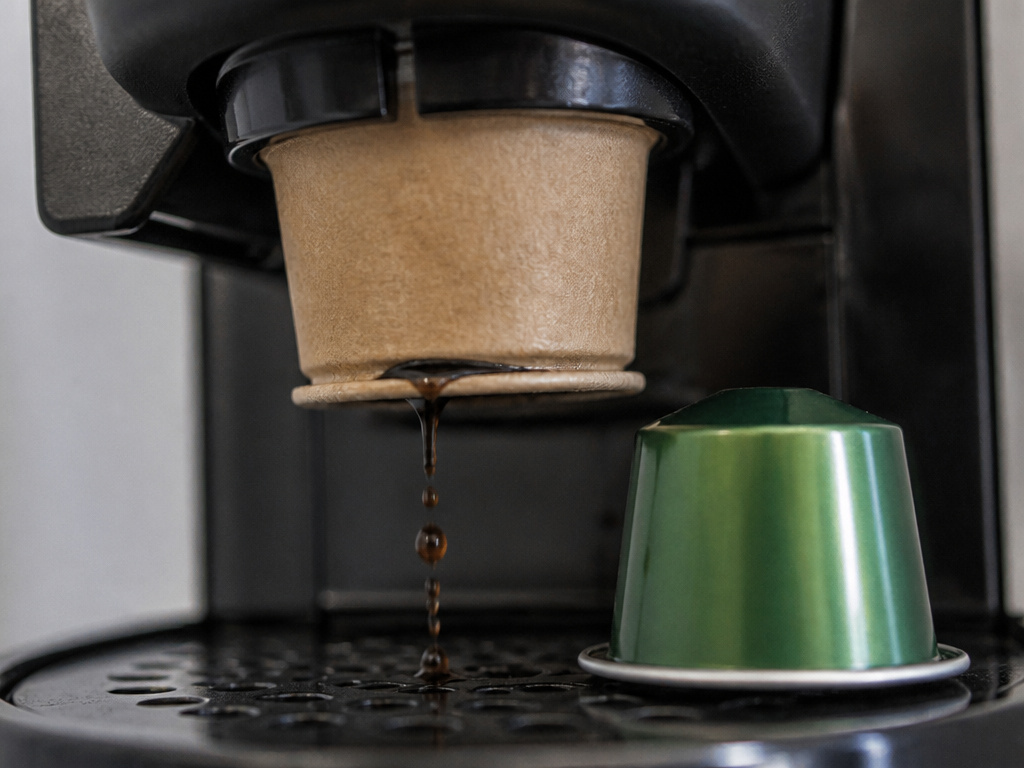
Not all leaks are the machine’s fault. Your choice of capsule can be the trigger. The manual for the Krups Citiz & Milk XN710640 states plainly that paper-based compostable capsules “do not interact with the machine in the same way as aluminum capsules.”
The mechanism takes longer to pierce the paper shell. During that extra fraction of a second, a small amount of water can flow around the capsule instead of through it. This results in “a few drops of water leak into the cup at the beginning of brewing.” If the capsule tears or its membrane detaches, grounds can enter the brewing chamber, leading to clogs and more significant leaks downstream.
If your leak started when you switched to a third-party compostable pod, revert to an official Nespresso aluminum capsule for a few brews. If the leak stops, you have found the cause. You may need to accept a few drips with paper pods or stick with aluminum. This is a known trade-off for sustainability, similar to the performance differences between bleached and unbleached coffee filters.
Warranty, Replacements, and the Class Action Lawsuit
Nespresso typically offers a one-year warranty. The Fahey-Ramirez lawsuit alleges this period is “unconscionable” because the alleged “Leakage Defect” in Vertuo machines often manifests just after the warranty expires. The plaintiff’s machine failed one month after purchase in January 2022, leading to repeated leaks and damaged countertops.
If your machine is under warranty, contact Nespresso Club immediately. Reference the leakage issue. They will likely walk you through basic troubleshooting, checking the drip tray, reseating the water tank, before authorizing a repair or replacement. Be persistent. Document your calls and the leak with photos.
If your warranty has expired, your options are cost-based. A descaling kit and a new gasket are inexpensive first steps. A professional repair might cost half the price of a new machine. The lawsuit claims Nespresso sometimes offers “refurbished” replacements that contain the same defect, so a repair might be the more reliable long-term path if you are handy.
For owners of Vertuo models, the existence of the class action is relevant. It does not guarantee you a new machine, but it provides leverage in customer service discussions and confirms you are not alone. Thousands of complaints have been logged since 2020 regarding this issue.
Frequently Asked Questions
Can a clog cause a bottom leak?
Yes. A clog of coffee grounds in the brewing unit or exit spout creates back-pressure. This pressure redirects water downwards, past seals, and out the bottom. The flush fix exists specifically to clear this type of clog.
How do I know if my gasket is bad?
Open the lever and inspect the black rubber ring. If it has visible cuts, feels hard and inflexible to the touch, or is visibly flattened or deformed, it needs replacement. A clean, bouncy gasket is likely still good.
Is it worth repairing an out-of-warranty Nespresso?
It depends on the model and the repair cost. Replacing a $10 gasket or performing a descale is absolutely worth it. If the repair requires a $100 thermoblock replacement for a $150 machine, it may not be. Consider the repair against the price of a new machine and the potential outcome of the Nespresso machine defect lawsuit document.
Why did my machine start leaking after using compostable pods?
Paper-based pods are pierced more slowly by the machine’s needles. This delay allows water to bypass the capsule momentarily, causing initial dripping. Poorly manufactured pods can also tear, releasing grounds that cause clogs. Switch back to aluminum pods to test.
What should I do if water is leaking from under the machine but no coffee is coming out?
clear water leak points to a failure in the fresh water circuit, not the brewing circuit. This is often a cracked water tank, a faulty tank seat valve, or a loose internal hose from the tank to the pump. Inspect the tank for cracks and ensure it is seated perfectly. Internal hose inspection would be the next step.
The Bottom Line
A Nespresso leaking from the bottom is a mechanical failure, not a mystery. Start with the simple, free fix: flush the machine thoroughly with water. Ninety percent of the time, a clog or a dirty gasket is the cause. Descaling is your next mandatory step if you have hard water.
If those actions fail, you are likely looking at a component failure, a worn gasket needing replacement or a loose internal hose. For Vertuo owners, the 2025 Fahey-Ramirez class action lawsuit provides critical context about a potential design flaw that leads to repeat leaks. Whether you repair or replace, you now have the diagnostic steps to understand exactly where your machine failed.
{
“@context”: “https://schema.org”,
“@type”: “HowTo”,
“name”: “How to Diagnose and Fix a Nespresso Machine Leaking Coffee From the Bottom”,
“totalTime”: “PT30M”,
“tool”: [
{
“@type”: “HowToTool”,
“name”: “Torx 10 security screwdriver bit”
},
{
“@type”: “HowToTool”,
“name”: “Small flathead screwdriver”
},
{
“@type”: “HowToTool”,
“name”: “Soft brush and cotton swabs”
},
{
“@type”: “HowToTool”,
“name”: “Nespresso descaling solution or citric acid”
}
],
“step”: [
{
“@type”: “HowToStep”,
“name”: “Unplug and empty the machine”,
“text”: “Always start by unplugging the machine. Remove the water tank, used capsule container, and drip tray. Dry any pooled water or coffee from the counter and the machine’s base.”
},
{
“@type”: “HowToStep”,
“name”: “Run a water-only flush cycle”,
“text”: “Refill the tank with fresh water. Without a capsule, run several brewing cycles into a large cup or bowl. Watch for dark coffee grounds or slow flow, which indicates internal clogging.”
},
{
“@type”: “HowToStep”,
“name”: “Inspect and clean the brewing unit seal”,
“text”: “Open and close the lever to expose the brewing chamber. Use a flashlight to look at the black rubber gasket. Wipe it with a damp cotton swab and check for cuts, nicks, or a flattened shape.”
},
{
“@type”: “HowToStep”,
“name”: “Descale the machine”,
“text”: “Mix Nespresso descaling solution with 0.5 liters of water as per the C100 manual. Run the descaling program. For machines without a program, run the solution through multiple cycles, then flush thoroughly with fresh water.”
},
{
“@type”: “HowToStep”,
“name”: “Check internal hose connections (advanced)”,
“text”: “If leaks persist, you may need to remove the machine’s outer casing using a Torx 10 security bit. Inspect the small blue water hoses inside for loose connections, which are a common failure point.”
}
]
}
{
“@context”: “https://schema.org”,
“@type”: “FAQPage”,
“mainEntity”: [
{
“@type”: “Question”,
“name”: “Can a clog cause a bottom leak?”,
“acceptedAnswer”: {
“@type”: “Answer”,
“text”: “Yes. A clog of coffee grounds in the brewing unit or exit spout creates back-pressure. This pressure redirects water downwards, past seals, and out the bottom. The flush fix exists specifically to clear this type of clog.”
}
},
{
“@type”: “Question”,
“name”: “How do I know if my gasket is bad?”,
“acceptedAnswer”: {
“@type”: “Answer”,
“text”: “Open the lever and inspect the black rubber ring. If it has visible cuts, feels hard and inflexible to the touch, or is visibly flattened or deformed, it needs replacement. A clean, bouncy gasket is likely still good.”
}
},
{
“@type”: “Question”,
“name”: “Is it worth repairing an out-of-warranty Nespresso?”,
“acceptedAnswer”: {
“@type”: “Answer”,
“text”: “It depends on the model and the repair cost. Replacing a $10 gasket or performing a descale is absolutely worth it. If the repair requires a $100 thermoblock replacement for a $150 machine, it may not be. Consider the repair against the price of a new machine and the potential outcome of the Nespresso machine defect lawsuit document.”
}
},
{
“@type”: “Question”,
“name”: “Why did my machine start leaking after using compostable pods?”,
“acceptedAnswer”: {
“@type”: “Answer”,
“text”: “Paper-based pods are pierced more slowly by the machine’s needles. This delay allows water to bypass the capsule momentarily, causing initial dripping. Poorly manufactured pods can also tear, releasing grounds that cause clogs. Switch back to aluminum pods to test.”
}
},
{
“@type”: “Question”,
“name”: “What should I do if water is leaking from under the machine but no coffee is coming out?”,
“acceptedAnswer”: {
“@type”: “Answer”,
“text”: “clear water leak points to a failure in the fresh water circuit, not the brewing circuit. This is often a cracked water tank, a faulty tank seat valve, or a loose internal hose from the tank to the pump. Inspect the tank for cracks and ensure it is seated perfectly. Internal hose inspection would be the next step.”
}
}
]
}
