
How to Make Drip Coffee & Hit the SCA’s 200°F Brew Standard
To make drip coffee, you need to match three specific parameters: a coffee-to-water ratio of 55 grams per liter (a 1:18 ratio), a water temperature at the brew head of 200°F ± 5°F (93°C ± 3°C), and a total brew contact time between 4 and 8 minutes. These are the official standards set by the Specialty Coffee Association for optimal extraction.
Most people get this wrong because they rely on the vague “scoop” measurement printed on their coffee maker’s carafe and never check if their machine actually gets hot enough. The scoop method ignores bean density and leads to weak or bitter coffee every single time.
This guide walks through the SCA’s brewing standards, the tools that matter, a step-by-step process, and the critical maintenance step that prevents your morning cup from tasting like yesterday’s stale oil.
Key Takeaways
- The SCA’s 55g/L (1:18) ratio is non-negotiable for balanced strength. A standard 12-cup carafe needs about 100 grams of coffee, not the 75 grams most scoops deliver.
- Water temperature is the most common failure point. If your brewer doesn’t hit 200°F at the shower head, the coffee under-extracts and tastes sour and thin.
- A burr coffee grinder is the single biggest upgrade over a blade grinder for drip. Inconsistent particle size from a blade creates simultaneous bitter and sour notes.
- Clean the machine’s brew basket and carafe lid after every use. Old coffee oils oxidize within hours and make your next pot taste rancid.
- At high altitudes, water boils below 200°F. Compensate with a slightly finer grind and a 10% increase in your coffee dose.
The SCA’s Drip Coffee Brewing Standards (and Why They Matter)
The Specialty Coffee Association doesn’t publish opinions. They publish measurable standards based on decades of sensory analysis. Their brewing standards document specifies exact numbers for temperature, contact time, and ratio. Ignoring these numbers is why home drip coffee often disappoints.
The SCA states the water temperature at the point of contact with the coffee should be 200°F ± 5°F (93.0°C ± 3.0°C). This is the sweet spot for efficiently dissolving the desirable sugars and acids in coffee. Below 195°F, you get a flat, sour cup. Above 205°F, you risk extracting harsh, bitter compounds.
According to the Specialty Coffee Association’s Brewing Standards, the brewing ratio should be 55 g/L ± 10%. This translates to a coffee-to-water mass ratio of approximately 1:18. The contact time between water and coffee should be 4–8 minutes.
Your machine’s advertised “200-degree brewing” often refers to the temperature in the tank, not at the shower head. Heat loss through the internal tubing can drop the temperature by 10–15 degrees. That’s why SCA-certified brewers like the Bonavita BV1900TS are tested to actually deliver water within that range at the brew head.
TL;DR: Target 200°F water at the brew head, a 1:18 coffee-to-water ratio, and a 4–8 minute total brew time. These three numbers from the SCA are your blueprint.
The 4 Tools That Replace Guesswork
You can follow the SCA standards with a basic machine if you have the right supporting tools. This isn’t about buying the most expensive brewer. It’s about buying the tools that eliminate variables.
First, a digital kitchen scale. Measuring by weight is the only way to hit the 55g/L ratio consistently. Coffee bean density varies wildly; a scoop of a dense dark roast can weigh 30% more than a scoop of a fluffy light roast. Volume is a liar.
Second, a burr coffee grinder. Blade grinders hack beans into a random mix of dust, chunks, and medium pieces. The dust over-extracts into bitterness while the chunks under-extract into sourness. You get both flavors in one cup. A burr grinder crushes beans between two surfaces for a consistent particle size, which is the foundation of even extraction. The debate between a blade coffee grinder and a burr model ends here for quality.
Third, a gooseneck kettle. Even if your machine has a tank, a kettle lets you use filtered water and pre-rinse your paper filter with precision. Chlorine and minerals in tap water flatten flavor.
Fourth, the filter itself. The choice between bleached coffee filters and unbleached coffee filters matters. Unbleached filters can impart a faint papery or cardboard taste to the first few pots. Bleached filters (white) are rinsed to remove that taste. For the purest coffee flavor, always pre-rinse your filter with hot water, regardless of type.
| Tool | Minimum Viable Choice | The Upgrade That Matters |
|---|---|---|
| Scale | Any digital scale with 1g resolution | One with a timer for tracking brew time |
| Grinder | A manual burr grinder | An electric burr grinder with flat burrs |
| Water | Filtered pitcher water | Third Wave Water mineral packets |
| Filter | Standard paper coffee filters | Reusable gold-toned mesh filter |
Choosing and Measuring Your Coffee
The bean decides everything. Starting with stale or poorly roasted coffee means you’re optimizing a process that cannot succeed. Freshness matters more than exotic origin.
Buy whole beans from a local roaster with a roast date printed on the bag. Use them within 3–4 weeks of that date. After a month, the volatile aromatics that create fragrance and acidity have mostly dissipated. What’s left tastes like muted cardboard.
When selecting beans, understand the difference between a coffee blend and a single-origin coffee. Blends are crafted for consistency and balance, often containing beans that complement each other’s flavor profiles. Single-origin coffees showcase the unique taste of one region, which can be more variable but also more distinctive. A bright, acidic blonde roast bean behaves differently in the brewer than a chocolatey dark roast.
Weigh your coffee. For a full 1.5-liter carafe (about 10 cups), you need 82.5 grams of coffee to hit the SCA’s 55g/L standard. That’s roughly 20 tablespoons, not the 10–15 your carafe’s markings suggest.
Common mistake: Using pre-ground coffee from the grocery store — it’s often ground too fine for drip and goes stale within minutes of opening the bag. The excessive surface area of fine particles leads to over-extraction and bitterness, and the stale grounds contribute a flat, woody taste.
Step-by-Step Brewing Process
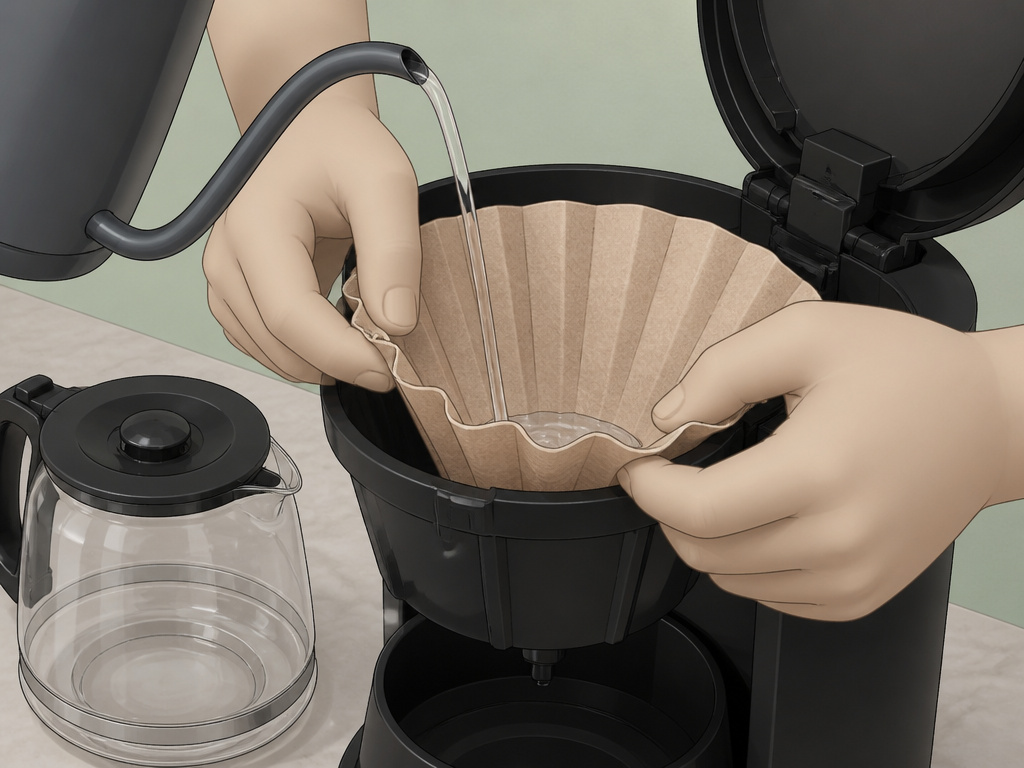
This sequence assumes you have a scale, fresh beans, a grinder, and filtered water. Skip a step and the result degrades predictably.
Before you start: Your coffee maker’s heating element and hot plate are live. Never open the brew basket during the cycle—escaping steam can cause serious burns. Always handle the carafe with a dry cloth; a wet grip on hot glass can slip.
- Measure and grind. Weigh your whole beans, then grind them immediately. A medium grind should feel like coarse sand, not powder. Grinding finer speeds up extraction, grinding coarser slows it down. Store any unused beans in an airtight container away from light and heat.
- Prepare the filter and basket. Place your filter in the basket. Run 8–12 ounces of hot water from your kettle through the empty filter and into the carafe. This accomplishes three things: it removes the paper taste from unbleached coffee filters, it preheats the entire brew path, and it warms the carafe so your coffee doesn’t cool too quickly on the hot plate. Dump this water out.
- Add coffee and start the brew. Add the fresh grounds to the damp filter, level the bed, and reassemble the brewer. Start the cycle. Listen to the sound. A proper shower head will distribute water in a steady, even patter, not a weak trickle or a single concentrated stream.
- Monitor the time. The complete brew cycle, from first water contact to the last drip, should fall within the SCA’s 4–8 minute window. If it’s faster, your grind is too coarse or your machine’s water flow is too high. If it’s slower, your grind is too fine or the filter is clogging.
- Serve and clean immediately. As soon as the pot is full, remove the carafe from the hot plate. Pour your coffee. Discard the used filter and grounds. Rinse the brew basket and wipe the carafe lid clean. This last step is non-negotiable.
Leaving the carafe on the hot plate for more than 30 minutes begins a stewing process that breaks down the coffee’s flavor compounds. It turns sharp and bitter. Use a thermal carafe if you need to keep coffee hot for longer.
Troubleshooting Your Drip Coffee
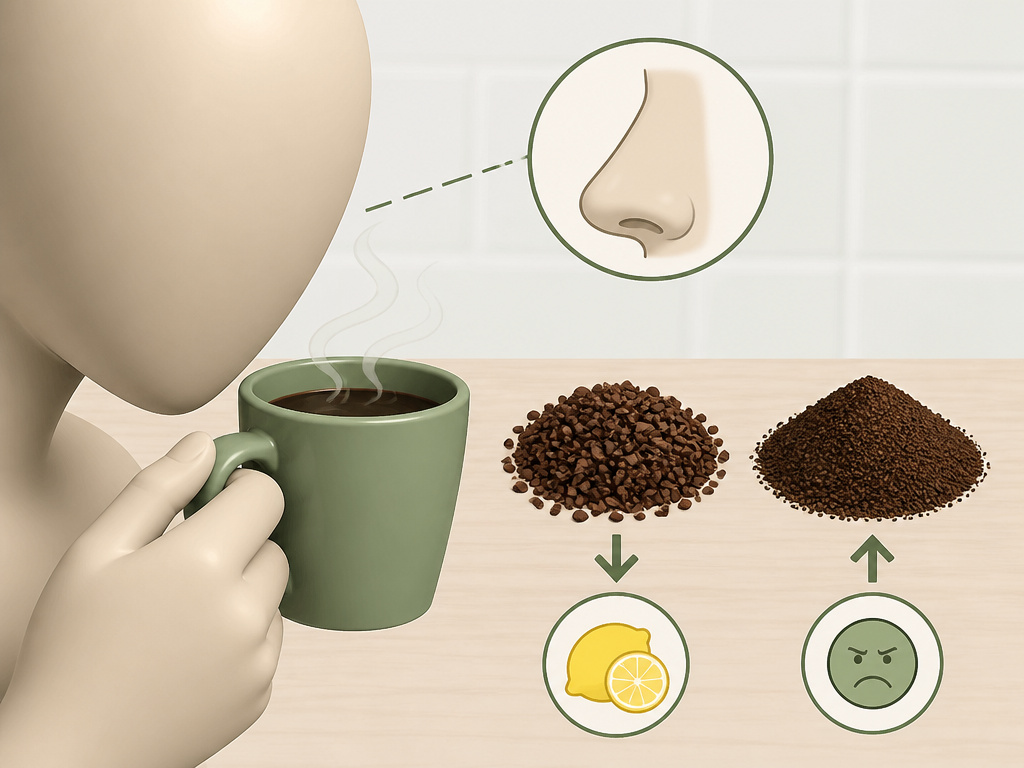
Your senses are the best diagnostic tools. The flavor tells you exactly what went wrong in the brewing equation.
- Coffee tastes sour, salty, or weak. This is under-extraction. The water didn’t dissolve enough of the coffee solids. Likely causes: water temperature too low, grind too coarse, brew time too short, or not enough coffee (ratio too weak).
- Coffee tastes bitter, harsh, or dry. This is over-extraction. The water dissolved too many compounds, including the undesirable ones. Likely causes: water temperature too high, grind too fine, brew time too long, or too much coffee (ratio too strong).
- Coffee tastes flat and stale, but not specifically bitter or sour. The beans are old. The aromatic compounds have evaporated. No brewing adjustment can fix this. Start with freshly roasted beans.
- Coffee has a papery or cardboard taste. You didn’t pre-rinse your paper filter. Always pour hot water through it before adding coffee. This is especially critical for unbleached coffee filters.
- Coffee tastes rancid or like old vegetables. This is the taste of oxidized coffee oils. You didn’t clean the brew basket or carafe after the last use. The oils go off within hours. Disassemble and clean every part that touches coffee with a vinegar solution.
For high-altitude brewers, the lower boiling point is a permanent handicap. If you live above 3,000 feet, your machine likely cannot reach 200°F. You must compensate by increasing the extraction pressure elsewhere: use a slightly finer grind and increase your coffee dose by about 10%. This gives the cooler water a better chance to fully extract the grounds.
Maintaining Your Machine for Consistent Flavor
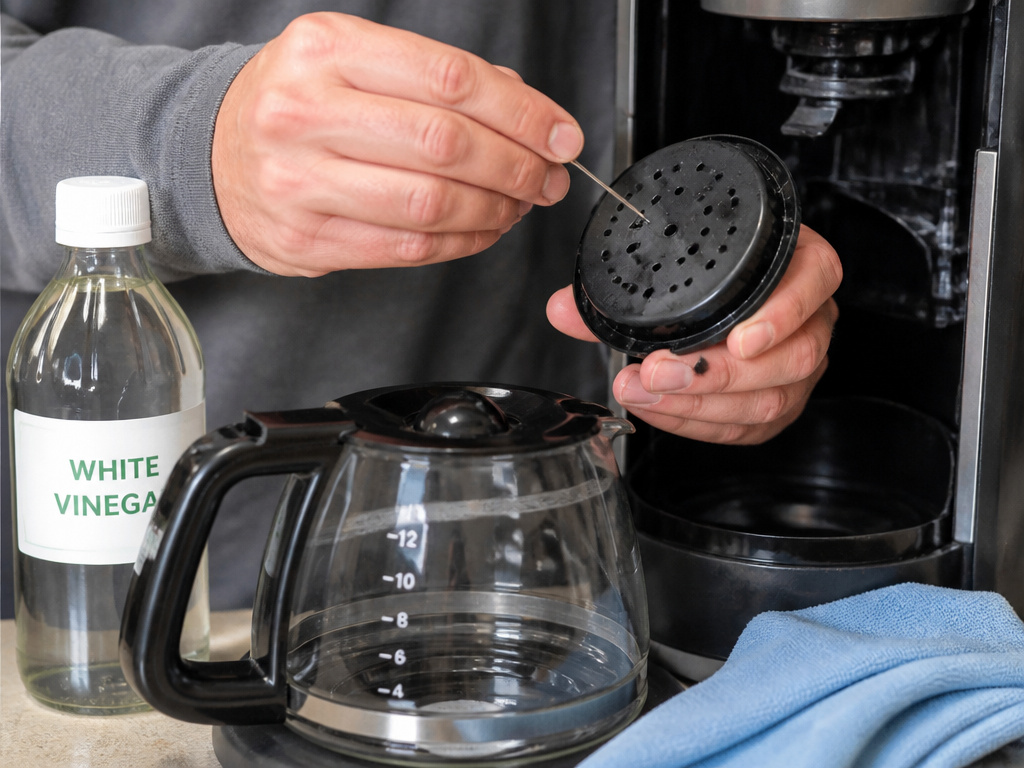
Your coffee maker is not a self-cleaning appliance. Mineral scale from water and polymerized coffee oils from grounds build up with every brew. They change the machine’s performance and taint the flavor.
Clean the carafe, lid, and brew basket after every single use. A quick rinse with hot water and a wipe with a soft cloth prevents oil buildup. Once a month, run a descaling cycle. Use a commercial descaling solution or a mixture of one part white vinegar to two parts water. Run the solution through a full brew cycle, then run two to three cycles with fresh water to flush any vinegar taste.
Every six months, check the shower head—the part that sprays water over the grounds. Mineral deposits can clog the tiny holes, leading to uneven saturation. A pin or needle can clear them.
Neglect this, and the machine will slowly poison your coffee. The oils turn rancid. The scale insulates the heating element, causing it to run hotter and potentially damaging the machine. The first sign is often a faint, off-putting smell when the machine heats up.
Frequently Asked Questions
What is the best coffee-to-water ratio for drip coffee?
The Specialty Coffee Association standard is 55 grams of coffee per liter of water, a 1:18 ratio by mass. For a standard 12-cup (1.5 liter) pot, this means 82.5 grams of coffee. Always use a scale, as volume measurements with scoops are inaccurate.
Does the type of coffee filter matter?
Yes. Bleached coffee filters are rinsed to remove the papery taste that can leach into your brew from unbleached coffee filters. Always pre-rinse paper filters with hot water. Reusable metal or cloth filters allow more oils and fine sediment through, resulting in a heavier-bodied but potentially murkier cup.
Can I use pre-ground coffee?
You can, but you sacrifice control and freshness. Pre-ground coffee is often ground too fine for optimal drip brewing, leading to over-extraction and bitterness. It also begins staling the moment the bag is opened. For the best flavor, invest in a burr coffee grinder and buy whole beans.
How often should I clean my coffee maker?
Clean the carafe, lid, and filter basket after every use to prevent rancid oil buildup. Descale the machine’s interior with a vinegar solution or commercial descaler every month if you have hard water, or every 2-3 months with soft water. A neglected machine makes bad coffee.
What’s the difference between drip coffee and an Americano?
Drip coffee is made by passing hot water through a bed of grounds once. An Americano brewing method involves diluting a shot of espresso with hot water. While both are brewed coffee drinks, they have different strength, body, and flavor profiles due to the extraction method and pressure used.
The Bottom Line
Great drip coffee isn’t an accident. It’s the result of matching three measurable standards: weight, temperature, and time. Start by weighing your coffee and water to hit the 1:18 ratio. Verify your machine can deliver 200°F water to the grounds. Grind fresh beans to a consistent medium size.
The biggest trap is complacency. Using the same scoop of stale, pre-ground coffee in an un-cleaned machine guarantees a mediocre cup. Break that cycle with a scale and a grinder. Your first pot following the SCA’s 55g/L rule will taste stronger than you’re used to. That’s the point. That’s the flavor you’ve been missing.
{
“@context”: “https://schema.org”,
“@type”: “HowTo”,
“name”: “How to Make Drip Coffee to SCA Standards”,
“totalTime”: “PT10M”,
“tool”: [
{
“@type”: “HowToTool”,
“name”: “Drip coffee maker (SCA certified preferred)”
},
{
“@type”: “HowToTool”,
“name”: “Burr coffee grinder”
},
{
“@type”: “HowToTool”,
“name”: “Digital kitchen scale”
},
{
“@type”: “HowToTool”,
“name”: “Fresh coffee beans”
},
{
“@type”: “HowToTool”,
“name”: “Paper or reusable coffee filter”
}
],
“step”: [
{
“@type”: “HowToStep”,
“name”: “Measure your coffee and water”,
“text”: “Use a digital scale to measure 55 grams of coffee per liter of water, which is the SCA’s 1:18 brewing ratio standard. For a standard 10-cup pot, that’s roughly 82 grams of coffee to 1.5 liters of water.”
},
{
“@type”: “HowToStep”,
“name”: “Grind your beans fresh”,
“text”: “Grind the beans to a medium consistency, similar to coarse sand. A burr grinder provides the even particle size needed for balanced extraction.”
},
{
“@type”: “HowToStep”,
“name”: “Prepare the machine and filter”,
“text”: “Insert a clean filter into the basket. If using a paper filter, rinse it with hot water from the kettle to eliminate paper taste and preheat the brewer. Discard the rinse water from the carafe.”
},
{
“@type”: “HowToStep”,
“name”: “Add grounds and start the brew”,
“text”: “Add the ground coffee to the filter, level the bed, and place the carafe. Start the brewing cycle. The total contact time between water and grounds should fall within 4 to 8 minutes.”
},
{
“@type”: “HowToStep”,
“name”: “Serve and clean immediately”,
“text”: “Once brewing is complete, remove the carafe and serve. Discard the used filter and grounds immediately. Wipe the basket and carafe lid to prevent oily residue from hardening and tasting rancid in the next pot.”
}
]
}
{
“@context”: “https://schema.org”,
“@type”: “FAQPage”,
“mainEntity”: [
{
“@type”: “Question”,
“name”: “What is the best coffee-to-water ratio for drip coffee?”,
“acceptedAnswer”: {
“@type”: “Answer”,
“text”: “The Specialty Coffee Association standard is 55 grams of coffee per liter of water, a 1:18 ratio by mass. For a standard 12-cup (1.5 liter) pot, this means 82.5 grams of coffee. Always use a scale, as volume measurements with scoops are inaccurate.”
}
},
{
“@type”: “Question”,
“name”: “Does the type of coffee filter matter?”,
“acceptedAnswer”: {
“@type”: “Answer”,
“text”: “Yes. Bleached coffee filters are rinsed to remove the papery taste that can leach into your brew from unbleached coffee filters. Always pre-rinse paper filters with hot water. Reusable metal or cloth filters allow more oils and fine sediment through, resulting in a heavier-bodied but potentially murkier cup.”
}
},
{
“@type”: “Question”,
“name”: “Can I use pre-ground coffee?”,
“acceptedAnswer”: {
“@type”: “Answer”,
“text”: “You can, but you sacrifice control and freshness. Pre-ground coffee is often ground too fine for optimal drip brewing, leading to over-extraction and bitterness. It also begins staling the moment the bag is opened. For the best flavor, invest in a burr coffee grinder and buy whole beans.”
}
},
{
“@type”: “Question”,
“name”: “How often should I clean my coffee maker?”,
“acceptedAnswer”: {
“@type”: “Answer”,
“text”: “Clean the carafe, lid, and filter basket after every use to prevent rancid oil buildup. Descale the machine’s interior with a vinegar solution or commercial descaler every month if you have hard water, or every 2-3 months with soft water. A neglected machine makes bad coffee.”
}
},
{
“@type”: “Question”,
“name”: “What’s the difference between drip coffee and an Americano?”,
“acceptedAnswer”: {
“@type”: “Answer”,
“text”: “Drip coffee is made by passing hot water through a bed of grounds once. An Americano brewing method involves diluting a shot of espresso with hot water. While both are brewed coffee drinks, they have different strength, body, and flavor profiles due to the extraction method and pressure used.”
}
}
]
}
