
How to Clean a Keurig Coffee Maker with Vinegar Properly
To clean a Keurig coffee maker with vinegar properly, use the correct ratio for your model and run the descale mode. For most machines, use 10 oz of vinegar. Newer models like the K-Supreme need 14 oz each of vinegar and water. Then, you must complete at least four full rinse cycles to remove all acidic residue.
To clean a Keurig coffee maker with vinegar, you need the correct vinegar-to-water ratio for your model, must activate the descale mode, and must complete a minimum of four full water-reservoir rinse cycles after the vinegar runs through. The official Keurig descaling instructions specify 10 ounces of vinegar for most models, but newer machines like the K-Supreme work best with a 14-ounce vinegar and 14-ounce water mix. Skipping the extended rinse is the reason the next dozen cups taste like salad dressing.
People get this wrong because they treat it like cleaning a kettle. They pour in some vinegar, run a brew cycle or two, flush it once, and call it done. The internal lines and thermoblock hold onto that acidic solution. One quick rinse leaves enough residue to taint your coffee for a week.
This guide walks through the exact steps for models with a descale mode (like the K-Supreme, K-Elite) and the manual method for older units. It covers the non-negotiable rinse count, what to do if you smell vinegar afterward, and how often you should actually do this to prevent scale from locking up the heater.
Key Takeaways
- Use a 1:1 ratio of vinegar to water for newer Keurig models (14 oz each for K-Supreme); use 10 oz vinegar for older models.
- You must activate the descaling mode on supported machines by holding the 8oz and 12oz buttons, running vinegar through a normal brew cycle does not clean the internal thermostat.
- Complete a minimum of four full reservoir rinse cycles while the machine remains in descale mode, followed by 2-3 extra normal brew cycles with fresh water.
- Descaling frequency is every 3-6 months, but if your water is hard, lean toward 3 months to prevent a clog that requires a full pump replacement.
- If your coffee tastes like vinegar after cleaning, you didn’t rinse enough. Run three more full reservoir cycles of fresh water through the machine.
Why Vinegar Works and What It Actually Cleans
Vinegar descales. It does not sanitize or remove coffee oils. The acetic acid in white vinegar dissolves calcium carbonate and magnesium deposits, limescale, that build up inside the thermoblock heater and water lines. Scale acts as an insulator. A scaled-up heater works harder, takes longer to heat, and can eventually overheat and fail. It also restricts water flow, leading to weak, slow brews.
Descaling with a 5% acetic acid white vinegar solution breaks down mineral scale by dissolving the calcium carbonate bonds. The process requires heated solution and extended contact time, which is why the Keurig descale mode cycles the hot mixture through the system repeatedly.
The thermoblock is the critical component. It’s a small, high-efficiency heater that flash-heats water as it passes through. Scale builds up on its internal channels first. A normal brew cycle sends water through too quickly for vinegar to work. The descaling mode on modern Keurigs is programmed to run a larger volume (often 14 oz) and may pause between cycles to let the solution sit. This is the mechanism that matters. Using vinegar without this mode on a machine that has it is a half-measure.
TL;DR: Vinegar’s acetic acid dissolves mineral scale in the heater and lines, not coffee residue. The dedicated descale mode is essential because it allows for heated, extended contact time.
What You’ll Need (And What to Avoid)
Gather these items before you start. Substitutions here cause problems.
- Distilled White Vinegar (5% acidity): This is the standard grocery-store vinegar. Do not use apple cider, red wine, or cleaning vinegar (higher acidity). The non-standard acids and colors in other vinegars can leave residues or odors the machine can’t rinse out.
- Fresh Water: Use the same water you normally brew with. If you use filtered water, use it for the rinse cycles too. Switching water types mid-process can shock the system with new minerals.
- A Large Bowl or Measuring Cup: It needs to hold at least 16 ounces. The brew spout splashes more during descaling than during normal brewing. A wide bowl catches the spray.
- A Clean Water Reservoir: This is obvious, but wash it with soap and water first. Adding vinegar to a reservoir with old water or slime just circulates gunk.
Remove your charcoal water filter cartridge if your Keurig uses one. The vinegar will saturate and ruin the filter. You can reinstall it after the final rinse.
Before you start: Unplug the machine if you are uncomfortable. The descaling solution gets hot. Never run vinegar through a machine with a K-Cup or pod in place, it will ruin the pod and force coffee grounds into the internal lines. Always place a large container under the spout; the outflow splashes and will overflow a small cup.
The 7-Step Vinegar Descaling Process (K-Supreme Model)
This sequence is for Keurig models with a digital display and a descale mode, like the K-Supreme, K-Elite, or K-Select. The button combination to enter the mode is usually the same.
1. Empty and Prep the Machine
Remove any K-Cup. Lift the handle and visually confirm the pod holder is empty. Take the water reservoir off the machine and pour out any existing water. If you have a water filter, remove it and set it aside. Give the reservoir a quick rinse.
2. Mix the Cleaning Solution
For the K-Supreme, the correct ratio is 14 ounces of vinegar followed by 14 ounces of fresh water. This makes a 50/50 solution that fills the reservoir to about the MAX line. Older models like the K-Classic specify 10 ounces of vinegar, then you fill the rest with water. The difference is due to the internal tank size and the descale mode’s programming.
3. Enter Descaling Mode
Place the filled reservoir back on the machine. Ensure the machine is powered off, no lights on. Press and hold the 8oz and 12oz brew buttons simultaneously. Hold them for about three seconds. The display will change: the ‘Descale’ light will illuminate, and the ‘K’ button will usually start flashing. This means you’re in the dedicated cleaning mode. The machine now knows to run the full reservoir volume and may adjust its heating cycle.
4. Run the Vinegar Solution Through
Place your large bowl under the brew spout. Press the flashing brew button (often the ‘K’ button). The machine will heat and then dispense the entire vinegar solution. It will take a couple of minutes. When it stops, discard the hot vinegar water from your bowl. The machine will prompt you to press brew again. Do so. It will run the second half of the solution. Discard that as well. Continue until the ‘Add Water’ indicator lights up. The reservoir will now be empty.
5. The First Rinse (Stay in Descaling Mode)
Here is the step every rushed tutorial cuts. Do not exit descale mode. Take the reservoir to the sink, rinse it out, and fill it to the MAX line with fresh water only, no vinegar. Place it back on the machine. The brew button will still be flashing. Press it. The machine will run this entire reservoir of clean water through the system. Catch it in your bowl and discard it. This first rinse water will still be warm and may smell faintly of vinegar. That’s normal.
6. Repeat the Rinse Until the Mode Exits
Refill the reservoir with fresh water. Press the brew button again. You must repeat this full-reservoir rinse cycle 4 to 5 times. The machine will automatically exit descaling mode when it detects sufficient flushing. The ‘Descale’ light will turn off, and all buttons will return to normal. This is your signal that the internal computer is satisfied.
7. Final Flushing Brews
The machine’s rinse count is the minimum. Vinegar odor clings to plastic. Run 2-3 additional brew cycles using the normal brew buttons (e.g., press 12oz) with fresh water and no K-Cup. This pulls water through the external spout and drip tray pathways that the descale mode might not have fully flushed. When you no longer smell vinegar on the steam from the brew, you’re done.
| Step | Action | Consequence If Skipped |
|---|---|---|
| Enter Descaling Mode | Hold 8oz + 12oz buttons | Vinegar doesn’t reach the thermoblock effectively; scale remains. |
| 14oz Vinegar + 14oz Water | Use measured 50/50 mix for K-Supreme | Solution too weak (less scale removal) or too strong (longer rinse, stronger odor). |
| 4-5 Full Water Rinses in Mode | Rinse while ‘Descale’ light is on | Vinegar residue stays in lines; next 10+ cups taste acidic. |
| 2-3 Final Normal Brews | Run regular cycles with fresh water | Vinegar smell lingers in the brew chamber and spout. |
TL;DR: The descale mode is mandatory for the vinegar to work on the heater. Staying in that mode for 4-5 full water rinses is mandatory to clear the vinegar out. The final normal brews clear the odor from the spout.
Model-Specific Variations and Manual Method
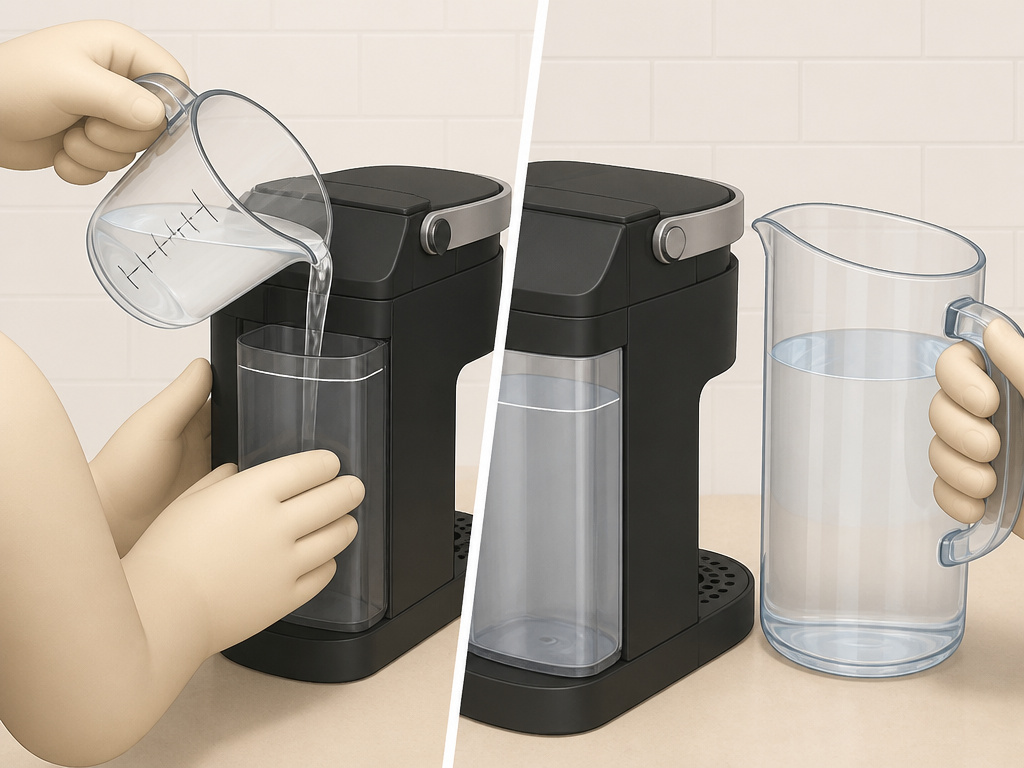
Not all Keurigs have a descale mode. The process differs slightly for compact and older models.
For Keurig K-Mini and K-Mini Plus: The official instruction is to fill the reservoir to the MAX line with white vinegar, then add water to fill it completely. You do not use a descale mode. Instead, you run brew cycles (without a K-Cup) manually until the vinegar solution is gone, then repeat the rinsing process with fresh water. Because there’s no automated cycle, you must be even more diligent with rinsing, aim for 6 full reservoir flushes.
For Older Models Without a Descale Light (e.g., K-Classic): The process is manual. Use 10 ounces of vinegar, then fill the reservoir with water. Run a brew cycle without a K-Cup. Let the machine sit for 30 minutes to an hour so the vinegar can work. Then, run several more brew cycles until the reservoir is empty. Follow with at least 4 full reservoirs of fresh water, running brew cycles each time.
Common mistake: Using the “strong brew” or “hot water on demand” setting for descaling, these settings use different temperature paths and may not circulate the vinegar through the main heating element correctly. Always use the standard brew button or the dedicated descale mode.
The principle is constant: solution, dwell time, excessive rinsing. The machine’s interface changes the button presses, not the chemistry.
How Often Should You Descale with Vinegar?
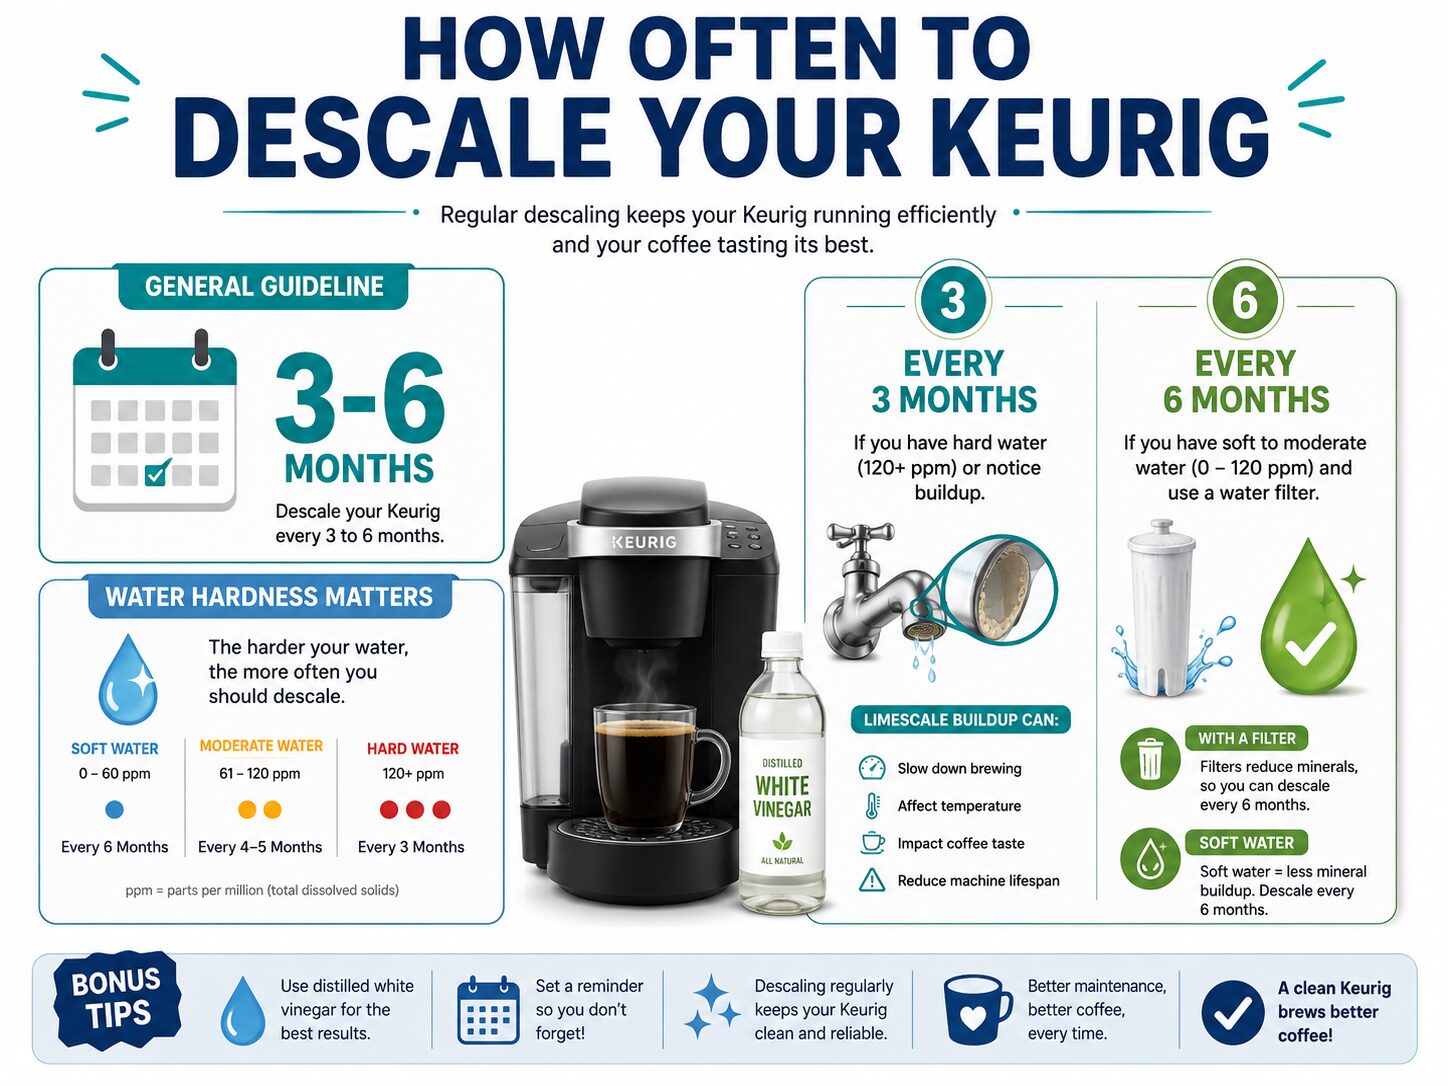
Keurig’s official recommendation is every 3 to 6 months. That’s a wide range. Your schedule depends on one factor: water hardness.
If you use filtered water, bottled water, or live in an area with soft water, you can push toward 6 months. If you use tap water, especially if you see scale in your kettle or showerhead, default to every 3 months. Scale buildup is progressive. A little scale slows the machine; a lot of scale kills the pump. The repair cost often exceeds the price of a new brewer.
A visual clue is your brew speed. If a cup that used to take 45 seconds now takes over 90 seconds to fill, scale is likely restricting flow. Another sign is inconsistent water temperature or a machine that seems to “cough” and sputter during brewing.
Think of descaling as changing the oil in your car. It’s cheap, simple preventative maintenance. Neglect it, and you’re shopping for a new engine.
Troubleshooting: After the Clean
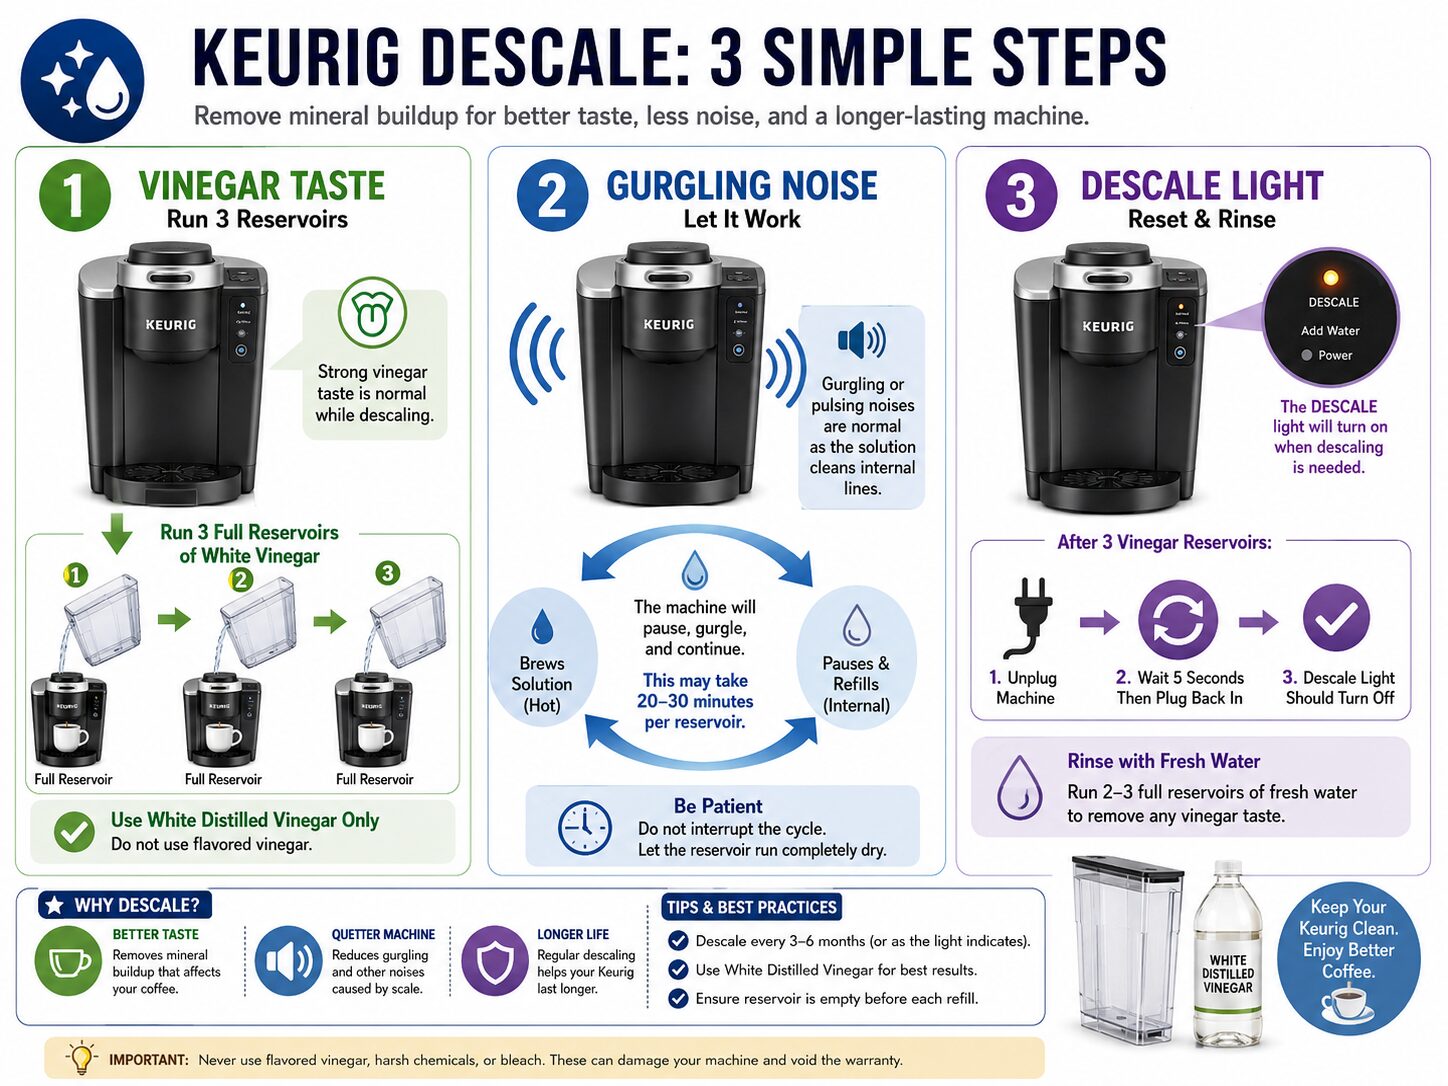
Sometimes, things don’t go perfectly. Here’s how to fix common post-descaling issues.
Problem: My coffee tastes like vinegar.
Cause: Insufficient rinsing. The internal lines still hold residual solution.
Fix: Don’t brew coffee. Immediately run 3 full reservoirs of fresh water through the machine using the standard brew button. Between each reservoir, let the machine cool for 10 minutes. The heat helps release trapped vinegar vapor.
Problem: The machine is making a gurgling or groaning noise.
Cause: Air trapped in the pump or lines after the descaling process, or a piece of dislodged scale is caught in the water inlet.
Fix: Run 2-3 more full brew cycles. The noise should clear as water flow normalizes. If it persists after a day, a deeper pump issue may be present.
Problem: The ‘Descale’ light won’t turn off after cleaning.
Cause: The machine’s internal counter for rinse cycles wasn’t met, or a sensor is still detecting scale.
Fix: Try running 2 more full reservoir rinse cycles with the machine unplugged for 30 seconds in between. If the light remains, consult the Black & Decker coffee maker manual for general reset procedures, as Keurig is a Black & Decker brand and many resets are similar.
| Symptom | Likely Cause | Immediate Action |
|---|---|---|
| Vinegar taste/smell | Incomplete rinsing | Run 3+ full reservoir flush cycles. |
| Weak or slow brew | Air lock or debris | Run several normal brew cycles to clear. |
| Error code / light stuck | Sensor confusion | Power cycle (unplug 5 mins), ensure reservoir is seated. |
| Leaking from bottom | O-ring dislodged by scale | Check specific coffee maker models for assembly diagrams; reseat the reservoir gasket. |
Keurig Descaling Solution vs. White Vinegar
You have two main choices: the branded Keurig Descaling Solution or store-bought white vinegar. Each has pros and cons.
The Keurig Descaling Solution is a formulated citric acid blend. It’s less pungent than vinegar and requires fewer rinse cycles, often just the 2-3 that the descale mode dictates. It’s also more expensive. A single-use bottle costs several times more than a gallon of vinegar.
White vinegar is cheap and effective. A gallon costs little and can descale your machine a dozen times. The trade-off is the strong smell and the non-negotiable extra rinse work. As noted in the YouTube research, users find the vinegar smell lingers if you follow only the minimum rinse instructions.
I’ve used both. The solution is convenient, especially in a small apartment where vinegar vapor is noticeable. But for cost-effectiveness, vinegar wins every time, as long as you commit to those extra four rinse cycles. Skipping them to save 15 minutes ruins the next week’s coffee.
Your choice hinges on your tolerance for smell and your patience for rinsing. For a first-time cleaning, the solution is foolproof. For routine maintenance every 3 months, vinegar is the economical pick. For other appliance care, understanding burr vs blade grinder maintenance is similar: the right tool and consistent routine prevent big problems.
Frequently Asked Questions
Can I use apple cider vinegar instead of white vinegar?
No. Apple cider vinegar contains sugars, colorants, and additional organic compounds that can leave a sticky residue inside your machine. This residue can foster mold growth and is much harder to rinse out than pure acetic acid. Only use clear, distilled white vinegar with 5% acidity.
How much vinegar do I put in my Keurig?
For most standard models (K-Classic, K-Select, K-Elite), use 10 ounces of white vinegar, then fill the reservoir with water. For the K-Supreme and K-Supreme Plus, use 14 ounces of vinegar followed by 14 ounces of water for a 50/50 mix. Always check your specific coffee maker models guide for the exact specification.
Is it safe to drink vinegar from Keurig?
You should never drink the vinegar solution. The descaling process is for cleaning only. You must thoroughly rinse it out with multiple cycles of fresh water before brewing coffee again. Proper rinsing removes all traces of acetic acid, making the subsequent coffee perfectly safe to drink.
Why does my Keurig still smell like vinegar after cleaning?
You didn’t rinse enough. The minimum rinse cycles in the descale mode are often insufficient to remove all odor from the plastic internal components and the brew spout. Run 2-3 additional full reservoirs of fresh water through the machine using the normal brew button. The smell will dissipate after a few more uses.
Can descaling with vinegar damage my Keurig?
No, when used correctly. White vinegar at a 5% concentration is explicitly approved by Keurig for descaling. Damage occurs from using stronger acids (like industrial descaler) or from failing to rinse, which leaves acidic residue that can slowly degrade internal seals. Following the proper ratio and rinse procedure prevents damage. For other brewing components, using the correct paper coffee filters is a similar preventative measure.
What if my Keurig doesn’t have a descale light or mode?
Older models require a manual process. Use 10 oz vinegar topped with water, run brew cycles until the reservoir is empty, let the machine sit for 30-60 minutes, then run at least 4 full reservoirs of fresh water through it. The lack of a dedicated mode means you must provide the dwell time and be extra thorough with rinsing.
Before You Go
Cleaning your Keurig with vinegar is about three things: the right 50/50 ratio for your model, using the descale mode if you have it, and committing to the extended rinse. The rinse is what everyone rushes. Don’t. Four full water reservoirs while the machine is in descale mode, plus a couple of normal brews afterward, is the barrier between a clean machine and a coffee that tastes like a pickle jar.
Mark your calendar for every three months. It’s a 40-minute task that keeps your brewer fast, your coffee hot, and avoids a $150 replacement. When you’re done, explore other ways to refine your cup, like choosing a natural coffee sweetener or learning about eco-friendly coffee brewing practices. Your machine will thank you with consistent, flavorless brews for years to come.
{
“@context”: “https://schema.org”,
“@type”: “HowTo”,
“name”: “How to Clean a Keurig Coffee Maker with Vinegar”,
“totalTime”: “PT40M”,
“tool”: [
{
“@type”: “HowToTool”,
“name”: “Distilled white vinegar (5% acidity)”
},
{
“@type”: “HowToTool”,
“name”: “Large bowl or measuring cup (holds at least 16 oz)”
},
{
“@type”: “HowToTool”,
“name”: “Fresh water”
}
],
“step”: [
{
“@type”: “HowToStep”,
“name”: “Prepare the machine”,
“text”: “Remove any K-Cup, empty the water reservoir, and take out the water filter if you have one.”
},
{
“@type”: “HowToStep”,
“name”: “Mix the cleaning solution”,
“text”: “For a K-Supreme, measure 14 ounces of white vinegar into the empty reservoir, then add 14 ounces of fresh water. For older models, use 10 ounces of vinegar and fill the rest with water.”
},
{
“@type”: “HowToStep”,
“name”: “Enter descale mode”,
“text”: “With the machine powered off, press and hold the 8oz and 12oz brew buttons simultaneously for 3 seconds until the descale light activates.”
},
{
“@type”: “HowToStep”,
“name”: “Run the vinegar solution”,
“text”: “Place your bowl under the spout and press the brew button. The machine will dispense the solution. Discard it and repeat until the ‘Add Water’ light comes on.”
},
{
“@type”: “HowToStep”,
“name”: “Rinse thoroughly”,
“text”: “Fill the reservoir to MAX with fresh water only. Staying in descale mode, press brew to run clean water through. Repeat this rinse 4-5 times until the machine exits descale mode automatically.”
},
{
“@type”: “HowToStep”,
“name”: “Perform final flushing cycles”,
“text”: “Once descale mode ends, run 2-3 additional 12oz brew cycles with fresh water and no K-Cup to eliminate any lingering vinegar odor.”
}
]
}
{
“@context”: “https://schema.org”,
“@type”: “FAQPage”,
“mainEntity”: [
{
“@type”: “Question”,
“name”: “Can I use apple cider vinegar instead of white vinegar?”,
“acceptedAnswer”: {
“@type”: “Answer”,
“text”: “No. Apple cider vinegar contains sugars, colorants, and additional organic compounds that can leave a sticky residue inside your machine. This residue can foster mold growth and is much harder to rinse out than pure acetic acid. Only use clear, distilled white vinegar with 5% acidity.”
}
},
{
“@type”: “Question”,
“name”: “How much vinegar do I put in my Keurig?”,
“acceptedAnswer”: {
“@type”: “Answer”,
“text”: “For most standard models (K-Classic, K-Select, K-Elite), use 10 ounces of white vinegar, then fill the reservoir with water. For the K-Supreme and K-Supreme Plus, use 14 ounces of vinegar followed by 14 ounces of water for a 50/50 mix. Always check your specific coffee maker models guide for the exact specification.”
}
},
{
“@type”: “Question”,
“name”: “Is it safe to drink vinegar from Keurig?”,
“acceptedAnswer”: {
“@type”: “Answer”,
“text”: “You should never drink the vinegar solution. The descaling process is for cleaning only. You must thoroughly rinse it out with multiple cycles of fresh water before brewing coffee again. Proper rinsing removes all traces of acetic acid, making the subsequent coffee perfectly safe to drink.”
}
},
{
“@type”: “Question”,
“name”: “Why does my Keurig still smell like vinegar after cleaning?”,
“acceptedAnswer”: {
“@type”: “Answer”,
“text”: “You didn’t rinse enough. The minimum rinse cycles in the descale mode are often insufficient to remove all odor from the plastic internal components and the brew spout. Run 2-3 additional full reservoirs of fresh water through the machine using the normal brew button. The smell will dissipate after a few more uses.”
}
},
{
“@type”: “Question”,
“name”: “Can descaling with vinegar damage my Keurig?”,
“acceptedAnswer”: {
“@type”: “Answer”,
“text”: “No, when used correctly. White vinegar at a 5% concentration is explicitly approved by Keurig for descaling. Damage occurs from using stronger acids (like industrial descaler) or from failing to rinse, which leaves acidic residue that can slowly degrade internal seals. Following the proper ratio and rinse procedure prevents damage. For other brewing components, using the correct paper coffee filters is a similar preventative measure.”
}
},
{
“@type”: “Question”,
“name”: “What if my Keurig doesn’t have a descale light or mode?”,
“acceptedAnswer”: {
“@type”: “Answer”,
“text”: “Older models require a manual process. Use 10 oz vinegar topped with water, run brew cycles until the reservoir is empty, let the machine sit for 30-60 minutes, then run at least 4 full reservoirs of fresh water through it. The lack of a dedicated mode means you must provide the dwell time and be extra thorough with rinsing.”
}
}
]
}
