
What is a Coffee Puck? The Key to Perfect Espresso at Home
A coffee puck is the compressed disc of ground coffee inside a portafilter basket, created by tamping. It is the essential filter through which near-boiling water is forced at 9 bars of pressure to extract espresso. Its structure, specifically its even density and lack of channels, directly controls the flow rate and flavor of your shot.
Most guides stop at “grind, dose, tamp.” They treat the puck as a passive object. The real conversation happens in the three millimeters between a channeled, bitter mess and the sweet, syrupy shot that follows a perfectly prepared bed. That gap is where extraction lives or dies.
This isn’t about creating a pretty disc to post online. It’s about engineering a permeable, uniform filter that resists 130 PSI of water pressure for exactly 25 to 30 seconds. We’ll break down what matters (distribution, dose), what doesn’t (tamping force, soggy pucks), and a patented layered method that even expensive grinders can’t replicate on their own.
Key Takeaways
- The puck’s only job is to provide uniform resistance. Channeling, where water finds a weak path, ruins extraction by simultaneously over- and under-extracting the coffee.
- Tamping pressure is irrelevant past ensuring a level, solid compress. The extraction pressure (9 bars) dwarfs your manual force. Consistency matters, not the number on a scale.
- A WDT tool with 0.4mm needles is non-negotiable for breaking up clumps, the primary cause of channeling in home setups.
- The patented stratified method (larger particles at the basket bottom, finer on top) can stabilize flow rate, a fact backed by a study in European Food Research and Technology.
- Ignore the puck’s post-brew condition. A wet puck or a dry one tells you nothing about the shot’s quality. Taste is the only metric that matters.
The Core Anatomy of a Coffee Puck
A coffee puck is a designed object, not a random pile of grounds. Its specifications are defined by the machinery acting upon it.
A standard double espresso puck weighs 18 to 20 grams. The industry-standard VST precision basket is machined for an 18-gram dose. The basket’s volume, the dose weight, and the grind fineness must be in equilibrium. Under-dosing leaves a gap between the puck and the group head shower screen. Water fills that space first, hitting the puck with a disruptive surge. Over-dosing means the puck presses against the shower screen before brewing even starts, often indicated by a deep screw imprint. This compresses the top layer unevenly and almost guarantees a stuck portafilter.
The optimal espresso flow rate through a properly prepared puck is 1 gram per second, as established in extraction research. This translates to a 36-gram yield from an 18-gram dose in roughly 28 to 32 seconds.
The tool that creates the puck is just as critical. A burr coffee grinder is the only starting point for espresso. Blade grinders produce a wildly inconsistent mix of dust and boulders. In a puck, water follows the path of least resistance, through the boulders. The surrounding dust then over-extracts, producing bitterness. You cannot tamp your way out of a bad grind.
TL;DR: Match your dose to your basket’s volume (18g for a standard double), use a burr grinder, and aim for a 1 g/s flow rate for balanced extraction.
What a Good Puck Tells You (And What It Doesn’t)
After brewing, people diagnose the spent puck like tea leaves. This is mostly superstition. Let’s separate signal from noise.
A soggy, wet puck post-extraction is not a failure indicator. It can result from a slightly coarser grind, a darker roast that retains less water, or simply the design of your machine’s three-way solenoid valve. Some machines saturate the puck more during the pressure release cycle. I’ve pulled stunning shots from pucks that fell apart in a soupy mess and terrible shots from perfectly dry, intact discs. The YouTube channel for the Espresso Test Lab has a video addressing this exact myth, emphasizing that cup taste is the only real metric.
The ridge inside your portafilter basket is another red herring. It’s a mechanical feature for the spring, not a fill line. Precision baskets like the VST come in ridged and ridge-less versions. Barista debates over which flows more evenly are academic. The ridge does not meaningfully impact extraction for the home brewer. The consistency gained from using a precision basket over a stock one outweighs any micro-difference the ridge causes.
So what does matter? Channeling. Any sign of it is a direct report on your puck prep. The surest way to spot it is by watching the bottom of your portafilter during the shot. Instead of dozens of tiny, steady streams merging into a single flow, you’ll see one or two aggressive jets, maybe some spraying. This means water has carved a tunnel through your puck. The result is a thin, sour shot (from the under-extracted channel) with a harsh, bitter finish (from the over-extracted areas around it).
Common mistake: Chasing a perfectly dry, picture-postcard puck after brewing, this often leads to over-adjusting grind and dose based on a visual cue that has no correlation to flavor in the cup.
The Non-Negotiable Prep Steps
Forget the old dogma. Modern puck preparation focuses on uniformity before compression. The sequence is logical, and each step has a mechanical consequence.
First, dose by weight. Volume is useless. Coffee density changes with roast and origin. An 18-gram dose of a dense Ethiopian bean might look tiny next to 18 grams of a fluffy Italian roast. Use a scale with 0.1-gram resolution. Straying more than a gram outside your basket’s design range causes the flow problems outlined earlier.
Second, grind directly into your portafilter or a dosing cup. Then, distribute. This is where the Weiss Distribution Technique (WDT) is mandatory. Even high-end grinders produce microscopic clumps, especially with light roasts. These clumps are density bombs in your puck. A WDT tool, literally a set of 0.3-0.4mm acupuncture needles, stirs the grounds to break these clumps and eradicate air pockets.
| Step | Tool | Purpose | Risk If Skipped |
|---|---|---|---|
| Dose | Digital Scale | Weight accuracy | Inconsistent basket fill, causing surge or pre-compression. |
| Grind | Burr Grinder | Particle uniformity | Fines cause mudding; boulders create instant channels. |
| Distribute | WDT Tool (0.4mm) | Break clumps, aerate | Clumps become hard spots that water flows around, not through. |
| Tamp | Calibrated Tamper | Even compression | Uneven density creates side channels; loose grounds wash out. |
Third, tamp. Here’s the big myth: you need 30 pounds of pressure. You don’t. The water hits the puck at 9 bars (about 130 PSI). Your tamp only needs to consolidate the grounds into a solid, cohesive bed so that water encounters uniform resistance across its entire surface. Anywhere between 15 and 30 pounds is fine. What’s critical is that the tamp is perfectly level. A tilted tamp creates a density slope, thick on one side, thin on the other. Water will race through the thin side every time. A calibrated tamper that stops at a set depth can help build muscle memory for a level press.
TL;DR: Weigh your dose, use WDT to distribute, tamp level with moderate pressure. This sequence addresses the actual physical barriers to even extraction.
The Patented Layered Puck Method
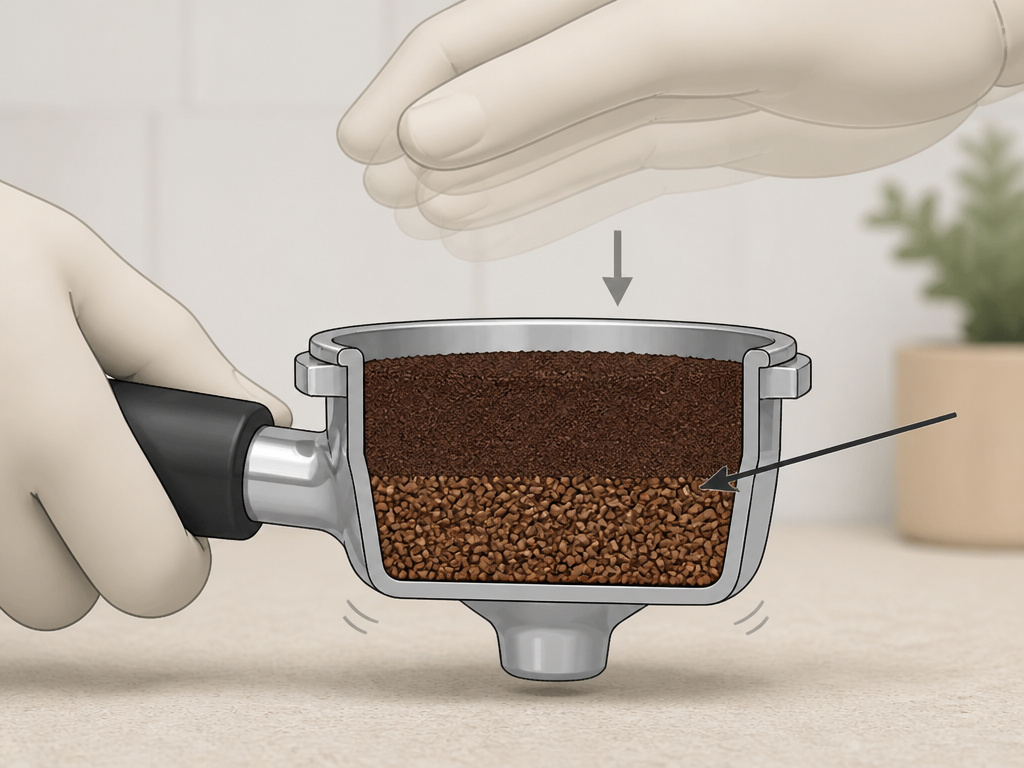
Sometimes, standard prep isn’t enough. Grinder consistency has limits, and bean variability is a fact. This is where primary research offers a smarter path.
A patent (WO/2020/148258) and a subsequent study published in European Food Research and Technology tested an innovative puck preparation method. Instead of a homogeneous bed of grounds, researchers created a stratified puck: a layer of larger coffee particles at the bottom of the basket, topped by a layer of finer particles. The larger particles at the bottom act as a sort of drainage layer, reducing the variable resistance that causes erratic flow. The finer top layer ensures proper initial extraction.
The study on this coffee powder puck preparation method found that the stratified approach yielded a more stable flow rate (closer to the ideal 1 g/s) compared to conventional methods, even when using heterogeneous coffee materials. This is a direct engineering solution to a physical problem.
How can you approximate this at home? You can’t layer different grinds perfectly without a second grinder. But the principle informs a key practice: after using your WDT tool, give the portafilter a very gentle, vertical tap on the counter before tamping. This encourages a slight natural stratification where the finest particles settle toward the top. Don’t knock it sideways, that causes segregation. The goal is to use gravity to your advantage, mimicking the study’s intent to manage flow.
This approach is particularly useful for those experimenting with single-origin coffee beans, which can be less forgiving than consistent blends. It also highlights why simply having a great Breville coffee machine isn’t enough. The machine provides pressure and temperature. You provide the correctly engineered filter.
| Puck Preparation Method | Best For | Core Principle |
|---|---|---|
| Standard WDT + Tamp | Consistent blends, daily use | Creates uniform density to resist channeling. |
| Stratified/Layered Method | Dense, light-roast single origins, problem beans | Manages flow rate stability via particle-size zoning. |
| Neglected Prep (dump & tamp) | Frustration and wasted beans | Guarantees random channeling and unbalanced shots. |
Advanced Troubleshooting Through the Puck
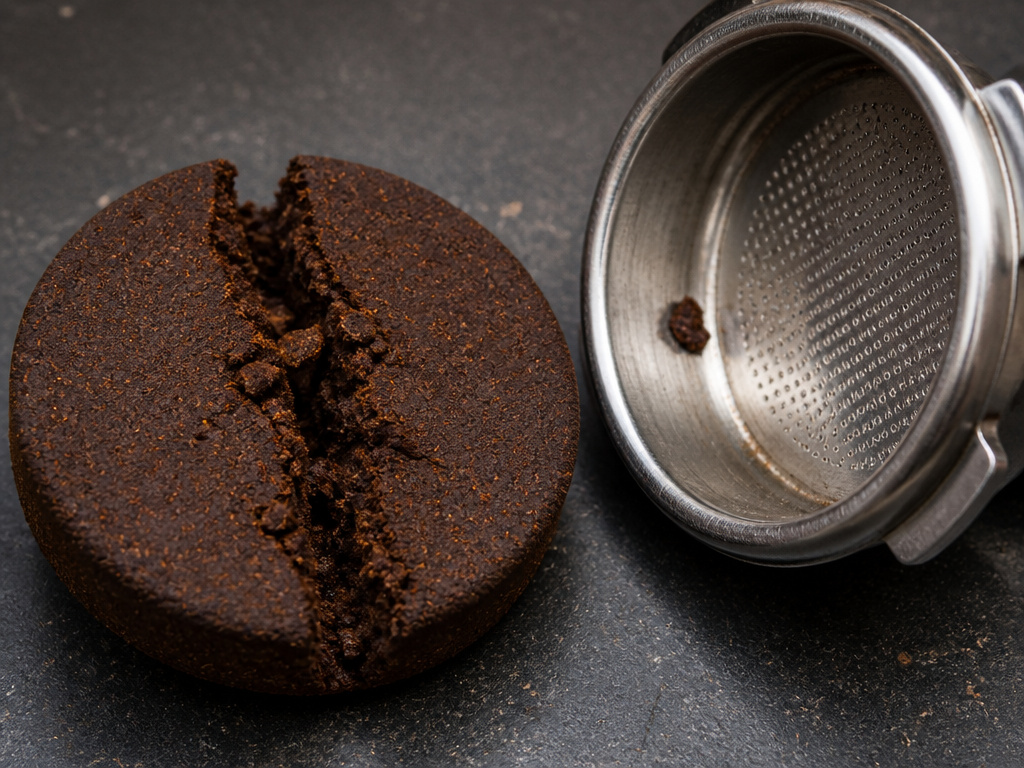
The puck is a diagnostic tool. Specific post-mortem signs point to specific upstream failures.
If your spent puck has a visible hole or crack running through its center, you have a classic example of side-channeling. The water took the path of least resistance around the edge of the basket and then erupted upward through the middle. The cause is almost always an uneven tamp or grounds stuck to the sidewall of the basket above the coffee bed. After WDT, use a finger or a leveling tool to sweep any stray grounds off the basket wall before tamping.
A puck that is muddy and sludgy, with very fine coffee paste, indicates your grind is too fine. The water cannot permeate the bed effectively, so it essentially blasts through, fracturing the puck and carrying fines into the cup. This often yields a bitter, astringent shot. Coarsen your grind incrementally.
Common mistake: Grinding excessively fine to slow down a fast shot, this often amplifies channeling because the water cannot penetrate the dense bed evenly and will blast a single weak point. Fix distribution first.
If the puck sticks to the group head shower screen when you remove the portafilter, your dose is too high. The coffee is making contact with the screen before brewing. This pre-compresses the top layer, creating a non-porous barrier. Lower your dose by half a gram. The imprint of the group head screw is a clear giveaway.
These are physical feedback loops. The puck tells you what the water experienced. Learning to read it turns guesswork into a targeted adjustment.
Frequently Asked Questions
What is the coffee puck in espresso?
It’s the compressed bed of ground coffee in the portafilter basket. It acts as the filter for the high-pressure water, and its structural integrity determines the evenness of the espresso extraction. A good puck is uniformly dense, allowing water to pass through all grounds at roughly the same rate.
Are you supposed to eat the coffee puck?
You can, but it’s an acquired taste. The puck is spent, most solubles are extracted. Some people bake with them (like brownies) for a mild coffee flavor. A popular YouTube video even plates them as a dessert with whipped cream and chocolate. It’s not about nutrition; it’s about zero waste.
What is the best pressure for tamping?
Any consistent pressure between 15 and 30 pounds is sufficient. The old 30-pound rule is outdated. The 9 bars (130 PSI) of brewing pressure completely overwhelm your tamp. Focus on a perfectly level tamp every time. A calibrated tamper that stops at a set depth helps achieve this consistency far more than a pressure-sensitive tamper.
Why does my espresso puck look soggy?
It’s likely a function of your machine’s design, not your technique. Many machines have a three-way solenoid valve that releases leftover pressure back through the puck, saturating it. Darker roasts also retain less water. A soggy puck does not correlate with a bad shot. Judge by taste, not appearance.
What does a perfect espresso puck look like after brewing?
It should be a solid, intact disc that knocks out of the portafilter in one piece. It will be dark, saturated, and may have a slight indentation from the shower screen. However, a “perfect-looking” dry puck can still hide channeling. The true test is the flavor in your cup and the visual of the shot pouring as a single, syrupy stream.
How do you get a puck out without banging?
Specialized tools like the “Breville Puck Sucker” use suction to pop the puck out cleanly. Alternatively, knock the portafilter sharply against a knock box immediately after brewing while the puck is still warm and expanded. Waiting lets it cool, contract, and stick.
Before You Go
The coffee puck is not a mystery. It’s a simple mechanical filter with a complex job. Stop worrying about its moisture content or tamping like you’re driving a railroad spike. Invest your effort in distribution with a proper WDT tool and matching your dose to your basket. Remember the layered method from the scientific study on puck preparation, it’s a reminder that this is as much engineering as art. Your machine provides the environment. You build the filter. When that filter is even and resistant, the water has no choice but to extract everything evenly. That’s the difference between a good shot and a great one. Now go taste it.
{
“@context”: “https://schema.org”,
“@type”: “HowTo”,
“name”: “How to Prepare a Coffee Puck for Consistent Espresso”,
“totalTime”: “PT5M”,
“tool”: [
{
“@type”: “HowToTool”,
“name”: “Burr coffee grinder”
},
{
“@type”: “HowToTool”,
“name”: “Portafilter with basket (e.g., VST 18g)”
},
{
“@type”: “HowToTool”,
“name”: “WDT tool with 0.4mm needles”
},
{
“@type”: “HowToTool”,
“name”: “58mm calibrated tamper”
}
],
“step”: [
{
“@type”: “HowToStep”,
“name”: “Dose and grind”,
“text”: “Weigh 18 grams of coffee beans and grind them to a fine espresso consistency directly into your portafilter basket.”
},
{
“@type”: “HowToStep”,
“name”: “Distribute the grounds”,
“text”: “Use a WDT tool to stir the grounds thoroughly, breaking up any clumps and creating an even, level bed before tamping.”
},
{
“@type”: “HowToStep”,
“name”: “Tamp level and consistently”,
“text”: “Place the tamper squarely on the grounds and apply firm, even pressure—anywhere from 15 to 30 pounds—to compress the coffee into a solid puck.”
},
{
“@type”: “HowToStep”,
“name”: “Lock in and brew”,
“text”: “Insert the portafilter into your espresso machine’s group head and immediately start your shot to prevent the dry puck from cracking.”
}
]
}
{
“@context”: “https://schema.org”,
“@type”: “FAQPage”,
“mainEntity”: [
{
“@type”: “Question”,
“name”: “What is the coffee puck in espresso?”,
“acceptedAnswer”: {
“@type”: “Answer”,
“text”: “It’s the compressed bed of ground coffee in the portafilter basket. It acts as the filter for the high-pressure water, and its structural integrity determines the evenness of the espresso extraction. A good puck is uniformly dense, allowing water to pass through all grounds at roughly the same rate.”
}
},
{
“@type”: “Question”,
“name”: “Are you supposed to eat the coffee puck?”,
“acceptedAnswer”: {
“@type”: “Answer”,
“text”: “You can, but it’s an acquired taste. The puck is spent, most solubles are extracted. Some people bake with them (like brownies) for a mild coffee flavor. A popular YouTube video even plates them as a dessert with whipped cream and chocolate. It’s not about nutrition; it’s about zero waste.”
}
},
{
“@type”: “Question”,
“name”: “What is the best pressure for tamping?”,
“acceptedAnswer”: {
“@type”: “Answer”,
“text”: “Any consistent pressure between 15 and 30 pounds is sufficient. The old 30-pound rule is outdated. The 9 bars (130 PSI) of brewing pressure completely overwhelm your tamp. Focus on a perfectly level tamp every time. A calibrated tamper that stops at a set depth helps achieve this consistency far more than a pressure-sensitive tamper.”
}
},
{
“@type”: “Question”,
“name”: “Why does my espresso puck look soggy?”,
“acceptedAnswer”: {
“@type”: “Answer”,
“text”: “It’s likely a function of your machine’s design, not your technique. Many machines have a three-way solenoid valve that releases leftover pressure back through the puck, saturating it. Darker roasts also retain less water. A soggy puck does not correlate with a bad shot. Judge by taste, not appearance.”
}
},
{
“@type”: “Question”,
“name”: “What does a perfect espresso puck look like after brewing?”,
“acceptedAnswer”: {
“@type”: “Answer”,
“text”: “It should be a solid, intact disc that knocks out of the portafilter in one piece. It will be dark, saturated, and may have a slight indentation from the shower screen. However, a \”perfect-looking\” dry puck can still hide channeling. The true test is the flavor in your cup and the visual of the shot pouring as a single, syrupy stream.”
}
},
{
“@type”: “Question”,
“name”: “How do you get a puck out without banging?”,
“acceptedAnswer”: {
“@type”: “Answer”,
“text”: “Specialized tools like the \”Breville Puck Sucker\” use suction to pop the puck out cleanly. Alternatively, knock the portafilter sharply against a knock box immediately after brewing while the puck is still warm and expanded. Waiting lets it cool, contract, and stick.”
}
}
]
}
