
What Does Descale Mean on a Keurig Coffee Maker? | Fix It
Descaling a Keurig coffee maker means running a cleaning solution through its internal water system to dissolve hard, chalky mineral deposits (scale) that form from heating water. The “Descale” light flashes when the machine’s internal counter estimates enough scale has built up to impair function, triggering a mandatory maintenance cycle.
People see the flashing light and think the machine is broken. It isn’t. It’s a scheduled service reminder that, if ignored, will break the machine. The light is a countdown to a clogged thermoblock or a weak, lukewarm brew.
This guide explains the chemistry behind scale, decodes your model’s specific warning system, and walks through the official procedure—including what to do when it goes wrong.
Key Takeaways
- The “Descale” light is a performance timer, not an error code; it activates after roughly 250 brews or 3-6 months of use.
- Scale is calcium carbonate from heated water; it acts as an insulator, forcing the heater to work harder and eventually fail.
- Never use vinegar; Keurig’s citric-acid-based Descaling Solution is formulated to dissolve scale without damaging internal seals.
- A heavily scaled machine may foam and sputter air during descaling; if this happens, power down, rinse, and wait 30 minutes before continuing.
- Postponing the reminder only delays it for 6 weeks; the light will not turn off permanently until you complete the full descaling cycle.
What Does the “Descale” Light Mean?
That flashing light is a mileage counter for your brewer’s water path. Keurig models track brew cycles or elapsed time. The K-Express, for instance, reminds you after every 250 brews. Others, like the K-Supreme, prompt every 3 months. The system calculates when enough mineral buildup has likely occurred to start causing problems.
The light means the machine’s internal algorithm thinks scale deposits are now thick enough to interfere with normal operation. It is a pre-failure warning. Ignoring it doesn’t reset the counter. On most models, if you press “Remind Me Later,” the system will simply flash again in 6 weeks. The only way to shut it off for another 3-6 months is to complete the descaling ritual.
Descaling is the process of removing limescale (primarily calcium carbonate) from the internal heating chamber and water lines of a Keurig brewer using a specific acidic solution. This maintenance is required to maintain proper heating efficiency, water flow, and beverage temperature.
TL;DR: The light is a maintenance timer based on brew count or time. It won’t stop until you run the descale cycle.
The Chemistry of Scale: What You’re Actually Removing
Scale isn’t dirt. It’s geology happening inside your coffee maker. When you heat water, dissolved calcium and magnesium bicarbonate compounds break down. They solidify into calcium carbonate—the same mineral as limestone, chalk, and marble. This forms a hard, insulating crust on any surface the hot water touches, especially the heating element and thermoblock.
That crust is the problem. It acts like a coffee cozy around your heater. The element must work harder and longer to push heat through the scale layer to reach the water. This strains the electrical components and leads to two visible failures: longer heat-up times and progressively weaker, cooler coffee. Left unchecked, the heater can overheat and burn out. This is why understanding your machine’s internal mechanics is as crucial as knowing how to operate it, much like consulting a Braun coffee maker manual for specific maintenance protocols.
The fix requires an acid to dissolve the alkaline mineral deposit. Keurig’s solution uses citric acid. It reacts with calcium carbonate, breaking it into soluble calcium citrate, carbon dioxide gas, and water. The fizzing you might see is that CO2 being released. Vinegar (acetic acid) works on the same principle but is more volatile and can degrade rubber seals over multiple uses. Keurig does not recommend it.
What You’ll Need (And What to Avoid)
Gather three things. Missing any one halts the process.
First, you need the cleaning agent. You have two Keurig-approved options:
* Keurig Descaling Solution: A 4-fluid ounce bottle of liquid citric acid formula.
* Keurig Descale Pouch: A powdered alternative; you mix it with 24oz of water in the reservoir.
Second, a large ceramic mug. The manual for every model stresses this. You need a mug that holds at least 14 ounces. Paper cups or small espresso cups cannot handle the volume and will collapse, creating a hot mess. The ceramic also withstands the acidic solution without degrading.
Third, fresh water. Use the same water you normally brew with. If you use a water filter in your Keurig, remove it before you start. Descaling solution will ruin the filter media, and a filter will slow the flow of the cleaning cycle.
| Item | Purpose | Risk If Substituted |
|---|---|---|
| Keurig Descaling Solution | Dissolves mineral scale chemically. | Vinegar may damage seals; plain water does nothing. |
| 14oz+ Ceramic Mug | Catches acidic solution safely. | Paper cup fails; small mug overflows. |
| Fresh Water | Flushes dissolved scale from system. | No water means concentrated acid sits in lines. |
Tools you will not need: screwdrivers, wrenches, or toothbrushes. This is a purely internal chemical process. If you’re comparing this maintenance to other brew methods, the principle of keeping water paths clean is universal, whether you’re descaling a pod machine or cleaning the Breville coffee machine filter on a high-end espresso unit.
The Step-by-Step Descale Process

The sequence is universal, but the button press to start it is model-specific. The entire process takes about 30 minutes for a standard brewer. For a K-Latte with a milk system, budget 45 minutes.
Before you start: The solution is a mild acid. Avoid skin contact. Do not ingest the solution from the mug. Work in a well-ventilated area, as the chemical reaction may produce a slight odor.
-
Prepare the Brewer. Power off the machine but leave it plugged in. Lift and remove the water reservoir. Discard any old water. If you have a water filter, take it out. Rinse the reservoir thoroughly with fresh water. Reinstall it empty. Ensure no K-Cup pod is in the holder.
- Skip this, and you dilute the solution with old water or ruin your filter.
-
Enter Descale Mode. This is the step that varies. The brewer must be powered off but receiving electricity.
- K-Supreme & K-Express: Press and hold the 8oz and 12oz buttons together for 3 seconds. The descale light will begin flashing.
- K-Supreme Plus (KSPS): If the descale light is on, press the left arrow, then CONTINUE. If the light is off, press both left and right arrows together to open Settings, then select “Descale Mode.”
- Other Models: Consult your manual. The common pattern is holding two brew-size buttons simultaneously.
The machine will now enter a special mode where it prompts you through cycles.
-
Add the Descaling Solution. Pour the entire bottle of Keurig Descaling Solution into the empty reservoir. Now, fill the reservoir to the Max line with fresh water. Gently swirl to mix. Place your large ceramic mug on the drip tray.
-
Start the Descaling Cycle. Press the brew button (often labeled “K” or the largest size). The brewer will start. It will run for a bit, pause, and the “Add Water” light will illuminate. This is normal. When it pauses, lift the reservoir lid, add more fresh water to the Max line, close it, and press brew again. Repeat this “brew-pause-refill” sequence until the machine stops and the descale light changes its pattern (often to a solid light). This takes about 15-20 minutes.
-
Common mistake: Using a paper cup for the descale cycle — the hot acidic solution soaks through and collapses the cup within the first minute, spilling solution into the drip tray and onto your counter.
-
-
Rinse the System Thoroughly. Discard the contents of your mug. Rinse the mug. Empty any remaining solution from the reservoir and rinse it thoroughly. Fill the reservoir completely with fresh water only. Place the mug back. Press brew again. The machine will repeat the same pause-and-refill process, this time flushing clean water through the system. You may need to do multiple reservoir refills of fresh water until the descale light turns off completely and the brewer returns to normal standby mode.
- Stop too early, and residual acid will make your next several cups of coffee taste sour and metallic.
TL;DR: Power off, hold correct buttons to enter mode, run solution through, then flush with multiple tanks of fresh water until the light goes off.
When Descale Goes Wrong: The Heavily Scaled Brewer

A normal descale cycles smoothly. A heavily neglected machine can fight back. The official manuals have a specific troubleshooting tree for this.
If scale buildup is severe, the descaling solution’s reaction can create significant foam. You might hear air blowing sounds, and the machine may dispense little or no water. This means foam or loose scale chunks are blocking the internal pump or water lines.
If your brewer sputters air and stops output during descaling: 1) Turn it off and unplug it immediately. 2) If descaling solution is in the reservoir, discard it and rinse the tank. 3) Refill with fresh water only, plug the brewer back in, power it on, and try to continue the fresh water rinse cycle. 4) If the problem continues, unplug the machine and let it sit for at least 30 minutes. This allows the chemical reaction to subside and blockages to loosen. Then restart the rinse.
This 30-minute cool-down is not a suggestion. It lets the aggressive foaming settle. Forcing the pump against a foam lock can burn it out. This level of neglect is why regular maintenance, akin to replacing Bunn coffee pot filters on schedule, is non-negotiable for machine longevity.
Why Not Just Use Vinegar?
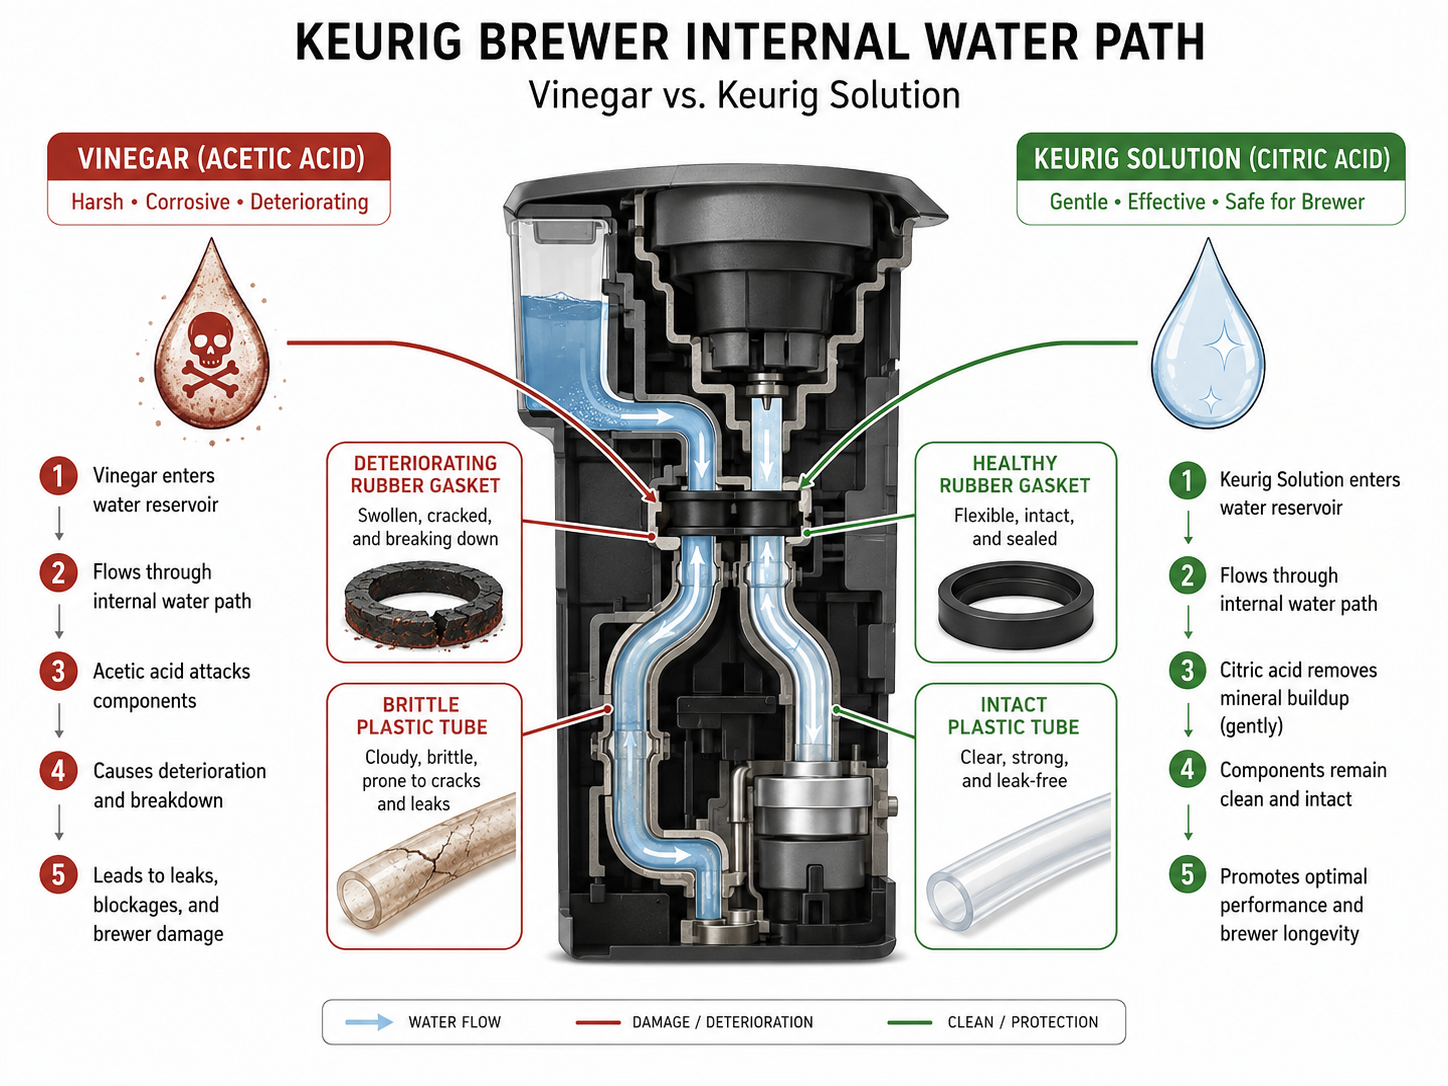
You can find a hundred YouTube tutorials recommending white vinegar. The official stance from Keurig is clear: don’t. The reason is about material compatibility over multiple cleanings.
Vinegar (acetic acid) is more volatile and has a stronger odor that can linger in silicone seals and plastic water lines. Over repeated descaling sessions—and you will do this many times over the brewer’s life—acetic acid can cause certain plastics to become brittle and degrade rubber gaskets faster than the milder citric acid in the branded solution. The Keurig Descaling Solution is engineered for the specific materials inside their machines. It’s the difference between using any cleaner on your car and using one formulated for its specific paint and interior surfaces.
Frequently Asked Questions
How often should I descale my Keurig?
Every 3 to 6 months, or as soon as the “Descale” light comes on. If you have very hard water, lean toward the 3-month mark. The K-Express model reminds you after 250 brew cycles.
Can I use the machine while the descale light is on?
Technically, yes. The brewer will still make coffee. But you are running it with reduced heating efficiency and toward a potential breakdown. It’s like driving a car with the “Check Engine” light on.
The light came back on right after I descaled. What happened?
You likely did not complete the full cycle. The light only resets after the final rinse cycles are done and the machine returns to standby. If you stopped after the solution cycle but before the multiple fresh water flushes, the light will remain on. Run the process again, ensuring you follow through to the end.
Is the descaling solution safe?
It is food-safe when used as directed. It is a citric acid solution. However, you should never drink the concentrated solution or the output from the descaling cycle. Rinse it thoroughly from your mug and brewer before normal use.
What if my machine still brews a partial cup after descaling twice?
The official guidance from Keurig’s Use & Care guides states that if partial brewing persists after two full descale attempts, you should contact Keurig Customer Service. This indicates a physical blockage or mechanical failure that chemical cleaning cannot fix.
The Bottom Line
Descaling isn’t optional cleaning. It’s preventive medicine for your coffee maker. The flashing light is a diagnostic tool, not a nuisance. Listen to it.
The process is straightforward: enter the special mode, run the solution through, then flush it all out with water. Respect the ceramic mug rule and the fresh water rinses. If your machine groans and sputters, give it that 30-minute timeout. This routine, performed a few times a year, is what separates a brewer that lasts three years from one that lasts a decade. It also ensures every cup, whether from a pod system or a more involved method like an Americano vs drip coffee comparison, starts with a perfectly clean water path. Your morning routine depends on it.
{
“@context”: “https://schema.org”,
“@type”: “HowTo”,
“name”: “How to Descale a Keurig Coffee Maker”,
“totalTime”: “PT30M”,
“tool”: [
{
“@type”: “HowToTool”,
“name”: “Keurig Descaling Solution or Descale Pouch”
},
{
“@type”: “HowToTool”,
“name”: “Large ceramic mug (14oz minimum)”
},
{
“@type”: “HowToTool”,
“name”: “Fresh water”
}
],
“step”: [
{
“@type”: “HowToStep”,
“name”: “Prepare the brewer”,
“text”: “Empty the water reservoir, remove any water filter, and ensure no K-Cup pod is in the holder.”
},
{
“@type”: “HowToStep”,
“name”: “Enter descale mode”,
“text”: “With the brewer plugged in but powered off, press and hold the model-specific button combination (like 8oz + 12oz) for 3 seconds until lights flash.”
},
{
“@type”: “HowToStep”,
“name”: “Run the descaling solution”,
“text”: “Add the solution and water to the reservoir, place your mug, and press brew. The machine will pause multiple times for you to refill with fresh water.”
},
{
“@type”: “HowToStep”,
“name”: “Complete the rinse cycles”,
“text”: “After the solution cycle, discard the mug contents. Refill the reservoir with only fresh water and repeat the brew process until the descale light turns off.”
}
]
}
{
“@context”: “https://schema.org”,
“@type”: “FAQPage”,
“mainEntity”: [
{
“@type”: “Question”,
“name”: “How often should I descale my Keurig?”,
“acceptedAnswer”: {
“@type”: “Answer”,
“text”: “Every 3 to 6 months, or as soon as the \”Descale\” light comes on. If you have very hard water, lean toward the 3-month mark. The K-Express model reminds you after 250 brew cycles.”
}
},
{
“@type”: “Question”,
“name”: “Can I use the machine while the descale light is on?”,
“acceptedAnswer”: {
“@type”: “Answer”,
“text”: “Technically, yes. The brewer will still make coffee. But you are running it with reduced heating efficiency and toward a potential breakdown. It’s like driving a car with the \”Check Engine\” light on.”
}
},
{
“@type”: “Question”,
“name”: “The light came back on right after I descaled. What happened?”,
“acceptedAnswer”: {
“@type”: “Answer”,
“text”: “You likely did not complete the full cycle. The light only resets after the final rinse cycles are done and the machine returns to standby. If you stopped after the solution cycle but before the multiple fresh water flushes, the light will remain on. Run the process again, ensuring you follow through to the end.”
}
},
{
“@type”: “Question”,
“name”: “Is the descaling solution safe?”,
“acceptedAnswer”: {
“@type”: “Answer”,
“text”: “It is food-safe when used as directed. It is a citric acid solution. However, you should never drink the concentrated solution or the output from the descaling cycle. Rinse it thoroughly from your mug and brewer before normal use.”
}
},
{
“@type”: “Question”,
“name”: “What if my machine still brews a partial cup after descaling twice?”,
“acceptedAnswer”: {
“@type”: “Answer”,
“text”: “The official guidance from Keurig’s Use & Care guides states that if partial brewing persists after two full descale attempts, you should contact Keurig Customer Service. This indicates a physical blockage or mechanical failure that chemical cleaning cannot fix.”
}
}
]
}
