
Troubleshooting Cuisinart Coffee Grinder | Burr Jams & Motor
To troubleshoot a Cuisinart coffee grinder, start by unplugging it and letting it cool for 30 minutes to reset the thermal protection circuit. Then, remove the bean hopper to clean the hidden safety switch and clear the grind chamber of oily residue or compacted grounds. Most failures stem from three things: a clogged chute, oily beans jamming the burrs, or a tripped motor overload.
People assume their grinder is broken when it just needs a five-minute cleaning. They miss the safety switch under the bean hopper or try to restart a hot motor too soon. The unit stays dead, and they buy a new one.
This guide walks through the seven most common failures, with the OEM wait times most manuals bury on page nine. You will learn how to spot the difference between a simple clog and a burnt-out motor, how to use the “Grind Off” mode on combo machines, and why dark roast beans are the number one grinder killer.
Key Takeaways
- The motor thermal protection on models like the CBM-22 and BM16-PCC requires a full 30-minute cool-down before it will reset. Trying to restart it sooner does nothing.
- Oily dark roast or flavored beans leave a sticky residue that bridges over the burrs and clogs the exit chute within two weeks of daily use. A high-pitched whine before stopping is the telltale sign.
- A hidden safety switch under the bean hopper must be engaged by a plastic actuator bar. If this bar breaks or the switch gets gummed up, the grinder acts completely dead even when plugged in.
- For Cuisinart Grind & Brew models, you can bypass a failed grinder entirely by using the “Grind Off” mode and switching to pre-ground coffee.
- Ceramic burrs in Grind & Brew machines can wear smooth or chip after 2–3 years of daily use, causing inconsistent grind size and eventual stalling.
Why Does My Cuisinart Grinder Stop Mid-Grind?
The motor stops because it overloaded. An overload trips one of two things: the thermal protection circuit or a mechanical jam the motor cannot overcome.
The thermal circuit is a safety feature. It cuts power when the motor windings get too hot, which happens if you run the grinder too long, grind too fine, or force oily beans through a partially clogged chamber. According to the Cuisinart CBM-22 manual, this reset takes “approximately 30 minutes.” The BM16-PCC manual states it can take “up to 30 minutes” for the protection to disengage.
The Cuisinart CBM-22 and BM16-PCC burr mills have a motor thermal protection circuit that requires a 30-minute cool-down period before the unit will power on again.
You cannot rush this. Plugging the unit back in after five minutes yields silence. The internal thermal cutoff needs time to cool below its trip point. Walk away, set a timer, and do not touch the power button.
A mechanical jam is more immediate. It usually happens at the burrs. Oily beans are the main culprit. The oils coat the ceramic or steel burrs and the surrounding chamber walls. Grounds then stick to that coating, building up until the gap between the burrs closes. The motor strains, emits a high-pitched whine, and then stops. Sometimes a small rock or other hard debris gets lodged between the burrs, causing a hard stop.
TL;DR: If it stops after a long grind, it’s likely thermal protection, wait 30 minutes. If it stops with a screech at the start, it’s a mechanical jam from oily beans or debris.
The Three Most Common Cuisinart Grinder Problems (and Their Fixes)
Most Cuisinart grinder failures fall into three buckets. Diagnosing which one you have saves an hour of tinkering.
1. The Grinder Won’t Start At All
Check the power, then the hopper. The outlet is obvious, but the bean hopper is a frequent miss. Many Cuisinart models have a safety switch that only engages when the hopper is fully seated and locked. If the hopper isn’t turned clockwise until it clicks, or if the small plastic actuator bar underneath is broken, the switch stays open.
A YouTube teardown of a Cuisinart DBM-8 shows this exact failure. The internal start switch is activated by a bar on the hopper assembly. If that bar snaps, a common plastic fatigue point, the switch never gets pressed. The grinder appears completely dead. You can test this by carefully depressing the switch inside the unit with a non-conductive tool while the hopper is removed. If the grinder starts, you’ve found the fault.
The fix is either reassembling the hopper correctly or, if the bar is broken, replacing the hopper assembly. Cuisinart sells these as parts.
Common mistake: Assuming the motor is dead because the unit is silent, the hopper safety switch is gummed up with fine grounds or its actuator is broken. Cleaning the switch contacts with a dry brush often brings it back to life.
2. It Starts But Makes a Loud Noise or Stalls
This is a burr or chamber issue. For blade grinders like the DCG-12BCC, the stainless steel bowl might be overfilled. The manual states not to fill beans above the rim of the bowl, as this can cause poor grinding or motor failure. For burr grinders, the grind might be set too fine.
On Cuisinart Grind & Brew models, the grind selector dial has numbered positions. Setting 1 (finest) can cause the burrs to stall because they are too close together. If your grinder groans and stops only on fine settings, try a coarser grind like setting 3 or 4. If it works, your burrs likely need a thorough cleaning, the fine setting magnifies any friction from oily buildup.
A loud rattling noise points to a foreign object. Unplug the grinder, remove the hopper and upper burr carrier, and inspect the chamber. Shine a flashlight inside. Look for a small pebble or a hardened chunk of coffee.
3. It Runs But Produces No or Uneven Grounds
The output chute is clogged. This is the classic “it sounds like it’s working but nothing comes out” failure. Oily beans, especially dark roasts, create a paste that builds up in the exit chute. Over time, this paste hardens and completely blocks the path.
The fix requires disassembly. For many models, you must first turn the grind size knob to its coarsest setting, 35 on the CBM-22 dial, before you can remove the upper burr assembly. Once removed, use a vacuum hose with a narrow attachment to suck out the loose grounds. Then, use a long, stiff brush (a clean paintbrush works) to scrape the walls of the chute. Reassemble and test with a small amount of non-oily, light roast beans.
| Symptom | Most Likely Cause | Immediate Action |
|---|---|---|
| No power, no sound | Hopper safety switch failed or disengaged | Remove hopper, inspect and clean switch contacts |
| Loud screech then stop | Burrs jammed by oily beans or foreign object | Unplug, disassemble, clean burrs and chamber |
| Motor hums but no grounds | Output chute completely clogged | Set grind to coarsest, disassemble, vacuum chute |
| Grinds inconsistently | Worn ceramic burrs (2–3 years daily use) | Inspect burrs for smooth spots or chips; consider replacement |
| Stops after 30+ seconds of grinding | Motor thermal overload | Unplug and wait 30 minutes for thermal reset |
TL;DR: No start? Check the hopper switch. Loud noise? Check for a jam or too-fine setting. No output? Clean the clogged chute.
Step-by-Step: The 7-Step Bump-Feed Replacement (and the One Step Nobody Skips)
This is the full clean-and-check procedure for a grinder that has stopped working. It addresses the most common failures in order of likelihood.
Before you start: Unplug the grinder. Never submerge the base unit in water. The removable parts are often top-rack dishwasher safe, but check your manual. Wear safety glasses, fine coffee grounds can fly when you dislodge a clog.
Step 1: Cool the motor for 30 minutes.
If the grinder was just running and stopped, walk away. The thermal protection needs a full half-hour to reset on most models. This is the step everyone skips. They plug it back in after two minutes, get no response, and assume the worst.
Step 2: Remove the bean hopper.
Grip the hopper and turn it counterclockwise. It should unscrew and lift off. On the Burr Mill models, you should hear a click. Set it aside.
Step 3: Locate and clean the safety switch.
Look inside the now-exposed grinder body. You will see a small, rectangular plastic switch with a button. This is the safety interlock. Use a dry, soft-bristled brush to wipe away any fine coffee grounds or oily residue from the switch button and the surrounding area. This switch must be depressed for the grinder to start.
Step 4: Set the grind selector to coarse and remove the burr carrier.
Turn the grind size dial all the way to the coarsest setting, often marked “Coarse” or a high number like 35. This retracts the upper burr, allowing you to lift the carrier straight out. On some models, you may need to press a release tab.
Step 5: Vacuum the grind chamber.
Use a vacuum cleaner hose with a narrow attachment. Insert it into the now-empty chamber and suck out all loose grounds. Tilt the grinder to get the corners. This clears the bulk debris that causes jams.
Step 6: Inspect and clean the burrs.
Look closely at the burrs. Ceramic burrs should be sharp and clean. If they look glossy, smooth, or chipped, they are worn. Steel burrs should not have visible nicks. Wipe them with a dry cloth. For sticky, oily residue, some owners use a tablespoon of uncooked white rice as an abrasive cleaner. Run the rice through the empty grinder for 15 seconds, then discard the rice flour immediately. Do not use water or any liquid cleaner.
Step 7: Reassemble and test with light roast beans.
Put the burr carrier back, ensuring it clicks or locks into place. Reattach the bean hopper by turning it clockwise until it clicks. Fill the hopper with no more than 2 ounces of a dry, light roast coffee bean. Set the grind to a medium setting. Plug the grinder back in and press start. It should run with a steady, medium-pitched hum and produce consistent grounds.
If it still does not start, the internal start switch or motor may be faulty. Professional repair or replacement is the next step.
What’s the Real Culprit Behind Oily Bean Clogs?
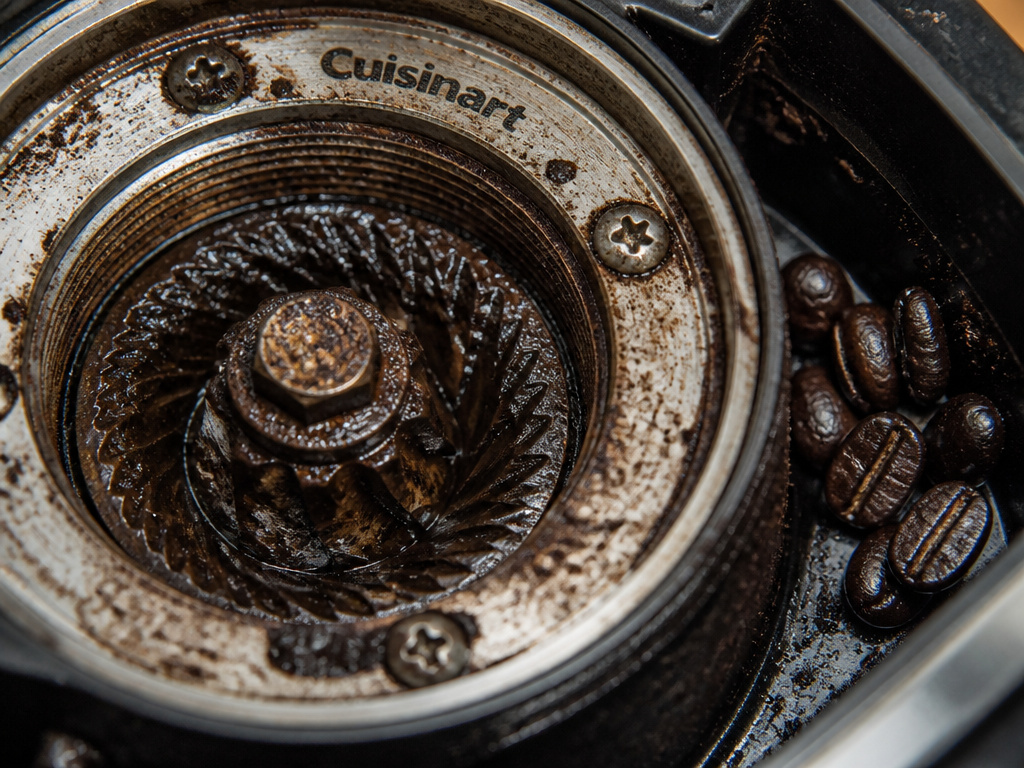
Dark roast and flavored beans are the number one grinder killer. They contain more surface oils. These oils transfer from the bean to the burrs and grind chamber with every use.
The physics are simple. Heat during roasting brings oils to the bean’s surface. Darker roasts get more heat. These oils are sticky. As you grind, the oils coat the ceramic or steel burrs. Coffee grounds are powdery and dry. They stick to the oily coating.
Within two weeks of daily use with dark roast beans, a layer of compacted coffee paste builds up in the grind chamber and exit chute. This paste acts like cement. It narrows the gap between the burrs, increasing friction. The motor works harder, heats up, and can trip the thermal cutoff. Or, the paste completely blocks the chute, so the motor runs but no grounds come out.
The first symptom is often a change in sound. A normally quiet grind develops a high-pitched whine as the motor strains against the added friction. Then, one day, it just stops.
The fix is preventive. If you must use oily beans, clean your grinder every two weeks. Run a cleaning cycle with 1 tablespoon of uncooked white rice or commercially available grinder cleaning tablets. Better yet, reserve your Cuisinart for light or medium roast beans, which are far drier. Use a dedicated blade grinder for dark roasts, or accept that you will be performing deep cleans monthly.
TL;DR: Oily beans leave a sticky residue that builds up in the grind chamber, causing jams and motor strain within two weeks. The fix is regular cleaning or switching to drier beans.
How Do You Fix a Cuisinart Grinder That Overheats?

You let it cool. Completely. The official manuals are clear on the timeline.
The Cuisinart CBM-22 manual states the thermal protection reset time is “approximately 30 minutes.” The BM16-PCC Supreme Grind manual says “up to 30 minutes.” This is not a suggestion. The bi-metallic strip inside the thermal cutoff must physically cool and bend back to its original position to close the circuit. Rushing this process does not work.
Overheating causes are usually behavioral. Grinding too many beans at once is a major one. The DCG-12BCC Grind Central manual warns not to fill the stainless steel bowl above the rim. The BM16-PCC has a max fill of 8 ounces (227g). Exceeding these limits makes the motor work too long in one cycle.
Grinding too fine is another cause. Fine grinding requires the burrs to be closer together, which creates more friction and heat. For a 12-cup pot, the BM16-PCC manual says a medium grind takes about 40 seconds. If you set it to fine and try to grind the same volume, it could run for 60+ seconds, pushing the motor into the thermal danger zone.
The solution is to respect the machine’s limits. Grind in smaller batches. Use the appropriate grind setting for your brew method, fine for espresso, medium for drip, coarse for French press. If you need a large amount of fine grind, do it in two or three smaller batches with a minute of cool-down time between each.
| Model | Max Bean Fill | Medium Grind Time (12 cups) | Thermal Reset Time |
|---|---|---|---|
| Cuisinart DCG-12BCC | Do not fill above bowl rim | 30 seconds (per manual) | Not specified; assume 30 min |
| Cuisinart BM16-PCC | 8 oz (227 g) | 40 seconds (per manual) | Up to 30 minutes (per manual) |
| Cuisinart CBM-22 | Not specified | Not specified | Approximately 30 minutes (per manual) |
Can You Still Use a Cuisinart Grind & Brew If the Grinder Fails?

Yes, using the “Grind Off” mode. This is a specific feature on Cuisinart’s combo Grind & Brew coffee makers (models like DGB-900, 850, 700, 550). When the built-in burr grinder fails, a common issue after 2–3 years as the ceramic burrs wear smooth, you are not stuck with a dead appliance.
The “Grind Off” mode bypasses the grinder entirely. You add pre-ground coffee directly to the filter basket, just like a standard drip machine. The unit will still heat water, brew, and keep the coffee warm. It essentially becomes a standard Cuisinart coffee maker.
To activate it, you typically press a “Grind Off” button on the control panel before starting the brew cycle. Consult your specific model’s manual for the exact sequence. This mode is a lifesaver that extends the machine’s usable life by years after the grinder component quits.
It also serves as a diagnostic step. If the machine works perfectly in “Grind Off” mode but fails in normal mode, you have isolated the problem to the grinder assembly, not the heating element, pump, or control board. Your repair focus narrows to the burrs, the grinder motor, or the bean hopper safety switch.
I kept a DGB-850 running for four extra years on “Grind Off” mode after the ceramic burrs chipped. The brew unit was still solid, and buying pre-ground coffee was cheaper than replacing the entire machine. I only retired it when the carafe heater died.
Frequently Asked Questions
Why did my Cuisinart grinder suddenly stop working?
It likely overheated. Unplug it and wait 30 minutes for the thermal protection circuit to reset. If it still does not start, check that the bean hopper is fully seated and locked. A disengaged or gummed-up safety switch under the hopper is the next most common cause.
Is it safe to clean my coffee grinder with rice?
Using 1 tablespoon of uncooked white rice is a common owner workaround, though not officially recommended by Cuisinart. The rice acts as a gentle abrasive to scrub oils off the burrs and absorbs fine, stale grounds. Run it through an empty grinder for 15 seconds, then discard the powdery rice immediately. Do not use water or any liquid cleaner.
How often should I clean my Cuisinart burr grinder?
Clean it every 2–4 weeks with daily use. If you use oily dark roast or flavored beans, clean it weekly. Oily residue builds up faster and is the primary cause of clogs and motor strain. Regular cleaning with a dry brush or rice cycle prevents most major issues.
What does the ‘Grind Off’ mode do on a Cuisinart Grind & Brew?
It bypasses the built-in grinder. You add pre-ground coffee to the filter, and the machine functions as a standard drip coffee maker. Use this mode if the grinder fails due to worn burrs or a motor issue; it can extend the life of your machine for years.
My grinder makes a loud rattling noise. What’s wrong?
foreign object is likely stuck in the burrs. Unplug the grinder immediately. Remove the bean hopper and upper burr carrier. Shine a light into the grind chamber and look for a small stone, a piece of hardened coffee, or other debris. Remove it with tweezers or a vacuum hose.
The Bottom Line
Most Cuisinart grinder problems are fixable with a thirty-minute wait, a thorough cleaning, and a bag of light roast beans. The thermal cutoff is not a death sentence, it is a fuse. The hidden safety switch under the hopper is not a design flaw, but a cleaning checkpoint you probably missed.
Chasing the perfect grind with oily dark roast beans will cost you a grinder every couple of years. Either commit to a biweekly cleaning ritual with rice or dedicated tablets, or reserve your Cuisinart for the drier, lighter roasts it handles without complaint. When the burrs finally do wear out, remember the “Grind Off” button on combo machines. That single feature turns a broken appliance into a perfectly serviceable brewer for another few seasons.
{
“@context”: “https://schema.org”,
“@type”: “HowTo”,
“name”: “How to Troubleshoot a Cuisinart Coffee Grinder”,
“totalTime”: “PT30M”,
“tool”: [
{
“@type”: “HowToTool”,
“name”: “Small Phillips screwdriver”
},
{
“@type”: “HowToTool”,
“name”: “Soft-bristled brush (like a paintbrush)”
},
{
“@type”: “HowToTool”,
“name”: “Vacuum cleaner with hose attachment”
},
{
“@type”: “HowToTool”,
“name”: “1 tablespoon uncooked white rice (optional)”
}
],
“step”: [
{
“@type”: “HowToStep”,
“name”: “Unplug and cool”,
“text”: “Unplug the grinder and let it sit for 30 minutes if it recently stopped working. The motor thermal protection circuit needs time to reset.”
},
{
“@type”: “HowToStep”,
“name”: “Remove hopper and check safety switch”,
“text”: “Turn the bean hopper counterclockwise to remove it. Inspect the small plastic actuator underneath and the contact points for coffee grounds or oily residue. Clean them with a dry brush.”
},
{
“@type”: “HowToStep”,
“name”: “Clear the grind chamber”,
“text”: “Turn the grind selector dial to its coarsest setting (like 35 on a CBM-22). Remove the upper burr carrier and use a vacuum hose to suck out all loose grounds from the chamber.”
},
{
“@type”: “HowToStep”,
“name”: “Inspect burrs for damage or oil”,
“text”: “Look at the ceramic or steel burrs. Check for chips, cracks, or a glossy, dark coating from oily beans. Wipe burrs with a dry cloth. Do not use water.”
},
{
“@type”: “HowToStep”,
“name”: “Test with a coarse grind”,
“text”: “Reassemble the grinder, fill the hopper with a small amount (under 2 oz) of light roast, non-oily beans. Set the grind to coarse and run it for 10 seconds. If it works, the issue was a clog or oil.”
},
{
“@type”: “HowToStep”,
“name”: “Run a rice cleaning cycle (optional)”,
“text”: “For a deep clean, add 1 tablespoon of uncooked white rice to an empty grind chamber. Run the grinder for 15 seconds. The rice absorbs oils and scrubs the burrs. Discard the rice flour immediately.”
},
{
“@type”: “HowToStep”,
“name”: “Re-test and monitor”,
“text”: “Grind a fresh batch of beans. Listen for a smooth hum. If the motor still doesn’t start, the internal start switch or motor may be faulty and require professional service.”
}
]
}
{
“@context”: “https://schema.org”,
“@type”: “FAQPage”,
“mainEntity”: [
{
“@type”: “Question”,
“name”: “Why did my Cuisinart grinder suddenly stop working?”,
“acceptedAnswer”: {
“@type”: “Answer”,
“text”: “It likely overheated. Unplug it and wait 30 minutes for the thermal protection circuit to reset. If it still does not start, check that the bean hopper is fully seated and locked. A disengaged or gummed-up safety switch under the hopper is the next most common cause.”
}
},
{
“@type”: “Question”,
“name”: “Is it safe to clean my coffee grinder with rice?”,
“acceptedAnswer”: {
“@type”: “Answer”,
“text”: “Using 1 tablespoon of uncooked white rice is a common owner workaround, though not officially recommended by Cuisinart. The rice acts as a gentle abrasive to scrub oils off the burrs and absorbs fine, stale grounds. Run it through an empty grinder for 15 seconds, then discard the powdery rice immediately. Do not use water or any liquid cleaner.”
}
},
{
“@type”: “Question”,
“name”: “How often should I clean my Cuisinart burr grinder?”,
“acceptedAnswer”: {
“@type”: “Answer”,
“text”: “Clean it every 2–4 weeks with daily use. If you use oily dark roast or flavored beans, clean it weekly. Oily residue builds up faster and is the primary cause of clogs and motor strain. Regular cleaning with a dry brush or rice cycle prevents most major issues.”
}
},
{
“@type”: “Question”,
“name”: “What does the ‘Grind Off’ mode do on a Cuisinart Grind & Brew?”,
“acceptedAnswer”: {
“@type”: “Answer”,
“text”: “It bypasses the built-in grinder. You add pre-ground coffee to the filter, and the machine functions as a standard drip coffee maker. Use this mode if the grinder fails due to worn burrs or a motor issue; it can extend the life of your machine for years.”
}
},
{
“@type”: “Question”,
“name”: “My grinder makes a loud rattling noise. What’s wrong?”,
“acceptedAnswer”: {
“@type”: “Answer”,
“text”: “foreign object is likely stuck in the burrs. Unplug the grinder immediately. Remove the bean hopper and upper burr carrier. Shine a light into the grind chamber and look for a small stone, a piece of hardened coffee, or other debris. Remove it with tweezers or a vacuum hose.”
}
}
]
}
