
How to Use Breville Coffee Machine: A Simple 5-Step Guide
To use a Breville coffee machine, follow a five-step manual process: warm up the machine, dose 18g of beans, grind manually, distribute and tamp the grounds evenly, then brew a 36g shot in 28-32 seconds. This method bypasses the inconsistent auto-features and is the only reliable path to cafe-quality espresso at home.
Most guides treat the Breville’s automatic grinder and programmable buttons as helpful shortcuts. They are not. They are the main source of frustration because they add variables you cannot control, precise dose weight and grind time. The machine is a capable tool, but you must take manual control of its key functions.
This guide walks through the exact manual process, from first power-on to steamed milk. It explains why each step matters, what breaks if you skip it, and how to maintain the machine so it lasts.
Key Takeaways
- Ignore the auto-grind and auto-brew features from day one. Manual control over dose and shot time is non-negotiable for consistency.
- Your two essential tools are a 0.1g resolution scale and a WDT tool. The scale manages input weight; the WDT tool manages extraction evenness.
- The target recipe is 18g of coffee in, 36g of liquid espresso out, in 28 to 32 seconds. This ratio balances strength and extraction.
- Common mistake: Using the machine’s auto-stop function for shots, it measures by volume, not weight, and over-extracts every time. Stop the shot manually with your scale.
- Replace the water filter every 3 months and descale every 2-3 months with a citric-acid-based solution. Hard water cuts both timelines in half.
Before You Start: The Two Non-Negotiables
You need two items that do not come in the box. The first is a digital scale accurate to 0.1 grams. Coffee is measured by weight, not volume. A tablespoon of dark roast weighs less than a tablespoon of light roast because the beans are less dense. Eyeballing it guarantees a different shot every time.
The second is a WDT tool, a handle with several thin needles. Ground coffee from the Breville’s grinder exits with static and clumps. Those clumps create density channels in the puck. Water follows the path of least resistance through those channels, resulting in a shot that is simultaneously sour (from under-extracted grounds) and bitter (from over-extracted grounds). The WDT tool breaks up clumps for even water flow.
Before you start: The group head and steam wand reach temperatures above 90°C (194°F) within minutes. Never touch the metal parts without a cloth during operation or immediately after. The portafilter stays hot enough to burn for ten minutes after removal.
The 5-Step Process, Start to Finish
This sequence works for the Breville Barista Express (BES870XL) and the Barista Express Impress (BES876/BES878). The Impress model has an auto-tamping arm; ignore it and tamp manually for now. Consistency beats automation.
1. Warm Up the Machine Completely
Turn the machine on. The power light illuminates. Wait ten full minutes before pulling your first shot.
The boiler needs time to reach a stable temperature, but the metal group head and portafilter take longer to soak up heat. A cold portafilter acts as a heat sink, dropping the water temperature as it hits the coffee grounds. That stalled extraction tastes sour and thin.
While waiting, seat the empty portafilter in the group head. Fill the water tank with fresh, filtered water. Check that the drip tray is empty.
TL;DR: A full 10-minute heat soak for the machine and portafilter is the cheapest flavor upgrade you can make.
2. Dose and Grind the Beans Manually
Set your scale to zero. Weigh out 18.0 grams of whole coffee beans. Pour them into the grinder hopper. The Breville has 25 grind settings, with 1 being the finest and 25 the coarsest. For espresso, you will operate between settings 4 and 10.
Place your empty portafilter on the scale, then tare it to zero. Hold it under the grinder chute. Press and hold the “Manual” grind button (or press the portafilter against the grinder sensor on some models). Grind until the hopper is empty and all 18g of beans have transferred into the portafilter.
This manual grind overrides the machine’s auto-dose timer, which is notoriously inconsistent. Humidity, bean density, and grind size affect how much coffee grounds pass through in two seconds. Manual grinding guarantees the same input weight every time, which is the first fixed variable in your recipe.
3. Distribute and Tamp
You now have a mound of grounds in your portafilter. Do not tamp yet. First, use your WDT tool. Insert the needles and stir the grounds in a slow, circular motion, reaching the bottom of the basket. Break up all visible clumps. Then gently shake the portafilter to level the bed.
Now tamp. Apply firm, even pressure straight down. You are not crushing the coffee; you are compressing it into a uniform puck that provides even resistance to water. A crooked tamp creates a sloped puck, causing water to flow faster through the thinner side.
On the Impress model, the auto-tamp arm can be used, but it often applies uneven pressure if the grounds are not perfectly level. Manual tamping is more reliable until you are confident in your distribution.
4. Brew the Shot and Watch the Scale
Lock the prepared portafilter into the group head. Place your scale on the drip tray grates, then place your cup on the scale. Tare the scale to zero.
Press the programmed shot button (usually the double-shot button). Start the timer on your scale. The machine will pre-infuse for about 10 seconds, dampening the puck with low-pressure water. Then the pump engages at full pressure, and espresso should begin flowing in a steady, honey-like stream.
Watch the scale. When the liquid weight reaches 36 grams, immediately press the shot button again to stop the brew. Note the time. Your target is 28 to 32 seconds from the moment you press start to the moment you have 36g in the cup.
| Shot Symptom | Likely Cause | Immediate Fix |
|---|---|---|
| 36g in < 25 seconds | Grind is too coarse | Adjust grinder 1-2 settings finer |
| 36g in > 35 seconds | Grind is too fine | Adjust grinder 1-2 settings coarser |
| No flow, drips only | Grind is far too fine | Adjust grinder 3-4 settings coarser |
| Gushing, blondes early | Severe channeling | Improve WDT distribution and tamp levelness |
The 28-32 second window is not arbitrary. It is the time needed for water at 9 bars of pressure to fully saturate and extract the coffee puck. Faster, and you miss the deeper, sweet compounds. Slower, and you over-extract bitter, astringent flavors.
5. Steam the Milk
Turn the steam wand knob to the on position. Wait until a strong, dry jet of steam is coming out, about 15 seconds. Purge any residual water into the drip tray.
Fill a steaming pitcher with cold milk to just below the spout. Submerge the steam wand tip about half an inch below the milk’s surface. Turn the knob to full steam.
You should hear a subtle, consistent paper-tearing sound as you introduce a small amount of air. After 3-5 seconds, lower the pitcher slightly to sink the wand tip and create a rolling vortex. This vortex folds the air into the milk, creating microfoam. Stop when the pitcher is too hot to touch comfortably on the side, about 55-60°C (131-140°F).
Turn off the steam, wipe the wand with a damp cloth, and give it a brief purge to clear the milk residue.
Why the Auto-Features Are a Trap
Breville includes intelligent dosing and programmable shot volumes to simplify the process. For consistent espresso, they complicate it. The auto-grind function uses a timer, not a scale. The same timer setting can produce 17g of coffee on a dry day and 19g on a humid day.
The programmable shot buttons stop based on the volume of water that has passed through the pump, not the weight of espresso in your cup. Crema, the golden foam on top, has different density and volume than liquid espresso. A shot that looks “full” might only contain 28g of actual liquid, with the rest being airy crema. This leads to under-extraction.
Common mistake: Relying on the machine’s pressure gauge as the sole diagnostic. A gauge reading in the “espresso range” only confirms resistance. It cannot tell you if that resistance comes from a perfectly even puck or a single, dense channel. The scale and timer are your true guides.
Take manual control of grinding and shot stopping from your first session. Use the programmable buttons only after you have dialed in your shot manually and know exactly how long it takes to reach 36g.
Dialing In: How to Fix a Bad Shot
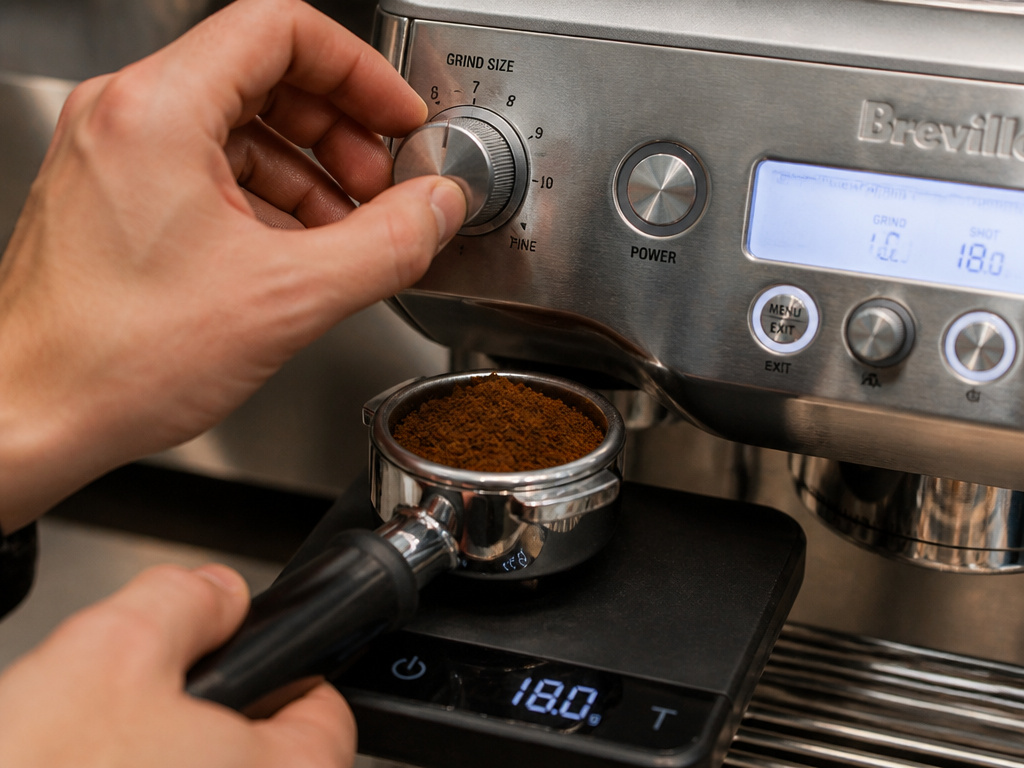
Dialing in is the process of adjusting variables to hit your 18g in, 36g out, 30-second target. The primary variable is grind size. The secondary variable is dose weight.
Start with 18g of beans and a grind setting of 8. Pull a shot and measure.
- If the shot is too fast (<25 seconds): Your grind is too coarse. Adjust the grinder to a finer setting (e.g., from 8 to 7). Keep the dose at 18g.
- If the shot is too slow (>35 seconds): Your grind is too fine. Adjust the grinder to a coarser setting (e.g., from 8 to 9). Keep the dose at 18g.
Only adjust the dose weight if you have reached the finest or coarsest grind setting and the shot is still out of range. If the shot is still too fast at grind setting 1, increase your dose to 19g. This adds more resistance. If the shot is still too slow at grind setting 10, decrease your dose to 17g.
Every new bag of coffee, even from the same roaster, may require a slight adjustment. Light roasts are denser and often need a finer grind. Dark roasts are more porous and often need a coarser grind.
Essential Maintenance: Filter and Scale
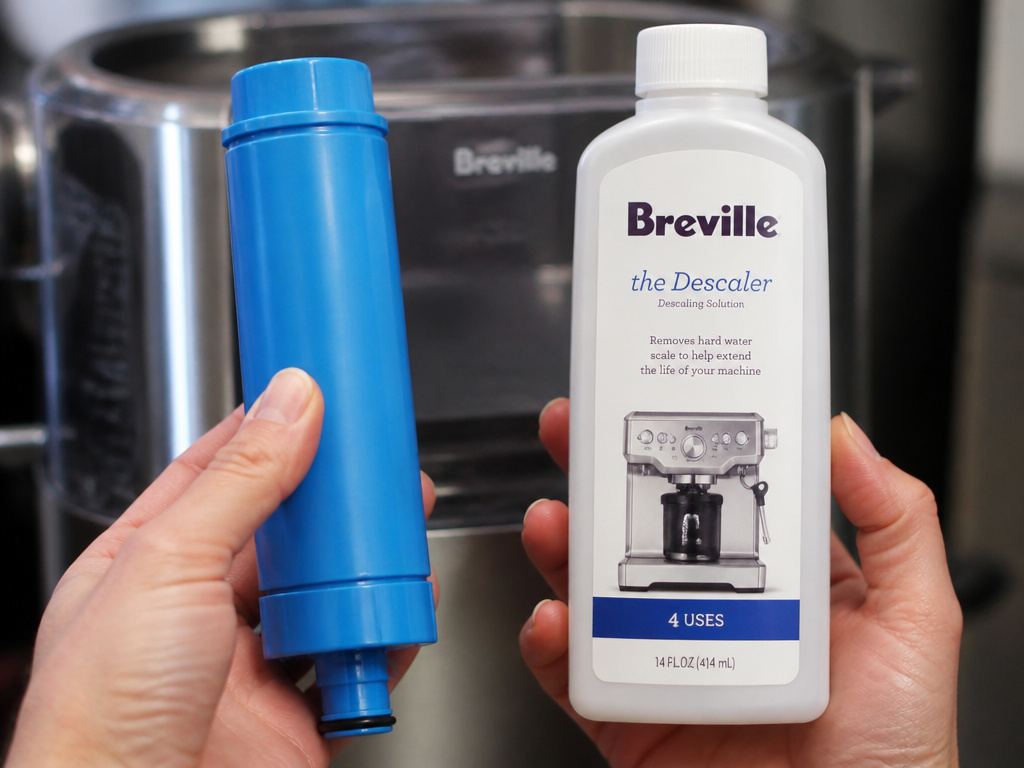
The machine’s performance depends on clean water and clear pathways. The official Breville manual for the Impress model states the water filter should be replaced every 3 months or after 40 liters of use. For the older Express model, the interval is every 2 months.
These filters soften water and reduce mineral content, slowing limescale buildup in the thermoblock and steam wand. If you have very hard water, replace the filter every 6-8 weeks. Ignoring it lets calcium carbonate plate onto the heating element, reducing efficiency and eventually triggering a descaling alarm that is a hassle to clear.
Descaling is a separate, critical process. The manual recommends it every 2-3 months. Use a citric-acid-based descaling solution made for espresso machines. Vinegar can leave behind odors.
- Mix the solution with water as directed.
- Fill the water tank with the mixture.
- Place a large container under the steam wand and group head.
- Enter the machine’s descaling mode (see your model’s manual).
- The machine will pump the solution through the system, flushing out scale.
- Rinse by running at least two full tanks of clean water through the machine.
Common mistake: Using vinegar or lemon juice to descale. The acetic and citric acids work, but they can degrade rubber seals over time and are difficult to fully rinse out. A dedicated descaling solution is formulated to be less aggressive on internal components.
Frequently Asked Questions
My Breville machine has 25 grind settings. Which one should I use?
Start at setting 8 for a medium roast. This is a middle ground. Your actual setting will depend on your specific beans, their roast date, and your local humidity. Expect to settle between settings 4 and 10 for espresso. The number itself is less important than the resulting shot time.
Can I use pre-ground coffee in my Breville?
You can, but you must use the dual-wall (pressurized) filter basket that came with your machine. The single-wall basket requires the precise resistance created by fresh grinding. Pre-ground coffee is often too coarse and stale, and the dual-wall basket creates artificial pressure to compensate. The result is drinkable but lacks the clarity and crema of a proper shot.
Why is my espresso shot so sour?
Sourness means under-extraction. The water passed through the coffee puck too quickly, grabbing only the bright, acidic compounds. The fix is almost always a finer grind setting. It increases surface area and resistance, slowing the shot down to extract the sweeter, deeper flavors.
The steam wand on my Breville isn’t producing a vortex. What’s wrong?
You likely have the wand tip too deep in the milk or are using insufficient steam power. Make sure you wait the full 15 seconds for the steam to become dry and powerful. Position the wand so the tip is just barely submerged at an angle near the pitcher’s side wall. This placement initiates the whirlpool.
How do I clean the grinder on my Breville?
Unplug the machine. Remove the bean hopper. Use a dedicated grinder brush or a clean, dry paintbrush to sweep out loose grounds. You can use vacuum attachment for the chute. Never use water or wet cloths. For a deep clean of the burrs, refer to your manual for removal instructions, this is typically an annual task.
The Bottom Line
Your Breville coffee machine is a capable semi-automatic espresso maker. Its best features are the quality grinder and the thermoblock heating system. Its worst features are the automated assists that promise simplicity but deliver inconsistency.
Skip the promises. Take manual control of the dose, grind, and shot stop. Your reward is a predictable, cafe-quality espresso in your kitchen. The process takes five focused minutes once you know the steps. The machine handles the pressure and temperature, you handle the precision. That partnership makes all the difference.
{
“@context”: “https://schema.org”,
“@type”: “HowTo”,
“name”: “How to Use a Breville Coffee Machine for Espresso”,
“totalTime”: “PT15M”,
“tool”: [
{
“@type”: “HowToTool”,
“name”: “Breville Barista Express or Impress machine”
},
{
“@type”: “HowToTool”,
“name”: “Digital scale with 0.1g resolution”
},
{
“@type”: “HowToTool”,
“name”: “54mm portafilter and basket”
},
{
“@type”: “HowToTool”,
“name”: “WDT tool with 0.4mm needles”
},
{
“@type”: “HowToTool”,
“name”: “Steaming pitcher”
}
],
“step”: [
{
“@type”: “HowToStep”,
“name”: “Warm Up and Prepare”,
“text”: “Turn on the machine and let it heat for 10 minutes. Place the empty portafilter in the group head to warm. Fill the tank with fresh water.”
},
{
“@type”: “HowToStep”,
“name”: “Dose and Grind Precisely”,
“text”: “Weigh 18g of fresh coffee beans. Pour them into the grinder hopper. Hold the portafilter under the grinder outlet and press the manual grind button until all beans are ground.”
},
{
“@type”: “HowToStep”,
“name”: “Distribute and Tamp”,
“text”: “Use a WDT tool to break up clumps and evenly distribute the grounds in the portafilter. Tamp with firm, level pressure until the coffee puck is compact and flat.”
},
{
“@type”: “HowToStep”,
“name”: “Brew and Time the Shot”,
“text”: “Lock the portafilter into the group head. Place your scale and cup underneath. Start the shot timer. Aim for 36g of liquid espresso in 28-32 seconds.”
},
{
“@type”: “HowToStep”,
“name”: “Steam and Pour”,
“text”: “Purge the steam wand, then submerge the tip just below the milk’s surface. Create a vortex to texture the milk. Wipe and purge the wand immediately after.”
}
]
}
{
“@context”: “https://schema.org”,
“@type”: “FAQPage”,
“mainEntity”: [
{
“@type”: “Question”,
“name”: “My Breville machine has 25 grind settings. Which one should I use?”,
“acceptedAnswer”: {
“@type”: “Answer”,
“text”: “Start at setting 8 for a medium roast. This is a middle ground. Your actual setting will depend on your specific beans, their roast date, and your local humidity. Expect to settle between settings 4 and 10 for espresso. The number itself is less important than the resulting shot time.”
}
},
{
“@type”: “Question”,
“name”: “Can I use pre-ground coffee in my Breville?”,
“acceptedAnswer”: {
“@type”: “Answer”,
“text”: “You can, but you must use the dual-wall (pressurized) filter basket that came with your machine. The single-wall basket requires the precise resistance created by fresh grinding. Pre-ground coffee is often too coarse and stale, and the dual-wall basket creates artificial pressure to compensate. The result is drinkable but lacks the clarity and crema of a proper shot.”
}
},
{
“@type”: “Question”,
“name”: “Why is my espresso shot so sour?”,
“acceptedAnswer”: {
“@type”: “Answer”,
“text”: “Sourness means under-extraction. The water passed through the coffee puck too quickly, grabbing only the bright, acidic compounds. The fix is almost always a finer grind setting. It increases surface area and resistance, slowing the shot down to extract the sweeter, deeper flavors.”
}
},
{
“@type”: “Question”,
“name”: “The steam wand on my Breville isn’t producing a vortex. What’s wrong?”,
“acceptedAnswer”: {
“@type”: “Answer”,
“text”: “You likely have the wand tip too deep in the milk or are using insufficient steam power. Make sure you wait the full 15 seconds for the steam to become dry and powerful. Position the wand so the tip is just barely submerged at an angle near the pitcher’s side wall. This placement initiates the whirlpool.”
}
},
{
“@type”: “Question”,
“name”: “How do I clean the grinder on my Breville?”,
“acceptedAnswer”: {
“@type”: “Answer”,
“text”: “Unplug the machine. Remove the bean hopper. Use a dedicated grinder brush or a clean, dry paintbrush to sweep out loose grounds. You can use vacuum attachment for the chute. Never use water or wet cloths. For a deep clean of the burrs, refer to your manual for removal instructions, this is typically an annual task.”
}
}
]
}
