
Learn How to Make Blended Coffee Like a Barista at Home
To make blended coffee, combine 1/2 cup of cold, strong coffee, 1/2 cup of milk or creamer, your chosen sweetener, and a full 12-ounce glass of ice in a high-speed blender. Blend on high for 45 seconds after a 3-second low start, then pulse for 3 seconds before serving immediately in a pre-chilled glass. The high-speed vortex and final pulse are what prevent a watery, separated mess.
Most recipes get the ingredients right but miss the mechanics. They tell you to dump everything in and blend. What they don’t say is that order, temperature, and a specific blender function decide whether you get a smooth, frothy drink or a sad puddle of coffee-flavored slush in three minutes.
This guide is built on the two things that actually matter: the physics of suspension and the programmed cycles inside a modern blender. We’ll cover why your Ninja’s Power Nutri Bowl works differently than a Vitamix’s Smoothie setting, how to use instant coffee when you’re out of espresso, and the USDA rule that keeps your batch safe if you make too much. Let’s get into the machine.
Key Takeaways
- Use a high-speed blender (Vitamix, Blendtec, Ninja), a standard countertop blender lacks the torque to pulverize ice completely, leaving gritty chunks.
- Layer liquids first, ice last. Pouring coffee and milk into the pitcher before adding ice protects the blades and creates a vortex that pulls solids down.
- The Vitamix Ascent Series “Smoothie” program runs for 60 seconds automatically, that’s 15 seconds longer than most manual blends need, which can over-aerate and warm the drink.
- Pulse for 3 seconds after the main blend. This re-incorporates the foam that rises to the top and prevents the drink from separating in the glass within minutes.
- For food safety, consumed blended coffee with dairy within 2 hours if left out, or refrigerate and consume within 3–4 days.
The Blender You Actually Need (It’s Not the One You Think)
A food processor will chop ice. A cheap personal blender will make a noisy, gritty mess. A high-speed blender with a motor rated above 2 peak horsepower and a tamper is the only tool that creates the emulsified, smooth texture of a coffee shop drink. The difference isn’t power alone, it’s the blade design and container shape.
Common mistake: Using a blender without a tamper for thick blends, the ingredients climb the walls, the blades spin in a pocket of air, and you get a half-blended, half-frozen lump. This is called cavitation, and it kills the motor over time.
High-speed blenders like the Vitamix Ascent Series or a Blendtec Designer Series create a vortex that pulls everything downward. The Ninja Foodi Power Nutri Duo uses a different trick: a built-in Power Paddle in its 700ml bowl physically pushes ingredients toward the blades. Both work. A $50 blender from a big-box store does not. The motor bogs, the ice stays in chunks, and you end up with a weak, watery drink because you added extra liquid to get things moving.
TL;DR: Borrow or invest in a blender with at least 2 peak horsepower and a container designed for frozen drinks. The alternative is a disappointing, grainy texture.
The 3-Second Rule That Stops Separation
Separation is the enemy. You blend a beautiful, frothy drink, pour it, and within two minutes a dark pool of coffee forms at the bottom under a layer of melting foam. The fix happens in the last three seconds of the process.
The physics are simple. Blending at high speed introduces tiny air bubbles, that’s the foam. Because air is lighter than liquid, the bubbles rise. If you stop blending abruptly, the foam settles at the top while the heavier liquid starts to sink. The solution is to pulse the blender 2–3 times after the main blend cycle. This brief re-agitation pops the largest bubbles and re-distributes the rest, creating a stable suspension.
| Blending Method | Result at 2 Minutes | Why It Happens |
|---|---|---|
| Blend on high, stop, pour | Clear separation, foam top, liquid bottom | Air bubbles rise instantly; no re-integration. |
| Blend, then pulse 3x | Uniform, smooth texture throughout | Pulsing re-incorporates foam before it fully separates. |
| Over-blend (90+ seconds) | Warm, watery, over-aerated drink | Friction heat melts ice; too much air makes it frothy but thin. |
The ideal blend time is 45 seconds on high after a 3-second start on low to break the ice. Then pulse. That final pulse is non-negotiable if you want a drink that looks good for more than a minute.
Your Ingredient Checklist (And What to Skip)
You need four components: coffee, liquid, sweetener, ice. Everything else is a variation.
Coffee: Cold brew concentrate is king. It’s strong, less acidic, and already cold, so it doesn’t melt your ice on contact. Strongly brewed coffee, chilled overnight, works. Instant espresso powder is a legitimate shortcut, one teaspoon dissolved in a tablespoon of hot water mimics a shot. Do not use hot, freshly brewed coffee. It melts the ice instantly, diluting the drink before you even blend.
Liquid: Whole milk or a barista-style oat milk gives the creamiest texture. Almond milk is popular but can separate faster due to lower protein content. If you use it, the final pulse is even more critical. For a richer, keto-friendly version, a teaspoon of MCT oil or coconut oil adds body and helps with emulsification.
Sweetener: Simple syrup blends instantly. Brown sugar adds a molasses note but must be fully dissolved in the liquid before adding ice, or it will sink as granules. Flavored syrups (vanilla, caramel) go in with the liquids.
Ice: Standard 1-inch cube tray ice is fine. Do not use crushed ice or pellet ice, the smaller surface area melts too fast during blending, adding excess water. The ice is your thickening agent. You lose it, you get soup.
A Ninja Foodi Power Nutri Duo handles thick blends like those with coconut oil or frozen bananas better than a standard pitcher blender because of its Power Paddle. It’s a solid pick if your recipes often include solid fats or frozen fruit.
The 7-Step Blended Coffee Sequence

This isn’t just a recipe. It’s a sequence where each step has a mechanical reason. Skip one, and the texture suffers.
- Chill your serving glass. Place it in the freezer for at least five minutes. A cold glass slows the melt rate at the drink’s surface. If you pour a frozen blend into a room-temperature glass, the outside layer immediately turns to water.
- Add liquids to the blender pitcher first. Cold brew or coffee goes in, then your milk or creamer. This cushions the blades when you start the motor and helps form the initial vortex that will pull the ice down.
- Add sweeteners and flavorings now. Pour syrups, cinnamon, cocoa powder, or extracts directly into the liquid pool. If you’re using granulated sugar, stir it into the liquid now to dissolve. Adding sugar on top of ice means it never fully incorporates.
- Measure your ice by volume. Fill the glass you’ll drink from to the very top with ice, then dump that ice into the blender. This guarantees the correct ice-to-liquid ratio for your serving size. Guessing leads to a drink that’s too thick or too thin.
- Start on low for 3 seconds. Secure the lid. Turn the blender to its lowest setting and count to three. This cracks the ice into smaller pieces without throwing them up the sides of the container. Jumping straight to high risks an air pocket.
- Blend on high for 45 seconds. Crank the speed to maximum. Listen. The sound will change from a loud crunching to a smoother, consistent whirl. Stop at 45 seconds. If you have a Vitamix Ascent Series blender, the “Smoothie” program runs for 60 seconds, cancel it at 45 to avoid overheating.
- Pulse 2–3 times. After the main blend, hit the pulse function briefly 2–3 times. This is the step that re-incorporates the foam. Pour immediately into your chilled glass.
TL;DR: Chill the glass, layer liquids first, measure ice with the glass, start low, blend high for 45 seconds, pulse, pour. Deviate and you get separation or grit.
Blended Coffee Variations and Pro Twists
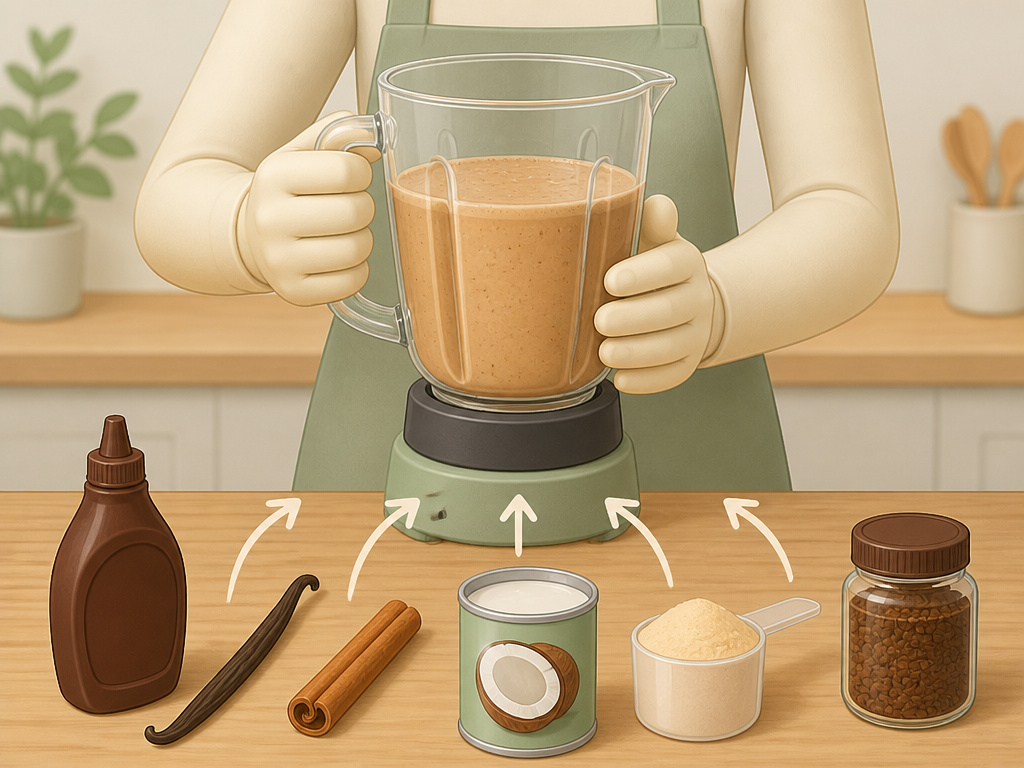
The base recipe is a canvas. Here are the modifications that work without breaking the texture.
Mocha: Add 1-2 tablespoons of chocolate syrup with the liquids. Use a darker syrup for a less sweet drink. A tablespoon of cocoa powder works but can be gritty if not blended thoroughly.
Vanilla Bean: Use 1/2 teaspoon of real vanilla bean paste instead of extract. The tiny seeds add visual texture and a deeper flavor.
Spiced: Add a pinch of ground cinnamon or nutmeg with the liquids. For a cinnamon coffee with more punch, blend in a whole cinnamon stick while blending, it will pulverize in a high-speed blender.
Dairy-Free Creamy: Use full-fat canned coconut milk (shaken first) as your liquid. It’s ultra-rich and pairs well with blonde roast beans for a lighter, tropical flavor profile.
Protein Boost: Add a scoop of unflavored collagen peptides or vanilla protein powder. Whey protein can make the drink frothy to the point of being fluffy, reduce blend time to 30 seconds if you use it.
The Instant Coffee Trick: Out of cold brew? Dissolve 2 teaspoons of instant coffee granules in 2 tablespoons of hot water first, then add to the blender with the cold milk. It works. It’s not as good as cold brew, but it’s far better than using hot brewed coffee.
Why Your Blended Coffee Tastes Weak (And How to Fix It)
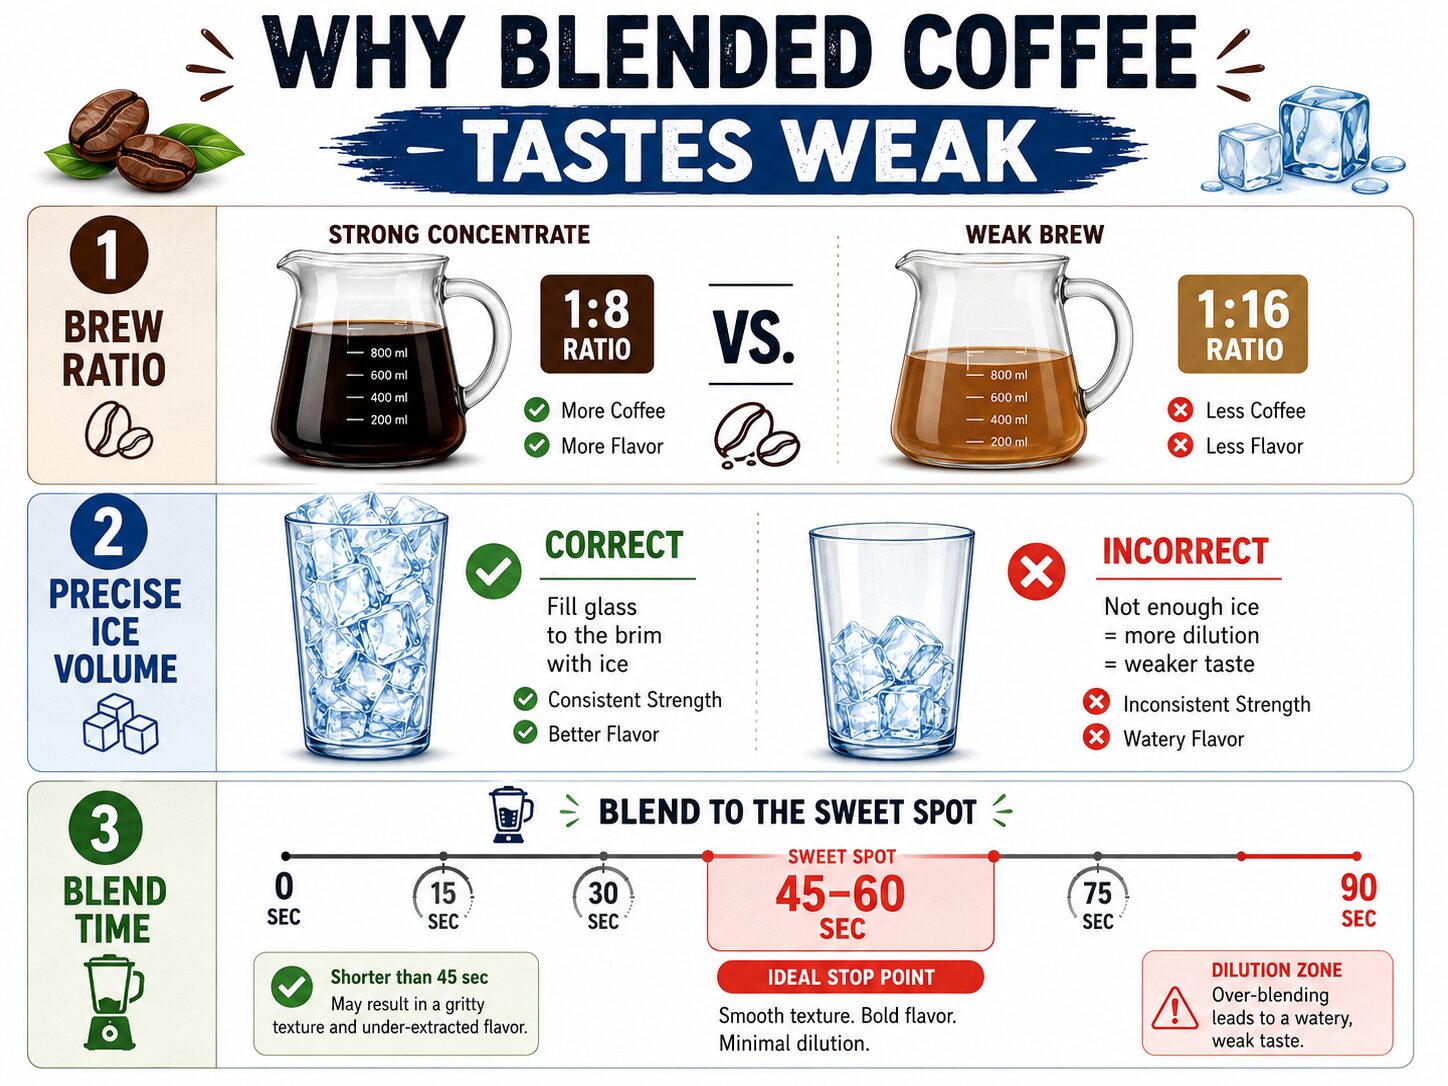
Weak flavor means one of three things: your coffee wasn’t strong enough, you used too much ice, or you over-blended and added water from melted ice.
First, coffee strength. If you’re brewing coffee specifically to chill for blending, use a 1:8 coffee-to-water ratio instead of the standard 1:16. You need a concentrate. Blonde roast beans or light roasts can taste muted and sour when blended, opt for a medium or dark roast for a more pronounced flavor that stands up to ice and milk.
Second, ice volume. The “fill your glass” method in step four is precise. If you just grab a handful from the bin, you’re probably using less than you think. Less ice means a thinner, weaker-tasting drink.
Third, blend time and heat. A Vitamix Ascent A3500 on its Smoothie program generates significant friction heat over its 60-second cycle. By the 50-second mark, the drink’s temperature can rise enough to melt a meaningful portion of the ice, diluting it. That’s why manual control and stopping at 45 seconds matters. The motor on cheaper blenders may struggle, requiring longer blend times to crush the ice, which also leads to melting and dilution.
I used a generic 1.2 HP blender for months and wondered why my drinks were always watery. I timed it, it needed 90 seconds of screaming to fully crush the ice. By then, the drink was 15 degrees warmer and tasted like diluted milk. Switching to a blender with enough torque to finish the job in under a minute changed everything.
Storing Blended Coffee (The USDA Rule)
You made a double batch. Can you save half for later? Yes, but with strict rules.
Blended coffee with dairy, milk alternatives, or other perishable ingredients is a potentially hazardous food once the ice melts. The USDA Food Safety and Inspection Service states that perishable foods should not sit in the “danger zone” (40°F–140°F) for more than two hours. Once blended, the clock starts.
- If left on the counter, drink it within 2 hours.
- If refrigerated immediately, it’s safe for 3–4 days.
The texture will suffer. The drink will separate, and the foam will collapse. Stirring or re-blending can help, but it will be thinner and less appealing. For best quality, blend and drink immediately.
Common mistake: Storing blended coffee in a sealed container in the fridge, the trapped gas from blending expands, often forcing the lid open and creating a mess. If you must store it, use a container with at least 2 inches of headspace or leave the lid slightly ajar for the first hour.
Blender Safety and Maintenance You Won’t Read in the Manual
High-speed blenders are powerful tools. A Vitamix 5000 Series recall in 2001 affecting about 10,000 units was issued because the blade assembly could separate from the container base. While modern designs have improved, the principle remains: respect the machine.
Always secure the lid firmly before starting. Use the tamper only when the blender is running, and never insert utensils while the blades are spinning. After making a sweet, dairy-based drink like blended coffee, clean the pitcher immediately. Residual sugar and milk proteins will harden and become difficult to remove, and they can unbalance the blade assembly over time.
For deep cleaning, fill the pitcher halfway with warm water and a drop of dish soap. Blend on high for 30 seconds. This cleans the underside of the blades and the container base in a way hand-washing can’t.
Frequently Asked Questions
Can I make blended coffee without a high-speed blender?
You can, but the texture will be grainy. A standard blender lacks the power to fully pulverize the ice. If you must use one, use crushed ice instead of cubes and plan on a longer blend time, accepting a slightly watery result.
My drink separates almost immediately. What did I do wrong?
You likely skipped the final pulse step or used a dairy alternative with low protein content, like some almond milks. The pulse re-incorporates the foam. Next time, blend for 45 seconds, stop, then pulse 2–3 times before pouring.
Can I use hot coffee to make a blended coffee?
No. Hot coffee will melt most of your ice on contact, resulting in a lukewarm, diluted drink. Always use cold brew, chilled coffee, or instant coffee dissolved in a small amount of hot water then cooled.
What’s the difference between blended coffee and a frappuccino?
Frappuccino is a Starbucks trademarked product that uses a proprietary coffee frappé base (a syrup) to ensure consistency and prevent separation. Homemade blended coffee uses real coffee and relies on technique (the high-speed blend and final pulse) to achieve a similar texture.
Is it better to use a blade grinder or a burr grinder for the coffee beans before brewing for blended coffee?
For the best flavor in your base coffee, a burr grinder is superior because it produces a consistent grind size, leading to even extraction. However, for blended coffee where the coffee is diluted with milk and ice, the subtleties from a perfect grind are somewhat masked. A decent blade grinder can suffice if you pulse it carefully to avoid too many fines.
Before You Go
Blended coffee fails on texture, not flavor. The machine matters, a high-speed blender isn’t a luxury, it’s a requirement for that smooth, emulsified result. Remember the sequence: cold glass, liquids first, measured ice, low start, 45-second high blend, and the critical 3-second pulse. That pulse is what keeps your drink from splitting in the glass.
Skip the hot coffee, embrace cold brew or instant, and don’t let a batch sit out. Your goal is a drink that looks and tastes professional from the first sip to the last, with no dark pool forming at the bottom. Now you know the mechanics behind it.
