
How Much Coffee to Put in Coffee Pot: The Perfect Ratio Guide
For a balanced cup from a standard drip coffee pot, use 55 grams of ground coffee per liter of water. That’s the Specialty Coffee Association’s Golden Cup Standard. For a typical 12-cup (60 oz) brewer, you need about 100 grams of coffee. Always weigh your grounds; tablespoons and scoops are unreliable.
Most people fill the basket until it looks right. They use the scoop that came with the machine. The result is a pot that swings from bitter to weak day after day, wasting beans and never tasting quite right.
This guide breaks down the industry-standard coffee to water ratio, explains why your machine’s manual might disagree, and shows you how to adjust for your specific beans and taste. You will stop guessing and start brewing with consistency.
Key Takeaways
- The professional starting point is a 1:18 coffee-to-water ratio by mass: 55g coffee per liter of water.
- Throw away the plastic scoop. A “tablespoon” of light roast is not the same weight as a tablespoon of dark roast. Use a digital scale.
- Your coffee maker’s manual often suggests a weaker ratio to appeal to a mass market; the Technivorm Moccamaster recommends 60g/L, while a Cuisinart suggests variable scoops.
- Weak coffee needs more coffee grounds, not a finer grind. Bitter, astringent coffee needs fewer grounds, not a coarser grind.
- Cold brew and espresso operate on completely different ratio scales, using a standard drip ratio for either makes an undrinkable mess.
The Golden Ratio and Why Scoops Fail
The National Coffee Association states the “Golden Ratio” is two tablespoons of ground coffee for every six ounces of water. The Specialty Coffee Association refines this into a mass standard: 55 grams of coffee per liter of water. Both point to the same truth, precision matters.
The Specialty Coffee Association’s Golden Cup Standard (SCA 310-2021) specifies a brew ratio of 55 grams of coffee per liter of water, ± 10%. This produces an extraction within the target range for optimal flavor balance.
Your coffee maker’s included scoop is the problem. A tablespoon is a volume measure. A light, dense Ethiopian roast might weigh 7 grams per tablespoon. A dark, oily Sumatran roast might weigh only 5 grams in the same spoon. If your recipe calls for 10 tablespoons, you could be using anywhere from 50 to 70 grams of coffee. That’s the difference between a weak, sour pot and a bitter, overpowering one.
I used scoops for years. My morning coffee was a lottery. One week with a new bag of Kenyan beans would be perfect. The next week, with a Colombian roast, the same number of scoops made a thin, disappointing brew. I blamed the beans. The scale showed me the truth, the Colombian beans were denser. Each scoop held nearly 2 grams more coffee. I was over-extracting without realizing it.
TL;DR: Weigh your coffee. A digital scale costing less than a bag of good beans eliminates the variable of bean density and grind fluffiness, making your brew repeatable.
What Your Coffee Maker’s Manual Actually Says
Manufacturer instructions exist to guarantee a drinkable cup for the broadest audience. They are not optimized for flavor. They are optimized for “not too strong.”
| Coffee Maker Model | Recommended Coffee | Water Volume | Implied Ratio (Coffee:Water) | Notes |
|---|---|---|---|---|
| Technivorm Moccamaster KBGV Select | 60 grams | 1.25 liters (10 cups) | 1:20.8 | Slightly weaker than SCA standard; aims for clarity over intensity. |
| Bonavita Connoisseur 8-Cup | 55 grams | 1 liter (8 cups) | 1:18 | Direct alignment with the SCA Golden Cup Standard. |
| Cuisinart DCC-3200P1 14-Cup | 10-12 “level scoops” | Full 14-cup pot | Variable | A “scoop” is not defined. This is a suggestion, not a recipe. |
The Technivorm’s recommendation is a specific choice. At 60g per 1.25L, the ratio is milder. It produces a clean, bright cup that won’t overwhelm a casual drinker. The Bonavita, also SCA-certified, sticks to the letter of the standard. The Cuisinart manual gives a range because it acknowledges user preference, but its volumetric guidance is inherently flawed.
You should start with the SCA’s 55g/L. Treat your machine’s manual as a secondary reference. If your brewer is SCA-certified, its manual likely mirrors the standard. If it isn’t, the manual is a safe starting point that you will probably need to adjust upward.
How to Measure Correctly: A Step-by-Step Method
You need a drip coffee maker, fresh coffee, a digital scale, and a grinder if you use whole beans. The grinder is non-negotiable for peak flavor. Pre-ground coffee loses volatile aromatics within minutes of grinding.
-
Determine your water volume. Check the carafe markings. Decide how many ounces or milliliters you are brewing. Convert liters to milliliters if needed (1 liter = 1000ml).
Consequence if skipped: You are guessing. Adding 55g of coffee to an unknown amount of water makes the ratio meaningless. -
Calculate your coffee mass. For the SCA standard, use 0.055 grams of coffee per milliliter of water. For 1000ml (1L), that’s 55g. For 750ml, it’s 41g. For 1500ml, it’s 83g.
Consequence if skipped: You default to volume scoops, reintroducing all the density and grind-size variables you are trying to eliminate. -
Weigh the coffee. Place your empty filter on the scale. Press tare to zero it. Grind coffee directly into the filter or add pre-ground coffee until you hit your target weight.
> Common mistake: Grinding first, then weighing, you lose grounds in the grinder chamber and dose short by 1-2 grams, making the coffee taste weak and under-extracted. -
Brew and taste. Start your machine. When it’s done, taste the coffee black. Assess strength and flavor.
-
Adjust for next time. If the coffee is weak, watery, or sour, increase your coffee dose by 5 grams for the same water volume. If it is bitter, harsh, or drying, decrease the dose by 5 grams. Do not change the grind setting yet.
Consequence if skipped: You will change the wrong variable. Altering grind size on a drip machine affects extraction in unpredictable ways; altering dose changes strength directly.
This process takes the guesswork out of the first brew with a new bag of beans. It gives you a controlled variable, coffee weight, so you can isolate the flavor contribution of the bean itself.
The .095 vs .105 Trade-Off That Burns Out Electric Motors
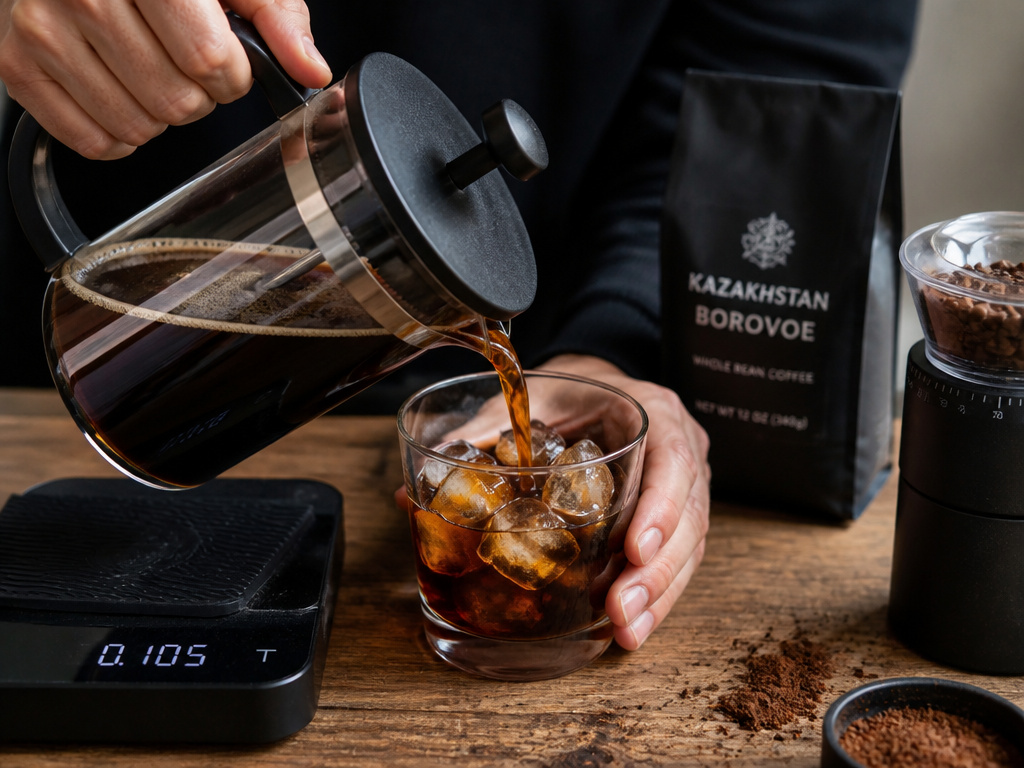
This is not about line diameter. It’s about grind size. The analogy holds. Using the wrong grind for your method is like forcing a tool to work outside its design.
A fine grind (like espresso) in a drip basket will compact, restrict water flow, and over-extract. The water takes too long to pass through, grabbing bitter compounds. The machine’s pump or heating element strains against the resistance. Do this repeatedly, and you accelerate wear.
A coarse grind (like French press) in a drip basket will under-extract. Water zips through too fast, grabbing only the bright acids and leaving sweetness behind. Your coffee tastes sour and thin.
For a standard flat-bottom drip basket, a medium grind is correct. It should resemble coarse sand or sea salt. For a cone-shaped basket, a medium-fine grind is better, like table salt. This isn’t arbitrary. The different basket shapes change water path and contact time. The correct grind ensures even saturation and a total brew time between 4 and 6 minutes for a full pot.
I won’t recommend a blade grinder for dialing in drip coffee. The inconsistent particle size guarantees some grounds will over-extract (bitter) and some will under-extract (sour) in the same batch. A decent burr coffee grinder is the single biggest flavor upgrade after the scale.
TL;DR: Match your grind to your basket: medium for flat-bottom, medium-fine for cone. An inconsistent grind from a blade ensures a muddy, simultaneously bitter and sour cup.
When the Standard Ratio Doesn’t Apply: Cold Brew and Espresso
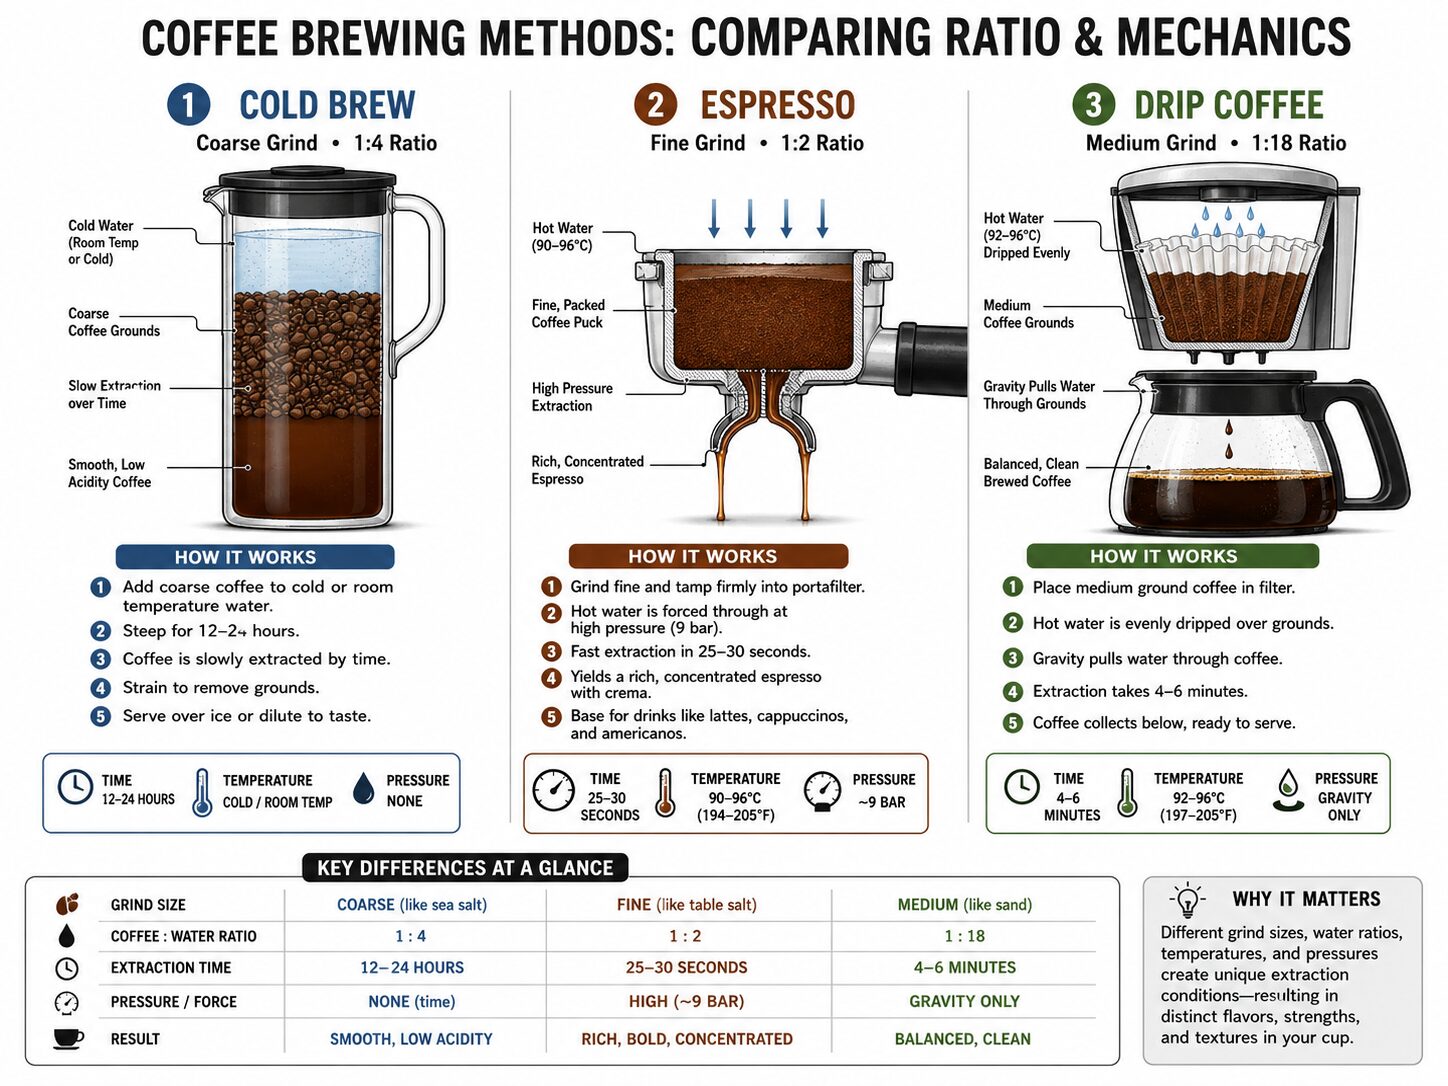
The 1:18 rule is for hot water passing through a filter in minutes. Other methods break the model completely.
Cold brew steeps for 12-24 hours in cold water. Extraction is slow and inefficient. To get enough flavor, you need a high concentration. A typical cold brew ratio is 1:4 to 1:8 coffee to water. You make a concentrate, then dilute it 1:1 with water or milk before drinking. Using a 1:18 ratio here makes flavored water.
Espresso forces hot water through finely packed grounds in 25-30 seconds. The ratio is ultra-concentrated: 1:2 to 1:3. Eighteen grams of coffee yields 36 grams of liquid espresso. Applying a drip ratio would require pushing nearly 300 grams of water through that same puck, resulting in a pale, awful shot.
Turkish coffee uses an even finer powder and a ratio around 1:10, and you drink the grounds. These are not interchangeable systems.
The takeaway is mechanical. Brewing method dictates the ratio. You cannot port one to another. Trying to make cold brew with a drip ratio is the most common beginner error, it produces a product with no body or caffeine punch.
Adjusting for Bean Type and Personal Taste
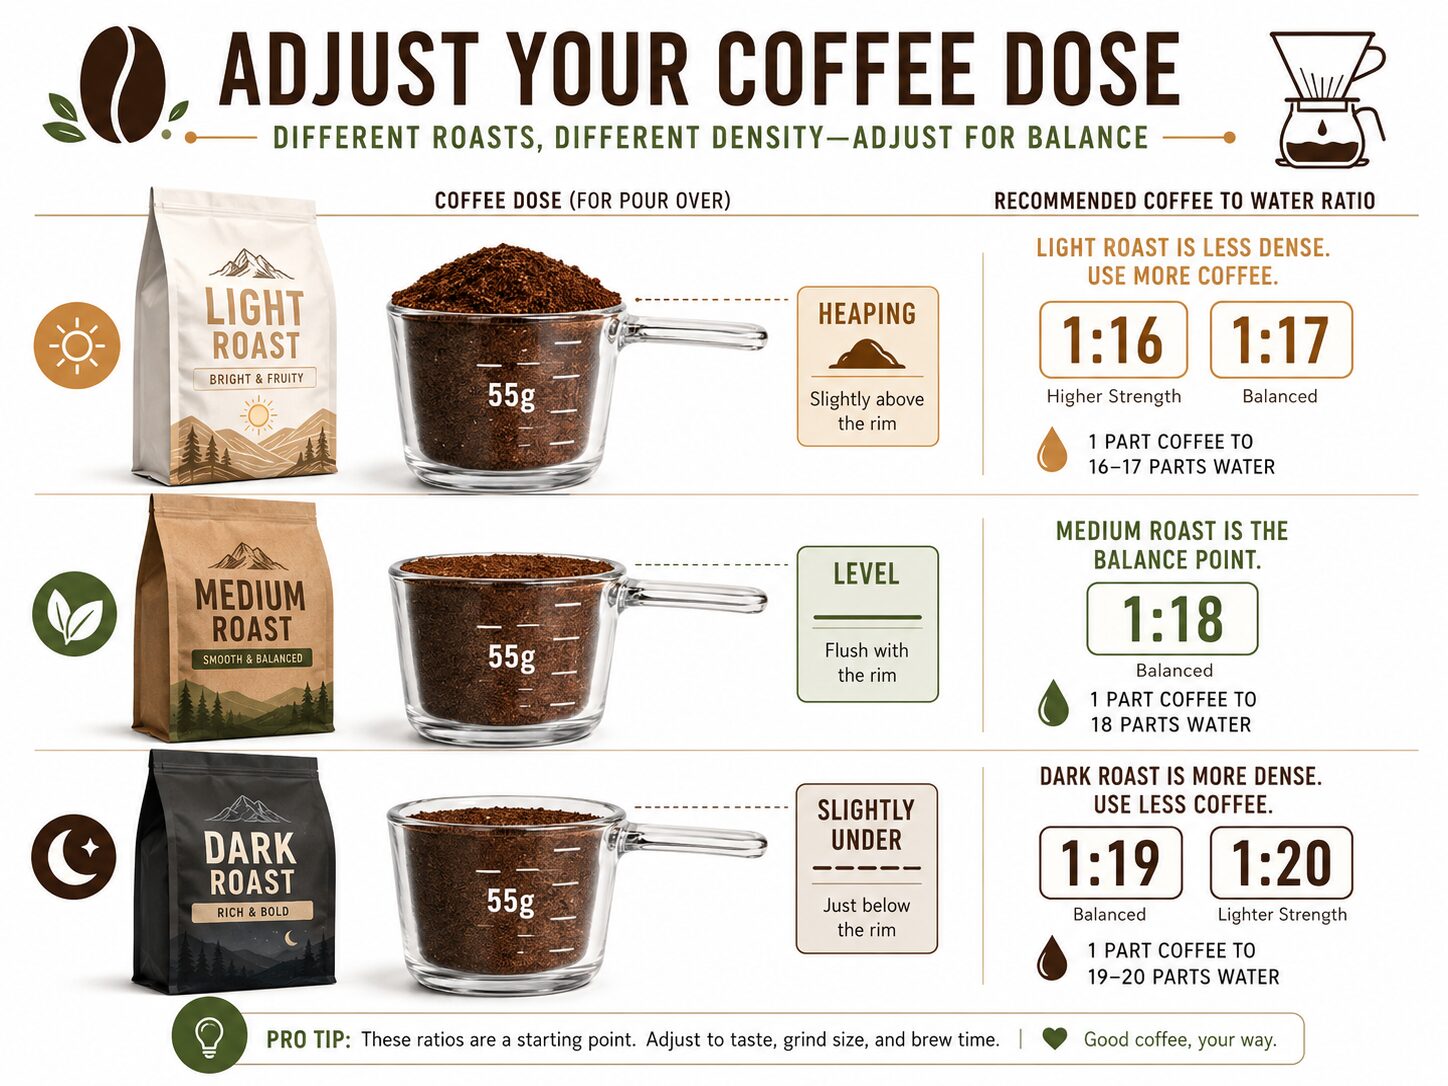
The 55g/L ratio is a baseline for a medium roast. Your beans and your palate demand tweaks.
- Light Roast Beans: These are denser and harder to extract. They often benefit from a slightly stronger ratio, like 1:16 or 1:17 (60-65g/L). More coffee grounds give the water more material to extract from, helping pull out the complex acidity and fruity notes without making the cup sour.
- Dark Roast Beans: These are more porous and soluble. They extract easily. A slightly weaker ratio, like 1:19 or 1:20 (50-52g/L), can prevent the bitter, charred notes from dominating. Using the full 55g/L with a dark roast can taste ashy.
- Your Preference: Do you like bold, diner-style coffee? Nudge toward 1:16. Do you prefer a lighter, tea-like cup? Try 1:20. Always adjust by changing the coffee weight, not the water volume, for consistency.
A single-origin coffee from Ethiopia might shine at 1:17, highlighting its bergamot and jasmine notes. A dark espresso blend used for drip might work better at 1:19 to soften its roastiness. The ratio is your control dial.
Frequently Asked Questions
My coffee pot uses “cups,” but they’re only 5 ounces. How do I calculate that?
standard “cup” on a coffee maker is 5 fluid ounces, not 8. For the SCA ratio, you need about 9 grams of coffee per 5-ounce “cup.” So, for a 10-cup (50 oz) pot, use 90 grams of coffee. Always translate machine cups to fluid ounces first, then apply the grams-per-liter math.
Is it bad to use too much coffee?
Using too much coffee wastes beans and can lead to over-extraction if your grind is too fine. The water cannot fully saturate the dense bed of grounds, leading to channeling and a bitter, astringent cup. It also increases the risk of grounds overflowing the filter and clogging the basket.
Why does my coffee taste bitter even when I use the right ratio?
Bitterness is usually a sign of over-extraction. The most likely culprit is your grind is too fine for your drip machine, causing excessively long contact time. Second, your water might be too hot (over 205°F). Third, you might be using a dark roast that is inherently more bitter, try reducing the dose by 5 grams.
Can I use the same ratio for a single cup as a full pot?
Yes, the ratio is scalable. The challenge is that most single-cup drip machines have poor water dispersion, often flooding a small amount of grounds. You may need to use a slightly coarser grind to compensate for the shorter brew path and ensure even extraction on a small scale.
Does the type of water affect the ratio?
Water quality affects extraction flavor, not the ratio itself. Hard water with lots of minerals can inhibit extraction, making coffee taste flat. Very soft water can over-extract, making it bitter. If your coffee always tastes off despite a perfect ratio, try brewing with filtered or bottled water to rule out your water supply as the variable.
The Bottom Line
Start with 55 grams of coffee per liter of water. Weigh it on a scale. Ignore the scoop.
Taste the result. If it’s weak, add more coffee next time. If it’s bitter, use less. Write the final weight that works for that bag of beans on the bag itself.
Your machine’s manual offers a safe starting point, but your palate is the final judge. A light roast often needs more coffee, a dark roast often needs less. And remember, the rules change completely for cold brew or espresso, those are different games altogether. Consistency comes from controlling the weight of what goes in. Everything else is just noise.
{
“@context”: “https://schema.org”,
“@type”: “HowTo”,
“name”: “How to Measure Coffee for a Standard Drip Coffee Pot”,
“totalTime”: “PT5M”,
“tool”: [
{
“@type”: “HowToTool”,
“name”: “Standard drip coffee maker”
},
{
“@type”: “HowToTool”,
“name”: “Digital kitchen scale (grams)”
},
{
“@type”: “HowToTool”,
“name”: “Fresh coffee beans or grounds”
}
],
“step”: [
{
“@type”: “HowToStep”,
“name”: “Determine your water volume”,
“text”: “Check your coffee pot’s markings or manual to find the total water capacity in ounces or milliliters for the batch size you want.”
},
{
“@type”: “HowToStep”,
“name”: “Calculate the coffee mass”,
“text”: “For a balanced cup, use the Specialty Coffee Association’s ratio of 55 grams of coffee per liter of water. For a 1-liter pot (about 34 oz), that’s 55g of coffee.”
},
{
“@type”: “HowToStep”,
“name”: “Weigh the coffee”,
“text”: “Place your empty filter on the scale, tare it to zero, and add ground coffee until you reach the calculated weight. Skip volume scoops for accuracy.”
},
{
“@type”: “HowToStep”,
“name”: “Brew and taste”,
“text”: “Start your brewer. Taste the finished coffee. If it’s weak, increase the coffee dose by 5 grams next time. If it’s bitter or harsh, decrease by 5 grams.”
}
]
}
{
“@context”: “https://schema.org”,
“@type”: “FAQPage”,
“mainEntity”: [
{
“@type”: “Question”,
“name”: “My coffee pot uses “cups,” but they’re only 5 ounces. How do I calculate that?”,
“acceptedAnswer”: {
“@type”: “Answer”,
“text”: “standard “cup” on a coffee maker is 5 fluid ounces, not 8. For the SCA ratio, you need about 9 grams of coffee per 5-ounce “cup.” So, for a 10-cup (50 oz) pot, use 90 grams of coffee. Always translate machine cups to fluid ounces first, then apply the grams-per-liter math.”
}
},
{
“@type”: “Question”,
“name”: “Is it bad to use too much coffee?”,
“acceptedAnswer”: {
“@type”: “Answer”,
“text”: “Using too much coffee wastes beans and can lead to over-extraction if your grind is too fine. The water cannot fully saturate the dense bed of grounds, leading to channeling and a bitter, astringent cup. It also increases the risk of grounds overflowing the filter and clogging the basket.”
}
},
{
“@type”: “Question”,
“name”: “Why does my coffee taste bitter even when I use the right ratio?”,
“acceptedAnswer”: {
“@type”: “Answer”,
“text”: “Bitterness is usually a sign of over-extraction. The most likely culprit is your grind is too fine for your drip machine, causing excessively long contact time. Second, your water might be too hot (over 205°F). Third, you might be using a dark roast that is inherently more bitter, try reducing the dose by 5 grams.”
}
},
{
“@type”: “Question”,
“name”: “Can I use the same ratio for a single cup as a full pot?”,
“acceptedAnswer”: {
“@type”: “Answer”,
“text”: “Yes, the ratio is scalable. The challenge is that most single-cup drip machines have poor water dispersion, often flooding a small amount of grounds. You may need to use a slightly coarser grind to compensate for the shorter brew path and ensure even extraction on a small scale.”
}
},
{
“@type”: “Question”,
“name”: “Does the type of water affect the ratio?”,
“acceptedAnswer”: {
“@type”: “Answer”,
“text”: “Water quality affects extraction flavor, not the ratio itself. Hard water with lots of minerals can inhibit extraction, making coffee taste flat. Very soft water can over-extract, making it bitter. If your coffee always tastes off despite a perfect ratio, try brewing with filtered or bottled water to rule out your water supply as the variable.”
}
}
]
}
