
Why Your Cuisinart Coffee Grinder Is Not Working & How to Fix
Your Cuisinart coffee grinder is not working due to one of three common failures: a safety switch not engaging, a clogged exit chute from oily beans, or a faulty internal microswitch in models like the DBM-8. Fix it by checking these switches, clearing impacted grounds, and addressing the specific stop-mechanism design flaw.
People assume it’s a dead motor or a complicated electrical fault. They start checking outlets and circuit breakers. The real issue is usually a tiny bit of ground coffee jammed in the wrong spot or a plastic switch arm that’s worn down. You’ll smell the motor straining before it gives up.
This guide walks through each failure point with the specifics you won’t find in the manual. We’ll cover how to test the switches, clear the chronic clog spot, and a simple storage trick that prevents the most common switch failure on the DBM-8.
Key Takeaways
- Three safety switches must click: the lid, the bean hopper lock, and (on DBM-8 models) an internal microswitch engaged by the hopper’s alignment bar.
- The “Stop” button on many models works by physically interrupting power, which packs grounds into the exit chute and causes the primary clog.
- Oily dark roast beans create a paste-like residue that jams the burrs and chute within 5-10 grinds if not cleaned regularly.
- Storing the DBM-8 with its hopper rotated 180 degrees disengages the internal microswitch, preventing the plastic actuator from fatiguing and breaking.
- The motor is the last thing to fail. If the unit has power and all switches are clean, the burrs are likely locked with compacted grounds.
The Three Hidden Safety Switches (And How to Test Them)
Your grinder has a brain, and it’s paranoid. It won’t spin unless it’s sure everything is closed and locked. Most owners know about the lid switch. They might know about the hopper lock. Almost nobody knows about the third switch inside the DBM-8 until it fails.
The first check is always the lid. It seems obvious. But the switch is a small plastic nub under the lid’s hinge area. If coffee grounds or oil get in there, it can’t depress fully. Wipe the contact area on the lid and the nub with a dry cloth.
Common mistake: Assuming the hopper is locked because it’s seated — the hopper on a Cuisinart DBM-8 must be rotated to a specific position to depress a second switch and engage a third internal microswitch. Missing this step is why the grinder seems to work intermittently.
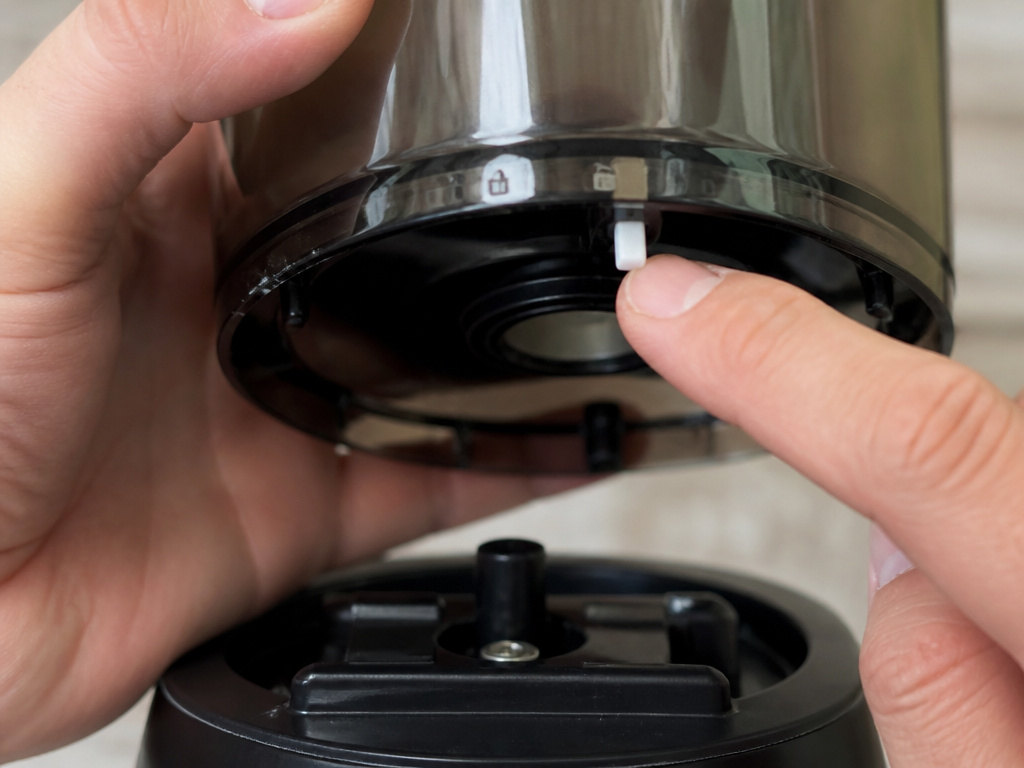
The bean hopper has a dual role. It holds beans and it acts as a key. On the DBM-8, there’s a small plastic bar underneath it. As you rotate the hopper to lock it, this bar moves down to press a tiny black microswitch buried inside the grinder’s housing. If this bar breaks or the hopper isn’t turned fully, nothing happens.
TL;DR: Listen for two distinct clicks when assembling: one when the lid closes, another when the hopper locks. No clicks mean no grind.
The Internal Microswitch in DBM-8 Models
This is the switch most repair guides miss. In the YouTube teardown, the fixer points right at it—a small black button inside the unit, near where the hopper sits. The plastic bar on the hopper must push this button down when locked. Over time, the plastic bar can crack or the switch itself can get stuck.
| Switch Location | How to Test It | Failure Symptom |
|---|---|---|
| Lid Switch | Press the nub with a pen while holding the grind button. If it runs, the switch works. | Grinder only runs if you press down hard on the lid. |
| Hopper Lock | Ensure hopper is fully rotated to the “lock” position. Listen/feel for a click. | Grinder works one time, then doesn’t after refilling hopper. |
| Internal Microswitch (DBM-8) | Remove hopper. Use a plastic tool to gently press the small black switch inside. | Grinder is completely dead, even with lid and hopper properly set. |
To test the internal one, unplug the grinder. Remove the bean hopper by lifting it straight up. Look inside the cavity. You should see a small black rectangular switch. Using a chopstick or a plastic spudger, gently press it. You’ll feel a slight click. Plug the grinder back in (carefully, with hopper still off). Hold the lid switch down and try the grind button. If it whirs to life, the switch is good but the hopper’s alignment bar isn’t hitting it. If the switch feels mushy or makes no click, it may be failed.
The Stop-Button Design Flaw That Causes Clogs
Cuisinart’s grinders lack a true off switch. To stop the grinding cycle early, you pull the ground coffee container out. This is a design defect that directly causes the most frequent clog.
When you yank that container out, the spinning burrs are still ejecting grounds. Those grounds have nowhere to go but into the gap you just opened. They pack into the plastic exit chute, just above the container slot. After a few times, you’ve built a dam.
I learned this the hard way with my first DBM-8. I’d stop it early to check grind size. After a month, the grind output slowed to a trickle. I took it apart and found a solid plug of compacted coffee the size of my thumb stuck in the chute. It took a screwdriver to scrape it out.
The fix is procedural. Let the timer run out. If you must stop it, turn the unit off at the power button or unplug it—don’t pull the container. If you already have the clog, here’s the clearance drill:
- Unplug the grinder.
- Remove the ground coffee container and the bean hopper.
- Turn the unit upside down over a trash can and tap it firmly. Some loose grounds will fall.
- Use a long, thin brush (a clean dry paintbrush works) to reach into the exit chute through the container slot. Scrape and brush.
- A blast of canned air into the chute from the top (where the hopper was) can dislodge the plug. Do this outside unless you want a kitchen dusted in fine coffee.
TL;DR: Never stop the grinder by removing the grounds container. That action is the primary cause of exit chute clogs.
Why Oily Beans and Fine Grinds Jam the Burrs
Burr grinders work by cutting, not smashing. But when you use oily dark roast beans or set the grind too fine for the machine’s design, those oils mix with fine coffee particles to create a paste. This paste gums up the space between the burrs and the exit pathways.
The Cuisinart DBM-8 manual states a hopper capacity of 0.5 pounds. It doesn’t warn you that a full hopper of a shiny, oily French roast can gum up the works before you’re halfway through it. The oils coat the burrs and the plastic chute. Fine particles stick to the oil. Heat from the motor softens the mixture. Eventually, the burrs can’t move.
You’ll hear it first. The motor pitch changes from a steady whir to a labored groan. Then it may trip the thermal overload protector and shut off. If you keep trying, you risk burning out the motor.
| Grind Setting | Risk Level | Recommended Bean Type |
|---|---|---|
| Extra Fine (Turkish) | High – Will likely jam | Avoid on Cuisinart burr grinders |
| Fine (Espresso) | Medium-High – Monitor for heat | Use only with dry, light roast beans |
| Medium (Drip) | Low – Safest setting | Any bean type, including oily dark roasts |
| Coarse (French Press) | Low – Least resistance | Best for breaking in a new grinder or cleaning |
The solution is to match your bean to your machine. For a Cuisinart, stick to medium or coarse grinds for daily use. If you need espresso-fine, invest in a dedicated grinder built for it, like the higher-end conical burr models. For cleaning, run a handful of uncooked white rice or dedicated grinder cleaning pellets through on a coarse setting. This will absorb oils and scrub the burrs. Follow with a brush.
Step-by-Step Troubleshooting and Repair
Follow this sequence. It goes from the simplest, most common fix to the more involved internal checks. About 80% of “dead” grinders are fixed at step 3.
Before you start: Unplug the grinder from the wall. Do not attempt any internal inspection or cleaning while the unit is connected to power. The burrs are sharp; handle them with care.
- Check Power and Assembly. Verify the outlet works with another device. Ensure the grinder is fully assembled: lid closed, bean hopper seated and rotated to the locked position, grounds container fully inserted. Listen for the safety switch clicks.
- Clean the Exit Chute. Remove the grounds container and the bean hopper. Use your brush and canned air to clear the entire path from the burrs to the container slot. This fixes most “slow feed” or “no output” issues.
- Inspect the Hopper’s Alignment Bar (DBM-8). Remove the bean hopper. Look at the bottom. There should be a small plastic bar or protrusion. If it’s cracked or missing, the internal microswitch won’t be pressed. This part is not sold separately; you’d need a replacement hopper.
- Test the Internal Microswitch. With the hopper off and the unit unplugged, locate the small black switch inside. Press it gently with a non-conductive tool. It should click. Plug the unit in (keep hands clear), hold the lid switch down, and press grind while depressing the internal switch with your tool. If it runs, the switch is good.
- Check for a Locked Burr. Unplug the unit. Attempt to turn the central burr by hand (often a hex shape in the center). If it doesn’t budge, it’s jammed with compacted grounds. You may need to partially disassemble the unit to clean it.
- Consider the Motor. If all switches click, the burrs turn freely, and the unit has power but does nothing, the motor or control board may be failed. This is less common and often the point where repair cost exceeds replacement value.
The Storage Trick That Prevents Switch Failure
From the YouTube fixer’s part two video: store your DBM-8 with the bean hopper rotated 180 degrees from the locked position. This pulls the alignment bar away from the internal microswitch. Storing it locked keeps constant pressure on that tiny switch button, which can fatigue the plastic over months and lead to failure. It’s a five-second habit that adds years to the grinder’s life.
When to Clean vs. When to Descale
Coffee grinders don’t need descaling—that’s for brewers with water lines. They need cleaning. The difference matters. Descaling removes mineral deposits with acid. Cleaning removes oils and coffee particles with brushing and abrasive media.
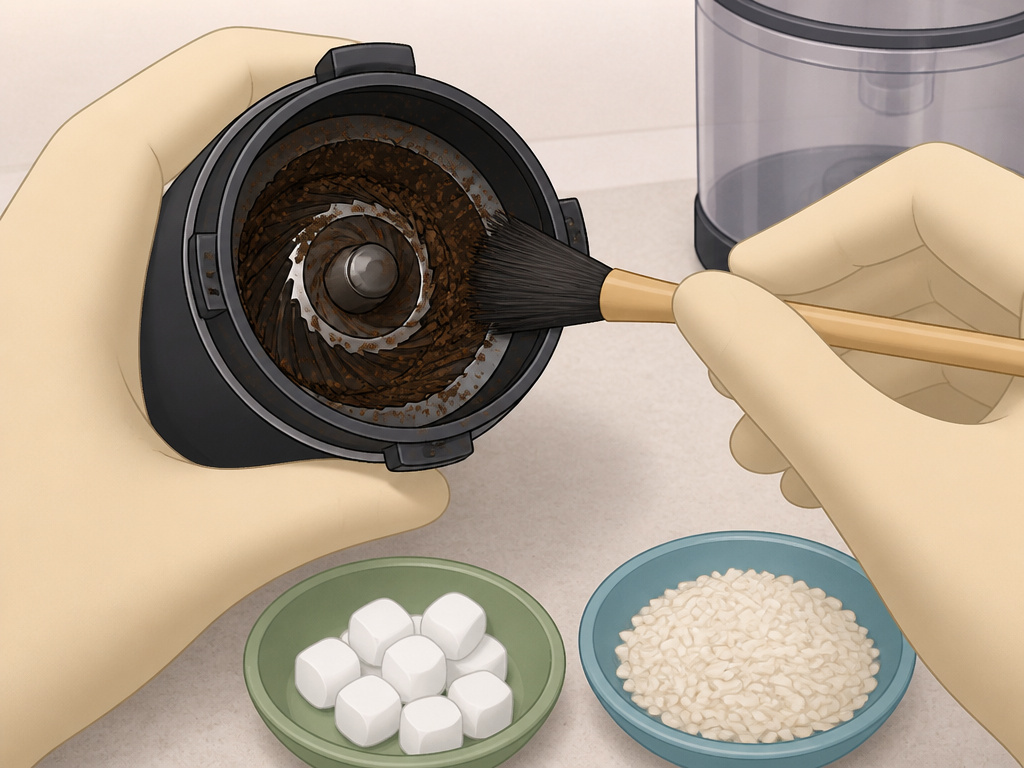
Clean your Cuisinart burr grinder every two weeks if you use it daily. The process is simple:
- Unplug and disassemble.
- Brush out all loose grounds from the hopper, burr chamber, and exit chute.
- Run a handful of grinder cleaning pellets or uncooked white rice through on the coarsest setting.
- Brush everything out again to remove the dust.
- Reassemble.
If you notice a persistent oily film or rancid smell, the oils have gone stale. A more thorough clean with a slightly damp cloth (wrung out) on the plastic parts may be needed. Never use water or cleaners on the burrs or inside the motor housing.
Frequently Asked Questions
Why does my Cuisinart grinder hum but not grind?
This is the sound of a locked burr. The motor is trying to turn, but the burrs are jammed with compacted, oily coffee grounds. Unplug the unit immediately. Follow the steps to clear the exit chute and check if the central burr can be turned by hand. Forcing it can burn out the motor.
The grinder works sometimes, but not others. What gives?
Intermittent operation is almost always a failing safety switch. On the DBM-8, the culprit is usually the internal microswitch or the hopper’s alignment bar. The connection is made only when the plastic bar hits the switch at the exact right angle. As the plastic wears, the connection becomes spotty. Test the internal switch as described.
Can I use wet beans or rice to clean my grinder?
Never use wet beans. Moisture will rust the burrs and create an impossible-to-clean paste. Uncooked, dry white rice is an acceptable cleaner for absorbing oils, but it’s abrasive and can dull burrs over many uses. Purpose-made grinder cleaning pellets are a better, if more expensive, option.
Is it worth repairing an old Cuisinart grinder?
For a clog or a simple switch issue, absolutely. The repair is often just cleaning and costs nothing. If the motor is dead or the main circuit board is fried, replacement is usually more economical. The Cuisinart CBM-18N and similar models have updated designs that address some of the switch flaws found in older versions like the DBM-8.
How do I find the manual for my specific model?
The model number is on a sticker on the bottom or back of the unit. Search for “Cuisinart [model number] manual” online. The official Cuisinart website hosts PDFs for most models, which are invaluable for proper disassembly diagrams. Always consult your appliance manual before taking anything apart.
Before You Go
A non-working Cuisinart grinder is frustrating, but it’s rarely a death sentence. The fixes are almost always physical—a clogged chute, a misaligned hopper, or a sticky switch. Start with the simple clean-out. Move to the switch checks. The motor is a last resort.
Match your beans to the machine’s design. Avoid the ultra-fine settings and oily dark roasts if you want a trouble-free life. And remember that storage trick: give that internal microswitch a break by storing the hopper unlocked. That alone can prevent the most mysterious “dead grinder” symptom.
For broader context on why burr design matters, our comparison of burr coffee grinders versus blade grinders details how consistency affects everything from flavor to machine longevity. And if you’re ever in a pinch without a grinder, we’ve tested unconventional grinding methods, including what a Ninja blender can and cannot do to a coffee bean.
