
How to Use a Keurig: Essential Coffee Maker Steps for All Models
To use a Keurig coffee maker, you add water, insert a K-Cup pod, select a brew size, and press start. The critical step most people miss is matching the water-filling method to your specific model. K-Mini models require water added for each cup, while K-Duo and K-Elite models have a multi-cup reservoir you fill once.
That’s the part that jams people up. They treat every Keurig the same, pour water into a reservoir that doesn’t exist on a K-Mini, and get a blinking light with no coffee. The machine is waiting for water it never received.
This guide walks through the universal steps, then dives into the model-specific quirks for the K-Mini, K-Duo, and K-Elite that the quick-start card glosses over. You’ll also get the real maintenance schedule that keeps it running past the two-year mark.
Key Takeaways
- The Keurig K-Mini and K-Mini Plus lack a traditional reservoir; you must add fresh water to the top chamber for every single brew cycle.
- On Keurig K-Duo and K-Duo Essentials models, the carafe side uses ground coffee (up to 15 tablespoons for 12 cups) and the single-serve side uses K-Cups, mixing them up brews nothing.
- The Keurig K-Elite’s High Altitude Setting requires a specific button-press sequence (power off, hold brew 3 seconds, power on) for locations above 5,000 feet; skipping it results in weak, under-extracted coffee.
- Always use fresh, cold tap water in the reservoir. Using softened, distilled, or previously boiled water accelerates mineral scale buildup and can trigger the descale light within 3 months.
- For the strongest coffee, use the “Strong” or “Iced” brew buttons if your model has them. These settings slow the water flow for a longer contact time with the grounds.
The Universal First Three Steps
Every Keurig brewer, from the basic K-Classic to the premium K-Supreme, follows the same core sequence. Get these three steps wrong and the machine will either do nothing or brew a terrible cup.
First, add water. For most models, this means lifting the lid at the back or side and filling the transparent plastic reservoir with fresh, cold tap water. Do not use distilled, softened, or previously boiled water. The minerals in tap water are necessary for the heating element to transfer heat efficiently. Strip them out and the element overheats, cycling on and off erratically. You’ll hear a clicking sound during the brew.
Common mistake: Using distilled or softened water, the lack of minerals causes the heating element to overcycle, shortening its lifespan and triggering the descale alert prematurely, often within 90 days.
Second, insert the K-Cup. Lift the handle on top of the machine to open the pod holder. Drop a K-Cup into the compartment, logo facing up. Close the handle firmly until you hear or feel a definitive puncture click. A weak close means the exit needle doesn’t pierce the foil seal fully. The result is a clogged spray and maybe three ounces of coffee dribbling out.
Place your mug on the drip tray. The tray is height-adjustable; pull up the riser plate for a taller travel mug.
Third, select your brew size and start. The button panel is usually on the front. A small cup icon might represent a 6-ounce brew, a medium for 8 ounces, and a large for 10 or 12 ounces. Press your chosen size. The machine will prime for a few seconds, you’ll hear the pump, then hot water will flow through the pod.
TL;DR: Cold tap water, a firmly seated K-Cup, and a correctly sized mug are the non-negotiable trio. Skip any one and the brew fails.
Keurig K-Mini: The No-Reservoir Rule
The Keurig K-Mini and K-Mini Plus break the first universal rule. They do not have a fill-and-forget water reservoir. The official Use & Care Guide states the water tank capacity is “1 cup.” That’s not a tank. It’s the brewing chamber itself.
You must add water for each individual cup. The process feels backward but works.
- Open the lid at the top of the machine.
- Pour fresh water directly into the open chamber. Use your coffee mug as a measuring cup. If you want a 10-ounce coffee, pour 10 ounces of water in.
- Insert your K-Cup and close the lid.
- Place your mug and press the brew size button.
The machine pumps that specific water volume through the pod. If you try to brew a second cup without adding more water, nothing comes out. The power light just blinks.
The K-Mini Plus adds a Strong Brew button and a cord storage compartment in the back. The Strong button slows the pump, extending the brew cycle by roughly 30 seconds for a more robust extraction. Use it for dark roasts or when a pod tastes weak.
| Feature | Keurig K-Mini | Keurig K-Mini Plus |
|---|---|---|
| Water System | Add per cup | Add per cup |
| Brew Sizes | 6, 8, 10, 12 oz | 6, 8, 10, 12 oz |
| Strong Brew | No | Yes |
| Cord Storage | No | Yes, in back |
Keurig K-Duo: Carafe vs. Single-Serve Setup
The K-Duo and K-Duo Essentials are hybrid brewers. One side makes a full carafe of coffee from ground beans. The other side is a standard K-Cup single-serve brewer. They use completely separate water pathways and mechanisms.
Opening the carafe side without a filter in place floods the drip tray with grounds and water. It’s a fifteen-minute cleanup.
For the carafe side, you need the included permanent gold-tone filter or a size #4 paper filter. The reservoir holds 60 ounces. The maximum ground coffee load is 15 tablespoons for a full 12-cup carafe. Exceed that and the filter basket overflows, sending a slurry of grounds and water into your carafe and the heating plate below.
For the single-serve side, use only K-Cup pods. Do not try to put ground coffee in the K-Cup holder. The machine will not engage, or it will force water through the dry grounds and create a packed, muddy mess that jams the exit needle.
The carafe side has an auto-off timer that shuts down the hot plate after two hours. The single-serve side does not. This dual-system design means you must be deliberate about which side you’re using. The switch is physical, not digital.
Keurig K-Elite: The High-Altitude and Hot Water Quirks
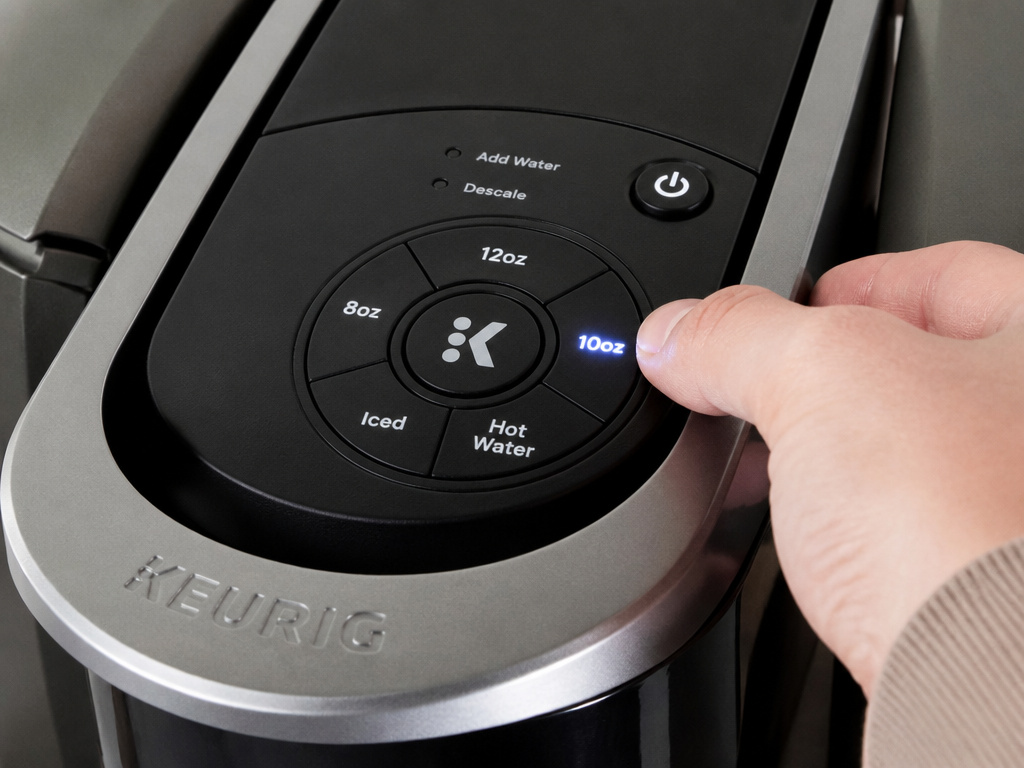
The K-Elite is a feature-rich single-serve model. Its 75-ounce reservoir is the largest in the lineup. The notable functions are the Iced button, Hot Water on Demand, and the High Altitude Setting.
The Iced button is not for brewing over ice. It’s a program that brews a stronger, more concentrated shot of coffee directly over a cup full of ice. The logic is simple: the hot coffee melts some ice, diluting to a normal strength without becoming watery. If you use the regular brew button over ice, you get weak, tepid coffee.
Hot Water on Demand lets you dispense hot water without a K-Cup. Press the button, wait for the light to stop blinking, and press again. Use it for tea, oatmeal, or instant soup. This function pulls water directly from the main reservoir, so ensure it’s full.
The High Altitude Setting is a mandatory adjustment for users above 5,000 feet. Lower air pressure changes the boiling point of water, which throws off the Keurig’s internal thermostat and pump timing. The coffee brews too fast and tastes weak.
To activate it (per the K-Elite Use & Care Guide):
1. Ensure the brewer is powered off.
2. Press and hold the 10oz brew button for 3 seconds.
3. Release the button.
4. Power the brewer on. The setting is now active.
You only need to do this once. The machine remembers. If you move or your machine seems to brew inconsistently at elevation, this is the first thing to check.
What to Do When Your Keurig Won’t Brew
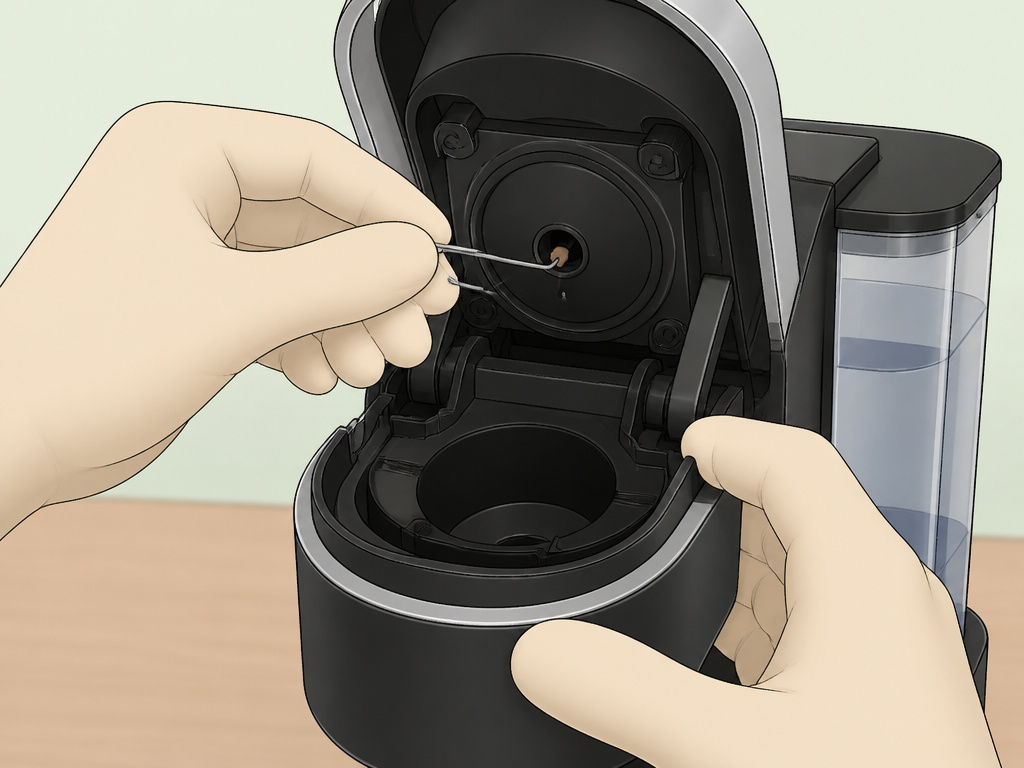
A non-responsive Keurig usually points to one of three issues: water, power, or a clog.
First, check the water. For reservoir models, is the tank seated all the way down? Is it actually full? For a K-Mini, did you add water this time? It’s the most common oversight.
Second, check the power. Is the cord firmly plugged into the wall and the machine? Is the outlet working? Try a different outlet. Some models have a master power switch on the side or back, make sure it’s on.
Third, consider a clog. Mineral scale from hard water or coffee grounds from a ruptured pod can block the exit needle or the inlet valve.
- Unplug the machine and let it cool.
- Open and close the K-Cup handle several times to see if the needle moves freely.
- Inspect the exit needle (the small tube in the bottom of the pod holder) for visible debris. A straightened paperclip can gently clear it.
- For reservoir models, remove the tank and look inside the machine’s water inlet for black flecks (carbon from the filter) or slime.
If the machine powers on but the brew button does nothing, or if it flashes lights in a sequence, you likely need a descaling cycle. This is not optional maintenance.
The Non-Negotiable Maintenance Schedule
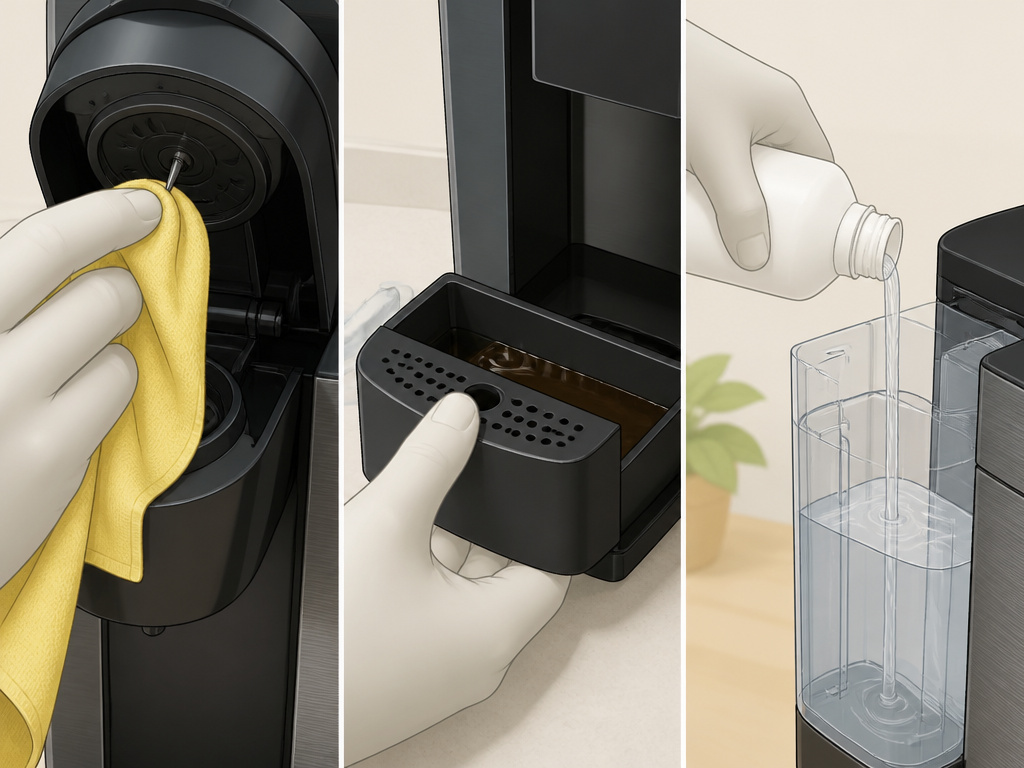
Keurigs are appliances, not magic boxes. They require three simple maintenance tasks performed on a schedule. Ignoring them guarantees a breakdown.
Daily: After your last brew, open and close the K-Cup handle to eject the used pod. Wipe any coffee splatter from the drip tray and exit needle with a damp cloth. Leaving a pod in the holder overnight lets residual moisture swell the grounds, gluing them to the puncture needles.
Weekly: Remove the drip tray and wash it with soap and water. Empty the water reservoir, rinse it, and refill with fresh water. Stagnant water grows biofilm, which you’ll taste as a musty, off note in your first cup each week.
Every 3-6 Months: Descale. The frequency depends on your water hardness. The machine will tell you with a flashing “Descaling” or “Add Water” light that won’t reset.
Common mistake: Using vinegar to descale, acetic acid can damage internal rubber seals over multiple uses. Keurig’s own descaling solution is citric acid-based, which is less corrosive and more effective on calcium carbonate scale.
You’ll need the official Keurig Descaling Solution or a generic citric acid powder. The process involves running the solution through a brew cycle without a pod, followed by several cycles of fresh water to rinse. The exact steps are in your model’s manual, like the Braun coffee maker manual, it’s the definitive source for this procedure.
Frequently Asked Questions
Why is my Keurig blinking and not brewing?
blinking power or “Add Water” light usually means the machine doesn’t detect water. For reservoir models, ensure the tank is fully seated. For a K-Mini, you forgot to add water for this cup. If water is present, the reservoir sensor might be scaled over, try descaling.
Can I use my own ground coffee in a Keurig?
Yes, with a reusable K-Cup filter. These are metal or plastic baskets you fill with your own grounds. Do not overfill, one level tablespoon per 8 ounces of water is the max. Tamping it down creates a solid puck that blocks water flow. The right coffee grind consistency from a burr grinder is crucial for these.
What do the different brew sizes mean?
The brew size (6oz, 8oz, 10oz, 12oz) controls how much water passes through the pod. A smaller size means less water contacts the same amount of grounds, producing a stronger, more concentrated cup. A larger size dilutes it. For a standard coffee strength, the 8-ounce setting is the baseline.
How do I make strong coffee on a Keurig?
Use the “Strong” brew button if your model has one. If not, choose the smallest brew size (6oz) for maximum concentration. You can also use a dark roast blend vs single origin pod, as blends are often crafted for bolder flavor. The Iced button on the K-Elite also produces a stronger brew to compensate for ice melt.
Why does my coffee taste bad or weak?
First, check your water. Stale reservoir water tastes flat. Second, your machine needs descaling. Mineral scale insulates the heating element, dropping water temperature below the ideal 192°F extraction range. Third, you might be using too large a brew size for the pod. Try the 6-ounce setting. Finally, the pod itself could be old or a light roast not suited to the machine, blonde roast coffee often tastes sour if under-extracted.
Before You Go
Using a Keurig correctly hinges on knowing your model. The K-Mini demands water each time. The K-Duo requires you to pick a side, carafe or pod, and stick to its rules. The K-Elite needs its high-altitude mode set if you live in the mountains.
The maintenance is straightforward but non-negotiable. Fresh water weekly, a descale every few months, and a quick wipe of the exit needle keep it running. Treat it like any other coffee appliance, not a disposable gadget. Your Black & Decker coffee maker manual has the same spirit, follow the specific steps for the machine you own.
Choose your pods for the brewer. A dense, dark roast works well on the standard setting. A delicate single-origin coffee might shine on a Strong brew or smaller cup size. It’s a tool. You get to decide how it works.
{
“@context”: “https://schema.org”,
“@type”: “HowTo”,
“name”: “How to Use a Keurig Coffee Maker”,
“totalTime”: “PT5M”,
“tool”: [
{
“@type”: “HowToTool”,
“name”: “Keurig coffee maker (K-Mini, K-Duo, or K-Elite model)”
},
{
“@type”: “HowToTool”,
“name”: “K-Cup coffee pod or ground coffee”
},
{
“@type”: “HowToTool”,
“name”: “Fresh, cold tap water”
},
{
“@type”: “HowToTool”,
“name”: “Coffee mug or carafe”
}
],
“step”: [
{
“@type”: “HowToStep”,
“name”: “Add Water”,
“text”: “For reservoir models (K-Duo, K-Elite), fill the tank with fresh cold water. For a K-Mini, you must add water to the top chamber for each individual brew.”
},
{
“@type”: “HowToStep”,
“name”: “Insert the K-Cup”,
“text”: “Lift the handle to open the pod holder. Place a K-Cup in the compartment and close the handle firmly until it clicks or snaps into place.”
},
{
“@type”: “HowToStep”,
“name”: “Select Brew Size and Start”,
“text”: “Place your mug on the drip tray. Press the button for your desired brew size (e.g., 6oz, 8oz, 10oz). The machine will begin brewing automatically.”
}
]
}
{
“@context”: “https://schema.org”,
“@type”: “FAQPage”,
“mainEntity”: [
{
“@type”: “Question”,
“name”: “Why is my Keurig blinking and not brewing?”,
“acceptedAnswer”: {
“@type”: “Answer”,
“text”: “blinking power or “Add Water” light usually means the machine doesn’t detect water. For reservoir models, ensure the tank is fully seated. For a K-Mini, you forgot to add water for this cup. If water is present, the reservoir sensor might be scaled over, try descaling.”
}
},
{
“@type”: “Question”,
“name”: “Can I use my own ground coffee in a Keurig?”,
“acceptedAnswer”: {
“@type”: “Answer”,
“text”: “Yes, with a reusable K-Cup filter. These are metal or plastic baskets you fill with your own grounds. Do not overfill, one level tablespoon per 8 ounces of water is the max. Tamping it down creates a solid puck that blocks water flow. The right coffee grind consistency from a burr grinder is crucial for these.”
}
},
{
“@type”: “Question”,
“name”: “What do the different brew sizes mean?”,
“acceptedAnswer”: {
“@type”: “Answer”,
“text”: “The brew size (6oz, 8oz, 10oz, 12oz) controls how much water passes through the pod. A smaller size means less water contacts the same amount of grounds, producing a stronger, more concentrated cup. A larger size dilutes it. For a standard coffee strength, the 8-ounce setting is the baseline.”
}
},
{
“@type”: “Question”,
“name”: “How do I make strong coffee on a Keurig?”,
“acceptedAnswer”: {
“@type”: “Answer”,
“text”: “Use the “Strong” brew button if your model has one. If not, choose the smallest brew size (6oz) for maximum concentration. You can also use a dark roast blend vs single origin pod, as blends are often crafted for bolder flavor. The Iced button on the K-Elite also produces a stronger brew to compensate for ice melt.”
}
},
{
“@type”: “Question”,
“name”: “Why does my coffee taste bad or weak?”,
“acceptedAnswer”: {
“@type”: “Answer”,
“text”: “First, check your water. Stale reservoir water tastes flat. Second, your machine needs descaling. Mineral scale insulates the heating element, dropping water temperature below the ideal 192°F extraction range. Third, you might be using too large a brew size for the pod. Try the 6-ounce setting. Finally, the pod itself could be old or a light roast not suited to the machine, blonde roast coffee often tastes sour if under-extracted.”
}
}
]
}
