
How a Coffee Percolator Works: The Complete Brewing Guide
A coffee percolator works by using heat to create a pressure differential, forcing water up a central tube to shower over a basket of grounds, then filtering back down to repeat the cycle. The key components are the lower water chamber, the vertical pump tube, the perforated coffee basket, and a spreader plate at the top. This cycle continues until you remove the heat, typically taking about one minute per cup for a model like the Presto 02811.
Most people think the constant bubbling is what makes strong coffee. It isn’t. That visual is a side effect of the physics at work. The real strength comes from managing the cycle’s length and temperature to avoid stewing the grounds.
This guide walks through the exact mechanics, from the 1913 patent that defined the design to the specific mistakes that turn your brew bitter. We’ll look at how stovetop and electric models differ and why starting with cold water matters more than you think.
Key Takeaways
- Percolation relies on a simple pressure difference, not a pump. Heated water and steam rise because they’re less dense than the cooler water below them.
- Starting with cold water is non-negotiable for stovetop models. Hot-start water skips the gradual heating phase and can lead to uneven, weak extraction in the first cycles.
- The official 2008 CPSC recall on certain Hamilton Beach percolators cited a short-circuiting power cord fire hazard, always inspect old electric models before use.
- Brew time is not universal. A Presto 02811 brews in about a minute per cup, but a full pot should finish in 5-8 minutes total. Letting it go longer re-circulates bitter, over-extracted coffee.
- You must use a coarse grind. A medium or fine grind will clog the basket, seep into the lower chamber, and make a muddy, terrible cup.
The Simple Physics of Percolation
Forget complex machines. A percolator is a closed-loop, gravity-fed system powered by basic thermodynamics. You apply heat to the base. The water directly above the heat source gets hot first.
Hot water and steam are less dense than the cooler water above them. This creates a pressure differential. The lighter, hotter mixture is pushed upward through the only available path, the hollow pump tube that stands in the center of the pot.
The percolation process is a continuous cycle of heating, pumping, and dripping. Water heated in the base chamber rises as a mixture of liquid and vapor through a central tube. It then discharges over a bed of coffee grounds, extracts flavor, and filters back down into the chamber to be reheated and recirculated.
That’s the entire engine. No moving parts, no electronics in a stovetop version. The spreader plate on top of the tube exists for one job: to diffuse the incoming hot water so it rains evenly over the coffee bed. An uneven shower creates channels, where water rushes through one part of the grounds and barely touches the rest.
TL;DR: Heat creates a density difference. Less dense hot water rises up the tube, showers the grounds, and falls back down to get reheated.
Anatomy of a Percolator
Every percolator has the same four core components. Their design hasn’t changed much since J.W. Carter’s 1913 U.S. Patent 1,079,067. Knowing what each part does explains why the process works, and why it fails when a part is missing or damaged.
- Lower Chamber / Base: This is the reservoir for fresh water and, later, the brewing coffee. It sits directly on the heat source. For electric models, the heating element is embedded in the base. The chamber must be filled to a minimum level, often two cups, to ensure enough water reaches the pump tube intake.
- Pump Tube: A hollow vertical pipe that connects the base to the top of the pot. Its bottom opening sits near the heat source. As water heats at the bottom, the steam and hot water mixture travels upward through this tube because it’s the path of least resistance.
- Coffee Basket & Stem: A perforated basket holds the grounds. It sits on a stem that fits over the top of the pump tube. The basket’s holes are sized for a coarse grind, anything finer falls through and makes silt.
- Spreader Plate / Drip Lid: This small, perforated disc sits on top of the pump tube, underneath the basket. It catches the water shooting up the tube and spreads it out into a gentle rain over the entire surface area of the coffee bed. Missing this piece causes a jet of water to drill a hole straight through your grounds.
Common mistake: Using a fine or medium grind in the basket, the grounds wash through the perforations, clog the pump tube intake, and the resulting coffee is filled with silt. You’ll taste the grit by the second sip.
The lid has a clear knob for one reason. Watching the color of the coffee as it bubbles up into that knob is your primary gauge for brew strength. No timer needed. When the coffee in the knob matches the darkness you want in your cup, you’re done.
The Three-Phase Percolation Cycle
The brewing cycle isn’t one continuous event. It happens in three distinct, repeating phases: heating, pumping, and dripping. Each phase has a specific mechanical purpose. Mess with the timing of one, and the whole extraction goes off.
| Phase | What Happens | Visual/Sound Cue | Risk If Rushed |
|---|---|---|---|
| Heating | Cold water in the base absorbs energy from the heat source. The water nearest the bottom heats first, creating a temperature gradient. | No sound. Water is still. | Starting with hot water skips this gradient. The first percolation rush is weak and under-extracts. |
| Pumping | Hot water and steam, now less dense, are forced up the pump tube. Pressure from below pushes the column upward. | A distinct blup-blup or bubbling sound from the lid. You’ll see coffee splashing against the clear knob. | Too high heat creates violent, fast pumping. This can force water through the grounds too quickly, leading to a weak, sour brew. |
| Dripping | Water hits the spreader plate, showers evenly over the grounds, extracts flavor, and filters back down into the base chamber. | A steady, gentle dripping sound inside the pot after the initial bubble. | A clogged basket or too-fine grind stops proper dripping. Water pools above the grounds, then overflows, making a mess. |
The cycle repeats because the water returning to the base is now slightly cooler than the water at the very bottom. It sinks, gets reheated, and rises again. This is why a steady, medium heat is ideal. It maintains the temperature differential that drives the pump.
High heat makes the pump phase too aggressive. Low heat stretches the heating phase out forever, and your coffee stews. Electric models like the Hamilton Beach 40614 automate this by cycling their heating element to maintain a steady percolation tempo.
TL;DR: Heat water until it pumps up the tube, drips through the grounds, and returns to be reheated. Keep the heat steady to maintain the cycle’s rhythm.
Stovetop vs. Electric Percolator Mechanics
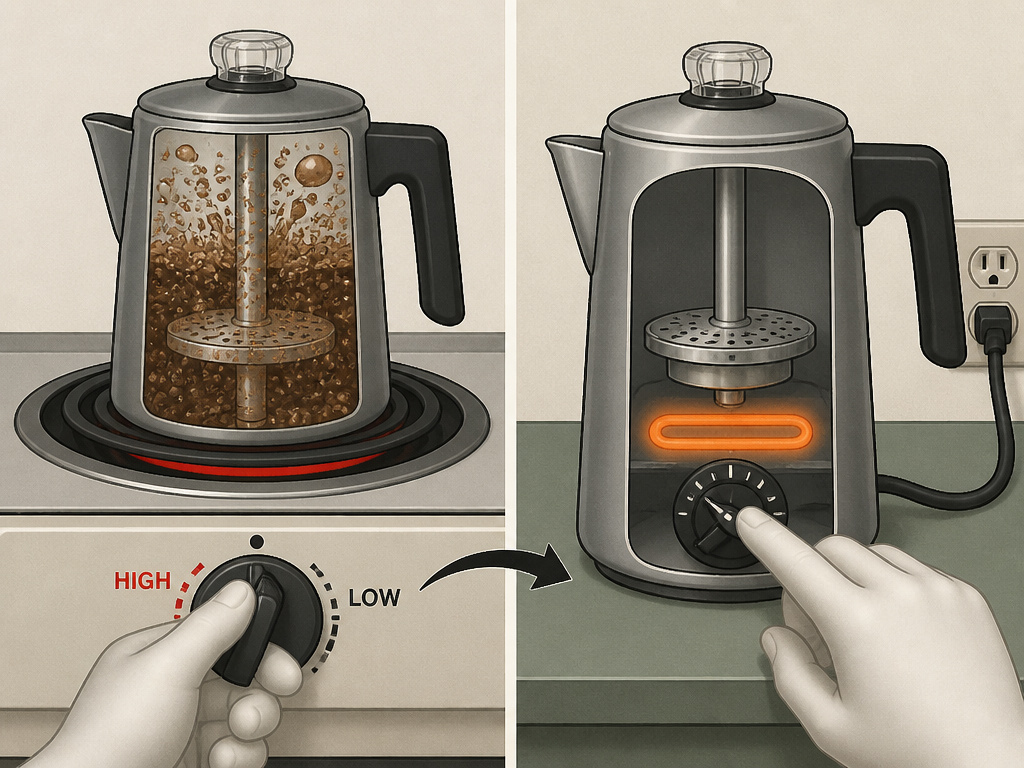 Both types use the same core physics. The difference is how they apply and regulate the heat. That difference changes your role from active temperature manager to passive observer.
A stovetop percolator is a manual transmission. You control the heat source directly. The sound and sight of the percolation are your only guides. Start on medium-high to initiate the first pump cycle, then drop to low or medium-low to maintain a gentle, steady bubble. This manual control is why many enthusiasts prefer it, you can adjust the “aggression” of the cycle to match the coffee’s roast.
I left a stovetop percolator on high heat for ten minutes once, trying to speed up a morning brew. The pump action was so violent it churned the grounds into a slurry that overflowed the basket. The coffee tasted like burnt rubber and acid. Now I never turn the burner past the halfway point after the first bubble.
An electric percolator is an automatic. Its internal thermostat cycles the heating element on and off to maintain a target brew temperature, usually just below boiling. Models like the Hamilton Beach 40614 have a Keep Warm function that holds the coffee at 180°F (82°C) after brewing. The convenience is obvious, but you sacrifice fine control over extraction strength.
The main risk with electric models is component failure over time. The 2008 Consumer Product Safety Commission recall of Hamilton Beach models 40610 and 40620 was issued because the electrical cord could short circuit, posing a fire hazard. Always inspect the cord and plug of an older electric percolator for cracks or fraying before you even plug it in.
| Aspect | Stovetop Percolator | Electric Percolator |
|---|---|---|
| Heat Control | Manual, via burner knob. Requires attention. | Automatic, via internal thermostat. Set-and-forget. |
| Brew Cycle Management | You listen and adjust. | Pre-programmed cycle length. |
| Post-Brew Warming | None. Coffee cools in the pot. | Often includes a Keep Warm plate or function. |
| Primary Risk | Overheating and boiling over. | Electrical component failure (see CPSC recall). |
| Best For | Controlled, hands-on brewing; camping. | Consistent, convenient morning pots. |
Why Grind Size and Water Temperature Are Critical
 The percolator’s design imposes two non-negotiable rules. Break them, and your coffee will be terrible. These aren’t preferences; they are requirements of the machine’s geometry and the physics of extraction.
First, you must use a coarse grind. The holes in the coffee basket are large. A grind suitable for a drip coffee maker will fall right through, ending up as sludge in your cup and clogging the base of the pump tube. A proper coarse grind looks like sea salt. It creates a porous bed that allows water to flow through while providing ample surface area for extraction. Using a burr grinder is the only reliable way to get this consistency.
Second, start with cold, fresh water for stovetop models. This is counterintuitive but proven. The gradual heating phase is part of the extraction process. It creates the thermal gradient that drives the first pump cycle. If you start with hot water, that first rush happens too fast and doesn’t properly saturate the grounds. The University of Nebraska-Lincoln’s extension resource on coffee brewing methods notes that controlled temperature rise is key to even extraction in percolation.
Common mistake: Pre-boiling water to save time, the first percolation cycle happens before the grounds are fully saturated, resulting in a weak first pass that the subsequent cycles can’t fully correct for. The cup tastes simultaneously weak and bitter.
Water quality matters too. If your tap water tastes like minerals or chlorine, your coffee will amplify those flavors. Use the same fresh, filtered water you’d use in any other brewing method.
How to Know When the Coffee Is Done
 There is no universal timer. The Presto 02811 manual suggests about one minute per cup, which is a good baseline. A full 12-cup pot should take 5-8 minutes of actual percolation time after the first bubble. Your eyes and ears are the best tools.
Watch the clear knob in the lid. At first, you’ll see clear or pale brown water splashing up. This is weak coffee from the first cycle. As the process repeats, the liquid in the knob will darken. When the color matches a dark amber, roughly the shade of a finished cup of traditional brewed coffee, it’s done. Immediately remove it from the heat.
Listen to the sound. A frantic, rapid blup-blup-blup means the heat is too high. A slow, occasional blup… blup… means it’s too low. Aim for a steady, rhythmic pace. This auditory feedback is your real-time quality control.
The final, crucial step is to stop the extraction. Unplug the electric unit or move the stovetop pot to a cold burner. Then, lift the entire basket and stem assembly out of the pot. This separates the grounds from the hot water. Leaving the basket in allows residual heat to continue steeping the coffee, which turns it bitter and astringent within minutes.
TL;DR: Brew until the coffee in the lid’s knob is dark amber, about 5-8 minutes. Then immediately remove the heat and lift out the coffee basket.
Frequently Asked Questions
Does a percolator boil coffee?
No, if working correctly, the coffee itself should not reach a rolling boil. The water in the base gets very hot, near boiling, which creates the steam and pressure to drive the pump tube. However, the coffee grounds are in the upper basket, away from the direct heat source. The liquid that cycles over them is hot, ideally between 195°F and 205°F (90°C–96°C), not boiling.
Is percolator coffee stronger than drip coffee?
It can be, but not for the reason most think. The recirculation means water passes over the grounds multiple times, which can extract more compounds. This can lead to greater strength but also a higher risk of over-extraction and bitterness. The strength is more controllable in a standard drip coffee machine, where water passes over the grounds just once.
Why does my percolator coffee taste bitter?
You are almost certainly over-extracting. The two main causes are brewing too long or using a grind that is too fine. A fine grind exposes too much surface area too quickly, and the recirculating water pulls out harsh compounds. After the coffee is the right color, you must stop the cycle. Letting it percolate for 10-12 minutes guarantees a bitter cup.
Can I use pre-ground store coffee in a percolator?
You can, but you must check the grind size. Most supermarket pre-ground coffee is ground for automatic drip machines, which is a medium grind. This is too fine for a percolator basket and will lead to silt in your cup and potential clogs. Seek out pre-ground coffee labeled for “percolator” or “cafetiere,” which is a coarser grind.
How do I clean a coffee percolator?
Disassemble it completely after each use. Wash the basket, stem, spreader plate, and lid with warm, soapy water. For the pot itself, a mixture of hot water and baking soda can help remove coffee oils. Never use abrasive scouring pads on aluminum models, as they can scratch and create off-flavors. For mineral scale, a vinegar solution run through a brew cycle works, but rinse thoroughly afterward.
Before You Go
A percolator isn’t a set-it-and-forget-it appliance. Its charm lies in its direct, mechanical process. You control the heat, you listen to the cycle, and you decide when it’s done based on what you see.
Remember the three rules: coarse grind, cold water start, and immediate stoppage. They matter more than the brand of single-origin coffee you use. The machine’s design, largely unchanged for over a century, demands them.
Try it with a blonde roast and a watchful eye. The clarity of a light roast can surprise you in a percolator, as long as you keep the cycle short and sweet. It’s a hands-on method that rewards attention. And when you get it right, that rich, familiar cup is its own kind of perfection.
